
User Manual
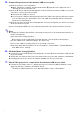
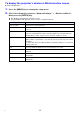

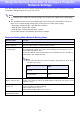


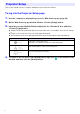
Table Of Contents
- Contents
- Establishing a Network Connection Between the Projector and a Computer
- Establishing a Direct Wireless LAN Connection Between a Computer and the Projector
- Using a Wired LAN Connection to Connect the Projector to an Existing Network
- Connecting the Projector to an Existing Wireless LAN Access Point
- Using the Projector as a NAT Router (Simultaneous Use of Wireless LAN and Wired LAN)
- Using the Remote Controller to Configure Projector Network Settings
- Using a Computer to Configure Projector Network Settings
- Preparing for C-Connection
- Network Projecting a Computer Screen Image (Using C-Connection)
- C-Connection Details
- Advanced Operations
- Controlling the Projector from an External Network Device
- Ports Used for TCP/UDP

15
Using the Remote Controller to Configure Projector
Network Settings
You can configure basic projector network settings with the projector’s remote controller by using the
Setup Menu that appears on the projection screen.
Note
To configure more advanced network settings, use the projector’s Web Service page (page
18).
The operations below can be performed using only the projector’s Setup Menu. For these,
there are no corresponding setting items on the projector’s Web Service page.
– Displaying “Wired LAN info” and “Wireless LAN Info”
– Changing the “Remote On” setting
– Changing the “PJLink Authentication” setting
See the table below for information about these settings.
Projector Setting Menu Network Setting Items
This menu item: Does this:
Wired LAN info Shows the current status of a wired LAN connection.
Wireless LAN Info Shows the current status of a wireless LAN connection.
Network Settings 3
IP Setting(LAN1)
Specifies how an IP address is specified when the projector is connected to a network.
Auto (initial default): Obtain an IP address automatically from a network DHCP server.
Manual: Manual IP address input.
Selecting the “Manual” option enables input for the following three items: “IP Address”,
“Subnet Mask”, and “Default Gateway”.
Note
This setting also affects the “LAN1 IP Settings” (page 28) below, which are on
the Web Service page.
Network Settings 3
Wireless LAN Function
Switches the projector’s wireless LAN function between “Enable” (initial default) and
“Disable”. This setting also affects the “Enable Wireless LAN” (page 24), which is on the
Web Service page.
Network Settings 3
Remote On
Specifies whether the projector can be turned on via wired LAN while it is in standby
(projector off with power being supplied).
Enable: Enable remote power on.
Disable (initial default): Disable remote power on.
Network Settings 3
PJLink Authentication
Enables (initial default) or disables PJLink connection authentication.
Web Service Page Setting
Items
Projector’s Setup Menu Setting
Items
LAN1 IP Settings (Auto if not
checked)
Auto, Manual
IP Address, Subnet Mask,
Default Gateway
Menu setting items of the same
name.