
User Manual


11
Note
Perform the operation below when connecting the projector to an existing network that is a
fixed IP environment.
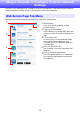
(1) In the sidebar click “Network Settings” (the lower one).
(2) Select the “LAN1 IP Settings (Auto if not checked)” check box.
(3) Input the applicable information for the “IP Address”, “Subnet Mask”, “Default Gateway”,
and “DNS Server” settings.
6.
Click the [Save changes] button.
In response to the restart dialog box that appears, click the [Reboot now] button. Wait until the
projector restarts.
At this time, the wireless LAN connection between the projector and computer is terminated.
Restarting the projector causes the network standby screen to be projected.
7.
Check if the projector is connected to the wireless LAN access point.
Perform the procedure under “To display the projector’s wireless LAN information screen”
(page 12) and then confirm the information below.
– The wireless LAN information screen “Operation Mode” item is “Client Mode”.