
User Manual


10
Use the procedure in this section to connect the projector to an operating wireless LAN access point.
To connect the projector to a wireless LAN access point
1.
Perform steps 1 through 3 under “To connect the projector and a computer via
wireless LAN” (page 6).
Use the computer connected via wireless LAN to configure projector settings.
2.
On the projector’s network standby screen (page 7), note the projector’s IP
address.
3.
Start up the computer’s browser, input the projector’s IP address into the
address bar, and then press the computer’s [Enter] key.
This displays the projector’s Web Service page (page 18).
4.
Use the Web Service page to put the projector into the Client Mode (required to
connect with an external wireless LAN access point).
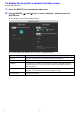
(1) On the Web Service page window title bar, click the [Setup] button.
(2) Input the password (Initial Default: admin) into the “Password” box, and then click the [Login]
button.
(3) Click “Wireless LAN Settings”.
(4) Select the “Enable Client Mode” check box.
5.
Connect the projector to the wireless LAN access point.
(1) Click the [Scan Access Point] button.
When scanning is complete, a down arrow button () appears on the right side of the
“External Access Point SSID” box.
(2) Click the button. On the list that appears, click the SSID of the wireless LAN access point
you want to connect the projector with.
This inputs the SSID you clicked.
If you know the character string that represents the SSID of the wireless LAN access point,
you can input it into the “External Access Point SSID” box manually without clicking the
[Scan Access Point] button.
(3) Click the “Security” box. On the list that appears, select the encryption you want to use for the
wireless LAN access point.
(4) In the “Passphrase/WEP Key” box, input the password of the wireless LAN access point.
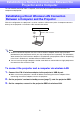
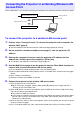
Connecting the Projector to an Existing Wireless LAN
Access Point
Wireless LAN connection
Existing network
LAN connection
Wireless LAN access point
Projector