
User Manual

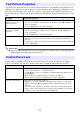

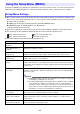
Table Of Contents
- Contents
- Safety Precautions
- Operating Precautions
- Getting Ready
- Unpacking
- Operation Flow to Projection
- General Guide
- Key and Indicator Panel
- Back Terminals
- Placing the Projector on a Desk or on the Floor
- Connecting with Another Device
- Connecting a Computer
- Connecting to a Video Device
- Outputting Audio from the Projector to Another Device
- Connecting a Microphone (XJ-UT Series, XJ-F21XN, XJ-F211WN, XJ-S400UN, XJ-S400WN)
- Connecting to a Network with a LAN Cable (Network Models Only)
- Connecting a Wireless Adapter (Network Models Only)
- LOGO Terminal (Firmware Updates, User Logo Transfers)
- Connecting a Scientific Calculator (Network Models Only)
- SERIAL Terminal (Projector Control Using Commands)
- USB Power
- Cover Included with the YW-41 Wireless Adapter
- Attaching and Removing the Cable Cover (XJ-UT Series)
- Remote Controller
- Operating the Projector
- Turning the Projector On or Off
- Selecting an Input Source (INPUT)
- Using Auto Projection Off
- Basic Image and Audio Operations During Projection
- Flipping the Projected Image Horizontally (Mirror Mode)
- Light Control
- Digital Screen Shift
- Projecting a Template
- Test Pattern Projection
- Control Panel Lock
- Configuring Remote Control ID and Projector ID Settings
- Using the Countdown Timer (TIMER)
- Using the Presentation Timer (TIMER)
- Using the Setup Menu (MENU)
- Using a Password
- Cleaning the Projector
- Troubleshooting
- Appendix
- Supplying USB Power to Another Device
- Mounting the Projector on a Wall (XJ-UT Series)
- Hanging the Projector from a Ceiling
- Using the MONITOR OUT Terminal (XJ-UT Series, XJ-S400UN, XJ-S400WN)
- Projection Distance and Screen Size
- Aspect Ratio Setting and Projection Image
- Supported Signals
- Projector RS-232C Control
- Specifications

51
Aspect Ratio Setting Details
For details about how the aspect ratio setting affects the projected image, see “Aspect Ratio Setting
and Projection Image” (page 82).
You can use the procedure below to enter the Mirror Mode, which flips the projected image
horizontally.
1.
While projection from an input source is being performed, press the [INPUT] key.
This displays the input menu. The input source that is currently being projected will be
selected on the menu.
2.
Press the [] or [] key to enter the Mirror Mode.
This exits the input menu and flips the image.
A Mirror Mode icon will be in the upper right corner of the projection screen while the projector
is in the Mirror Mode.
3.
To exit the Mirror Mode, press the [ESC] key.
Pressing any key other than [BLANK], [FREEZE], [D-ZOOM +], [D-ZOOM –], [VOLUME +], or
[VOLUME –] will also exit the Mirror Mode.
Note
Operation of the keys below is enabled while in the Mirror Mode.
[P], [BLANK], [FREEZE], [D-ZOOM +], [D-ZOOM –], [VOLUME +], [VOLUME –]
The [VOLUME +] and [VOLUME –] keys can be used to adjust the volume level, but not to
mute the audio.
Normal Projects at the projector’s maximum possible size while maintaining the input signal aspect ratio.
Full Projects at the projector’s maximum possible size by enlarging or reducing the input signal.
16:9 This setting specifies a 16:9 aspect ratio, which is the same as a movie screen, high-definition TV, etc.
Using this setting when the input signal is a 16:9 image that has been squeezed to a 4:3 image causes
the image to be displayed with its normal 16:9 aspect ratio.
16:10 This setting specifies a 16:10 aspect ratio. Use this setting to adjust the image for projection onto a
16:10 aspect ratio screen.
4:3 Regardless of the input signal aspect ratio, the image is always resized to an aspect ratio of 4:3 for
projection.
True Projects each input source dot as a projector output pixel dot. If the input signal resolution exceeds
the projector’s output resolution, the excess is cut off. When projecting while “True” is selected as the
aspect ratio setting for an RGB signal with a resolution that is less than SVGA, the image is enlarged to
SVGA and projected.
Letter Box With a WXGA model, this will resize the image horizontally to 1280 dots and project 800 vertical dots
of the center of the image, maintaining the aspect ratio of the input signal.
With a WUXGA model, this will resize the image horizontally to 1920 dots and project 1200 vertical
dots of the center of the image, maintaining the aspect ratio of the input signal.
Flipping the Projected Image Horizontally (Mirror
Mode)