. EN WSD-F30 User’s Guide Thank you for purchasing this watch. Before trying to use this watch, be sure to read the Safety Precautions in the Quick Start Guide that comes with it. Make sure you use the watch correctly. © 2019 CASIO COMPUTER CO., LTD.
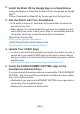
Contents Introduction ....................................................................................... EN-2 Watch Features ............................................................................ EN-2 Measurement Functions ............................................................... EN-4 Overview ...................................................................................... EN-6 About This Manual .......................................................................
Introduction Attention iPhone Owners! ● When using this watch while it is paired with an iPhone, be sure to have the Wear OS by GoogleTM app running on the iPhone. If the Wear OS by Google app is not running, functions that require communication with the iPhone will not operate. ● Some watch functions are restricted when it is paired with an iPhone. For details, visit the website below. https://support.casio.
Five-atmosphere Water Resistance + MIL-STD*2 Even though this watch has a built-in voice recognition microphone, it still is water resistant up to five atmospheres. This means you can wear your watch while swimming, fishing, etc. MIL-STD-810G standard environment resistance allows you to wear your watch while engaged in a variety of vigorous outdoor activities, including: mountain climbing, cycle sports, fishing, and more.
Measurement Functions Your watch can take barometric pressure, altitude, bearing, and other readings. Its built-in watch faces and applications can use readings for display and other useful functions. Note that this watch is not a special purpose measuring instrument. Readings produced by measurement functions are intended as general reference information only.
Altimeter, Barometer The watch’s Altimeter uses a pressure sensor to measure barometric pressure, and then calculates and displays relative altitude based on the measured value. Because of this, readings taken at different times at the same location may produce different altitude values due to changes in temperature, humidity, barometric pressure, and other factors. Also note that values displayed by the watch may be different from elevations indicated for areas where you are located.
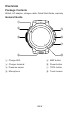
Overview Package Contents Watch, AC adaptor, charger cable, Quick Start Guide, warranty General Guide ① ② ⑤ ③ ⑥ ⑦ ⑧ ④ A Charge LED E MAP button B Charger terminal F Power button C Pressure sensor G TOOL button D Microphone H Touch screen EN-6
About This Manual The contents of this manual are subject to change without notice. Copying of this manual, either in part or its entirety, is forbidden. You are allowed to use this manual for your own personal use. Any other use is forbidden without the permission of CASIO COMPUTER CO., LTD. ● CASIO COMPUTER CO., LTD. shall not be held liable for any lost profits or claims from third parties arising out of the use of this product or this manual. ● CASIO COMPUTER CO., LTD.
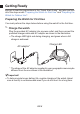
Getting Ready Be sure to read the precautions in the “Quick Start Guide”, and also perform all of the steps under “Preparing the Watch for First Use” and “Preparing the Watch for Outdoor Use”. Preparing the Watch for First Use You must perform the steps below before using the watch for the first time. 1. Charge the watch Plug the provided AC adaptor into a power outlet, and then connect the provided charger cable and AC adaptor as shown in the illustration.
2. Install the Wear OS by Google App on a Smartphone Android smartphone: Download the Wear OS by Google app on Google PlayTM. iPhone: Download the Wear OS by Google app from the App Store. 3. Pair the Watch with Your Smartphone If the watch is turned off, hold down the power button for about two seconds to turn it on. When pairing, it is recommended that you have the smartphone and watch within one meter of each other.
● Important! There are two versions of the CASIO MOMENT SETTER+ app. Make sure you have the latest version installed on your phone. Icons shown on Google Play indicate whether the app is the old version or new version.
Preparing the Watch for Outdoor Use Performing the steps below prepares the watch’s outdoor functions (CASIO watch faces and apps) for optimal operation. Perform these steps after you have completed the procedure under “Preparing the Watch for First Use”. 1. Configure watch settings to enable use of Play Store. 1. If you are using the watch while it is connected with an iPhone, connect the watch to Wi-Fi. 2. While a watch face is displayed, short press the power button to display the App menu. 3.
3. Configure the location settings of the watch and smartphone. Watch Operation 1. While the watch face is displayed, swipe the touch screen from top to bottom and then tap D. 2. Scroll downwards and tap “Connectivity”. 3. On the screen that appears, enable “Location”. Smartphone Operation Go to “Settings” and turn on “Location”. Next, select “High Accuracy” mode. If your smartphone does not have “High Accuracy” setting, turn on its GPS, Wi-Fi, and mobile network (data communication) settings.
5. Turn on the “Save daily activity records” setting. 1. While a watch face is displayed, press the TOOL button to display the Tool app. 2. Swipe the touch screen from right to left. On the “Settings” screen that appears, tap D to display the settings menu. 3. Scroll the setting menu downwards. When “Save daily activity records” is displayed, check to make sure that its setting is “OFF”. Next, tap the setting. ● A dialog box will appear to confirm if you want to save activity records.
Basic Operations You Should Remember ● Important! Note that the operations described here are subject to change due to the type and version of the operating system being used by the smartphone connected with the watch, changes that occur when the watch’s operating system is updated, and other factors. For details about Wear OS by Google operations, visit the website below. https://support.google.com/wearos/ Button Functions Power button Press to restore display brightness after it goes dark.
Wake Up If you don’t tap the touch screen for a few seconds, the watch screen will dim. To wake up the watch and restore it to normal brightness, tap the touch screen or press the power button. Power Supply Operations To do this: Charge the watch Turn off power Turn on power Perform this operation: See step 1 under “Preparing the Watch for First Use”. 1. While the watch face is displayed, swipe the touch screen from top to bottom and then tap D. 2. Scroll the screen downwards.
Watch Face Operations To do this: Switch to another watch face Perform this operation: 1. While a watch face is displayed, touch and hold the center of the touch screen for about two seconds. 2. Scroll a list of favorite watch faces left and right. When the watch face you want to use is displayed, tap it. Add a watch face to favorites 1. Scroll a list of favorite watch faces as far as it will go to the right and then tap the + button. This displays a list of all watch faces. 2.
Using Apps To do this: Start up an app Perform this operation: 1. While a watch face is displayed, short press the power button to display the App menu. 2. Scroll the list of apps upwards or downwards. When the app you want to run is displayed, tap it. Return to the watch face Press the power button.
Wear OS by Google Functions The Wear OS by Google operating system of this watch provides the functions below as standard. ● Dictation and voice command operation ● Messaging and incoming phone call notification Google FitTM, Timer, Agenda, Translate and other standard Wear OS by Google apps Watch faces and apps can be added using the Play Store app ● Wear OS by Google Settings For details, visit the website below. https://support.google.
Using Outdoor Watch Functions - Using CASIO Watch Faces and Apps This section explains how to interpret the contents of CASIO watch faces and how to use CASIO apps and make your outdoor adventures more interesting and enjoyable. Use this app: Location Memory Point Navigation TOOL Activity MOMENT SETTER Extend Mode Multi Timepiece To do this: Check your current location on a color map. Display the direction and distance to your destination. Find out more about the natural environment around you.
Using CASIO Watch Faces Your watch comes with the CASIO Watch Faces described below built in. Watch face names are used in the list of favorite watch faces and the list of all watch faces (see “Watch Face Operations”). Frontier 2 Layers Place Authentic Journey Traveler Multi Location World Time Analog watch face on which areas you visit are color highlighted on a map. Digital watch face that combines easy-to-read monochrome LCD and a color LCD.
Important! While the “Always-on screen*” setting is off (default setting), the watch will automatically switch to the monochrome LCD when display illumination dims after the prescribed period of non-use, regardless of the currently selected watch face. To switch back to the original watch face, tap the touch screen.
If you feel that altitude, barometric pressure, or other readings are not correct... Perform the operation required to calibrate the readings you feel are incorrect. See “Common Outdoor Function Settings” and perform one or more of the operations below.
Using the Location Memory App The Location Memory app makes it quick and easy to record map-related information. You can use the Location Memory app to perform the operations described below. ● Display a map to check your current location. ● Select from a variety of different map skins including street view, geographic view, satellite view, and more. ● While the app is running, you can track your route on the map. ● Use dictation to create a text memo about your current location.
Location Memory App Basic Operations You can perform main Location Memory app operations using the MAP button and TOOL button. The operations you can perform with these two buttons are indicated by on-screen icons displayed to the left of each button. You can also perform the operations by tapping the icons. Icon Pressing the button or tapping the icon does this: Changes the functions of the two buttons to zoom in and zoom out (see below).
Important! In order to be able to receive notifications triggered by “Revisit” marks, your Android phone must have the CASIO MOMENT SETTER+ app installed, and there must be a connection between the phone and watch. ● Note that notification receipt triggered by “Revisit” marks is not supported when the watch is connected with an iPhone. ● You can have up to 50 “Revisit” marks registered at one time.
Other Operations To view a recorded memo, swipe the displayed map from bottom to top. On the menu that appears, tap “History”. For information about how to track your route on a map, see “Enabling Route Tracking on the Map (Route Display)”. ● For information about map display settings, see “Common Outdoor Function Settings” and perform one or more of the operations below.
To display your route, use the procedure below to change “Route Display” on the setting menu from “OFF” (initial default setting) to “ON”. 1. While the map is displayed, swipe the touch screen from bottom to top. On the menu that appears, tap “Settings”. 2. Scroll the setting menu downwards. After confirming that the “Route Display” setting is “OFF”, tap to change it to “ON”. Important! This watch acquires location information at regular intervals and tracks your route on a map.
Changing the “Revisit” Mark Notification Setting Use “Revisit” marks to record a mark and have the watch alert you whenever you are in the vicinity. Under the watch’s initial default settings, notification is performed when both of the conditions below are satisfied. ● You are <> of the “Revisit” mark location. ● <> has passed since you were last <> of the “Revisit” mark location.
Viewing Your Route on a Phone You can perform the procedure below to export a route stored in watch memory and view it on a phone using Google EarthTM, etc. Note that your phone needs to have “Google DriveTM” and “Google Earth” installed in order to perform this procedure. To output a traveled route from the history display 1. While the map is displayed, swipe the touch screen from bottom to top. On the menu that appears, tap “History”. 2. Select the date of the history data you want to display. 3.
Using Point Navigation You can use Point Navigation to have the direction and distance to a destination displayed on the map. In addition to being available with the Point Navigation app, this capability can also be used with the Location Memory app and the Activity app. Navigation in progress (current location map) Note ● You can also have the direction to the destination specified with Point Navigation displayed on the TOOL app compass.
Point Navigation Basics To do this: Start navigation Perform this operation: 1. Use one of the operations below to start up Point Navigation. ● On the app menu, tap “Point Navigation”. ● While a map is displayed in the Location Memory app, swipe the touch screen from bottom to top and then tap “Point Navigation”. ● While the Activity app “START” screen*1 is displayed, swipe the touch screen from bottom to top and then tap “Point Navigation”. 2. Tap “Specify Destination”.*2*3 3.
To do this: Change the destination during a navigation operation Perform this operation: 1. Perform step 1 of “Start navigation”. ● This will display the message “Navigation being performed.”. 2. Scroll the message downwards, and then tap “Reset Destination”. 3. On the confirmation message screen that appears, tap “Stop”. 4. Perform the “Start navigation” procedure from step 2. Stop a navigation operation 1. Perform step 1 of “Start navigation”.
Using the TOOL App The TOOL app displays a wide variety of information about the natural environment around the watch. TOOL Function List Compass Altimeter Barometer Sunrise/sunset Tide Graph My Graph Shows a compass needle on the face. A color display shows the latitude and longitude of the current location. Two color screens are available.
Basic TOOL Operations To do this: Change the TOOL function Switch between the two color screens (A and B) (See “TOOL Function List”.) Change TOOL app settings Perform this operation: While the TOOL app is running, press the TOOL button or MAP button. ● While the TOOL app is running, swipe the touch screen from top to bottom, or from bottom to top. To switch from screen A to screen B, swipe the touch screen from right to left. To switch from screen B to screen A, swipe the touch screen from left to right.
Using Compass The pointer indicates true north.*1 The value in the center of the display shows how many degrees there are in a clockwise direction from the north indication (which is 0°) to 12 o’clock on the watch. For example, if 12 o’clock on the watch is facing due east, the value will show 90°. Letters on the display also indicate the direction that 12 o’clock is facing (16 directions). *1 Initial default setting.
Using Altimeter Altimeter has a color display Altimeter Screen (left), a color display Altitude Graph Screen (right), and a monochrome display. All of the screens show the altitude at your current location. The Altitude Graph Screen shows a graph of altitude changes over the past 24 hours, along with the low altitude (Min) and high altitude (Max) during that period. ● Your watch measures altitude within the range of –700 to 10,000 meters (or –2,300 to 32,800 feet), in units of 1 meter (or 5 feet).
Before Using Altimeter The watch’s Altimeter can be configured to use positioning information (GPS) to correct altitude readings automatically. Configure the settings below to use this function. ー Correctly configure the “Location” setting on the watch and smartphone. For more information, see step 1 under “Preparing the Watch for Outdoor Use”. ー Select “ON” for the “Correct Altitude Using Location” setting.
Altimeter Precautions Do not use this watch while skydiving, hang gliding, paragliding, gyrocopter flying, glider flying, or engaged in other activities where altitude changes suddenly. ● Altitude readings produced by this watch are not intended for specialpurpose or industrial level use. ● In an aircraft, the watch measures the in-cabin pressurized air pressure, so readings will not match altitudes announced by the crew.
Using Barometer Barometer has a color display Barometer Screen (left), a color display Barometric Pressure Graph Screen (right), and a monochrome display. All of the screens show the barometric pressure at your current location. The Barometric Pressure Graph Screen shows a graph of pressure changes over the past 24 hours, along with the low pressure (Min) and high pressure (Max) during that period. ● Your watch measures barometric pressure within the range of 260 to 1,100 hPa (or 7.6 to 32.
Using Sunrise/Sunset Sunrise/Sunset has a color display Time Screen (left), a color display Azimuth Screen (right), and a monochrome display. The Time Screen shows the following times: sunrise time (upper left), predawn nautical twilight start time (lower left), sunset time (upper right), postsunset nautical twilight end time (lower right), and the current time (bottom center). ● The Azimuth Screen shows the current time, the sunrise time, and the sunset time.
Using Tide Graph Tide Graph has a color display Tide Graph Screen (left), a color display Fishing Time Screen (right), and a monochrome display. The Tide Graph Screen shows the current tide level and time (red characters in the center of the screen), along with the high tide (High) and the low tide (Low) that will occur up to 12 hours later. The graph shows changes in the tide level for 24 hours (12 hours before and after the current time).
Interpreting Fishing Time Screen Contents Fish Marks (Projected Probability of Fishing Success Indicators) The number of fish marks on the Fishing Time screen indicates the projected probability of fishing success. Anywhere from zero to four white fish marks are displayed, and more white fish marks indicate that better success can be expected. Note however, that this in no way specifically guarantees your fishing success.
Current Date’s Optimum Predicted Fishing Time Period The Fishing time Screen shows two orange time periods centered on hour angles 00:00 and 12:00, and two blue time periods centered on hour angles 06:00 and 18:00. Each region indicates periods during which optimum fishing can be expected. The orange region indicates the best fishing period as predicted by the watch, while the blue region indicates the next best fishing period.
Current Moon Hour Angle and Moon Age Indications The location of the Moon indicator on the Fishing Time screen shows the current hour angle of the Moon, while the shape of the indicator shows the current Moon age. In the screen shown above, for example, the current Moon hour angle is 22:00 (12 o’clock position = hour angle 00:00, 6 o’clock position = hour angle 12:00), while the Moon age is 21.3 to 23.1. The table below shows how Moon age is indicated by the Fishing Time screen indicator.
Using My Graph My Graph shows the status of your activities for the current day. Under initial default settings, both color and monochrome screens show how many calories you have burned from the start (00:00) of the current day. ● A color display shows what types of activities you have performed on the current day (A Running, B Cycling, C Walking, D Riding, E Resting) as a concentric circle graph. Up to four of the five items (A through E) can be displayed at the same time.
To specify the type of values shown in the center of the My Graph screen 1. Swipe the touch screen from right to left. On the “Settings” Screen that appears, tap D. This displays the setting menu. 2. Scroll the setting menu upwards and downwards. When “Centered value / My Graph” is displayed, tap it. This displays a list of value types. 3. Scroll the list upwards and downwards. When the type of value you want shown in the center of the My Graph Screen is displayed, tap it.
To specify activity types that appear on the Activity Graph screen 1. Swipe the touch screen from right to left. On the “Settings” Screen that appears, tap D. This displays the setting menu. 2. Scroll the setting menu upwards and downwards. When “Activity Specific Properties” is displayed, tap it. This displays a list of activity types. 3. Tap the check boxes next to the activity types you want to show on the activity graph screen to select ( ) them.
Using the Activity App The Activity app shows cumulative elapsed time from when one of the outdoor activities listed below starts until it stops, a track of the route followed on a map, and a list of data (activity time, distance traveled, etc.) Trekking Fishing Cycling Paddle Snow Activity App Screen Screen Before Start of Measurement The text below the “START” (or “BEGIN”) button shows the activity type. You can change the activity type by swiping the touch screen left or right.
Use this menu item: History & Export → Activity History History & Export → History Auto Save History & Export → View History on Phone (Android only) Target altitude Point Navigation MOMENT SETTER ● To do this: Display an activity history (activity end dates and times). You can tap an item in the history to display its measurement result screen and/or map screen. Enable “History Auto Save”, which will cause the operations below to be performed whenever you stop a logging operation with the Activity app.
Measurement in Progress Screens Swiping the screen left or right while measurement is in progress will switch between a measurement data screen, map screen, “STOP” screen, etc. The screens that can be displayed depend on the activity type.
Enabling History Auto Save Note ● “History Auto Save” settings are applied to both the Activity app and Extend Mode app. Because of this, you do not need to perform the procedure below if you have already enabled History Auto Save with the Extend Mode app. 1. Display the Activity app “START” screen or “BEGIN” screen. 2. Swipe the touch screen from bottom to top. On the menu that appears, tap the following in sequence: “History & Export”, “History Auto Save”. 3.
Viewing History Data on a Phone ● Important! Note that your phone needs to have “Google Calendar”, “Google Drive”, and “Google Earth” installed in order to perform this procedure. 1. On the phone, start up Google Calendar. 2. On Google Calendar, tap the history data whose details you want to view. ● On the detailed information screen that appears, tap the link of the KML file stored on Google Drive. 3. Use Google Earth to open the KML file. Android phone: 1. Tap the KML file link. 2.
Note ● If the watch is paired with an Android phone, you can use watch menu operations to start up the phone’s Google Calendar. Using the Activity app: 1. Display the Activity app “START” screen or “BEGIN” screen. 2. Swipe the touch screen from bottom to top. On the menu that appears, tap the following in sequence: “History & Export”, “View History on Phone”. Using the Extend Mode app: 1. On the app menu, tap “Extend Mode”. 2. Tap the following in sequence: “Settings”, View History on Phone.
Using the MOMENT SETTER App For example, you can use the MOMENT SETTER app to receive notifications like the ones shown below. ● During an Activity app Trekking measurement operation, perform a vibration notification and display the remaining altitude when there are 200 m remaining to an altitude of 2000 m. ● Every day, perform vibration notification and display the sunrise time one hour before sunrise. Operation involves simple selection of the notification to be received from a menu.
MOMENT SETTER App Main Menu Starting up the MOMENT SETTER app first displays a Main Menu. Setting items included in the Main Menu are shown in the table below. Tapping this item: Recent Climbing, trekking*1, Fishing*1, Cycling*1, Paddle*1, Snow*1 Extras Settings Displays this menu: Menu of up to three notifications that were last turned on. This item appears when one or more MOMENT SETTER notifications were turned on. Notification menu corresponding to each activity type (see “Using the Activity App”).
Example MOMENT SETTER Operation This section shows an example operation for configuring notification settings for “Climbing, trekking”. This operation can be started from the MOMENT SETTER app or Activity app. 1. Start up the MOMENT SETTER app and scroll the main menu upwards and downwards. When “Climbing, trekking” is displayed, tap it. Alternatively, while the Activity app “Trekking” activity is displayed, swipe the touch screen from bottom to top. On the menu that appears, tap “MOMENT SETTER”. 2.
5. At the bottom of the display, tap to toggle it to . 6. Press the power button to exit the MOMENT SETTER app. ● After performing the above operation, you need to start up the Activity app and start a Trekking measurement operation to actually receive notifications. See “Using the Activity App”. Note ● A notification from MOMENT SETTER is deleted automatically after a fixed amount of time.
Using the Extend Mode App The Extend Mode app records multiple days of trekking and other activity data as a continual log (location information log).
*1 One day of data (current day’s log start time and pause times, next day’s log resume time) must be input by you each morning. *2 Maximum value based on eight hours of use and 16 hours of rest per day. Note ● While logging is paused, the bottom of the display shows the scheduled time until watch operation and logging restarts. ● This is just a brief explanation about how to use the Extend Mode app and perform its operations. For more information, refer to the Extend Mode help page at the website below.
Extend Mode App Basics To do this: Input a plan for the first day’s activity Perform this operation: 1. On the app menu, tap “Extend Mode”. 2. Tap “Prepare”. 3. Perform the operations below in accordance with the displayed message. ● Confirm that map of your destination has been downloaded. If it isn’t, download it. ● If the “Prepare” screen appears, input the following times: “Start Log”, “Pause”, “Restart Log”. 4. On the “Prepare” screen, tap . 5.
To do this: Switch from the monochrome display to the map display during a logging operation Advance the logging pause time (to pause logging immediately) Perform this operation: Press the MAP, POWER, or TOOL button. Note that the tapping the touch panel will not switch the display. Extend the logging pause time 1. In response to the message that appears when the pause time you input on the “Plan” screen is reached, tap “Extend 1 hour”.
Viewing History Data You can use the watch screen to view history data recorded with the Extend Mode app. Enabling “History Auto Save” will cause the operations below to be performed whenever you stop a logging operation with the Extend Mode app. This means you can view history data on the phone.
Note ● History data logged with the Extend Mode can be viewed and exported using the Location Memory app. Using the Multi Timepiece App The Multi Timepiece app provides access to the Multi Timepiece Mode, which makes it possible to display the current time and particular information (battery level, or barometric pressure/altitude, etc.) only on the monochrome LCD.
Display Styles There are two display styles in the Multi Timepiece Mode. You can select the display style each time you enter the Multi Timepiece Mode. Outdoor Style................... Current time, barometric pressure, altitude, compass Daily Style........................ Current time, day of the week, day, battery level, step count* Outdoor Style Daily Style * Either the battery level (default) or step count can be displayed.
Multi Timepiece Mode Operations To do this: Switch the watch to Multi Timepiece Mode Perform this operation: 1. On the app menu, tap “Multi Timepiece”. ● This displays the “Multi Timepiece” screen. 2. Tap “Settings” and then configure the settings below as required. Battery Level/ Step Count Illuminate the display in Multi Timepiece Mode While Daily Style is selected, this setting switches the value at the bottom of the display between the battery level and the step count.
To do this: Show or hide the compass (Outdoor Style only) Correct altitude and barometric pressure values (Outdoor Style only) Exit Multi Timepiece Mode and restore normal function Perform this operation: Short-press the TOOL button. Each press toggles the compass between show and hide. Note ● If “CALI” appears on the screen when you try to use the compass, it means that you need to perform magnetization correction.
Common Outdoor Function Settings CASIO apps and CASIO watch faces share the same outdoor functions such as Compass, Altimeter, etc. This section explains settings that are common to all CASIO apps and watch faces. Basic Operations for Configuring Common Settings Use the setting menu to configure common settings. The required operation to display the setting menu depends on what screen is displayed, but operations are the same in all cases once the menu is displayed.
Setting Item List The setting items displayed on the setting menu (see “Basic Operations for Configuring Common Settings”) are shown below. After displaying the setting menu, perform the operation required for the item whose setting you want to change. Note ● The letters to the right of each setting item indicate the screen from which the setting item can be displayed. For example, the letters “WF” to the right of a setting item means that the setting item can be displayed from a watch face (WF) screen.
Altitude Calibration (WF/TL/AC/EX) Operation 1. If “Correct Altitude Using Location” is on, turn it off. 2. Tap “Altitude Calibration”. 3. On the altitude input screen that appears, input the elevation at your current location (which you obtained from local indications). ● Tap the digit of the value that you want to change, and then use and to change it. ● To reset a manually input altitude calibration value, tap C.
Correct Altitude Using Location (WF/TL/AC/EX) Operation Each tap of this setting item toggles between “ON” and “OFF”. Description Select “ON” for this setting to perform auto altitude calibration based on the watch’s or your smartphone’s location information (GPS). “OFF” must be selected for this setting to perform altitude calibration manually using “Altitude Calibration”.
Centered value / My Graph (TL) Operation Tap this setting item and then scroll the list that appears upwards and downwards. When the type of value you want shown in the center of the My Graph Screen is displayed, tap it. Description This setting changes the type of value displayed in the center of the My Graph Screen. Home city (WF) Operation Tap this setting item and then scroll the list that appears upwards and downwards.
Monochrome Display (WF/TL/AC/TP/EX) Operation Each tap of this setting item toggles the face background between “Dark” and “Bright”. Description You can select how the watch’s monochrome LCD displays data. This setting is applied to all of the displays below.
Port setting (TL) Operation Tap this setting item and then scroll the list that appears upwards and downwards. When the name of the point (port name or name of a city near the ocean) you want is displayed, tap it. Description This setting specifies the point (port) whose tide information is displayed by the “Tide Graph” of the TOOL app. Re-calculation with Current Location (TL) Operation Tap this setting item to start acquisition of positioning information for your current location.
Save Daily Location Info (WF/MS/LM) Operation After tapping this setting, you then need to select “Every 6 minutes”, “Every 1 minute”, or “OFF”. ● Important! When you tap this setting item to toggle from “OFF” to “ON”, you will also need to tap “Every 6 minutes” or “Every 1 minute” on the confirmation dialog box that appears. Description This item is for configuring a setting related to the Location Memory app.
Height (TL/MS) Operation Tap this setting item and then use the screen that appears to input your height. ● Tap the digit of the value that you want to change, and then use and to change it. Description The value you input for this item is used as basic information when calculating data displayed on the TOOL app’s “My Graph”. Weight (TL/MS) Operation Tap this setting item and then use the screen that appears to input your weight.
Wrist where you wear the watch (TL/MS) Operation Each tap of this setting item toggles between “Right” and “Left”. Description The value you input for this item is used as basic information when calculating data displayed on the TOOL app’s “My Graph”. Target altitude (AC) Operation Tap this setting item and then use the screen that appears to specify a target altitude. ● Tap the digit of the value that you want to change, and then use and to change it.
Auto Record (AC) Operation 1. Use the Activity app to display the Snow “BEGIN” screen, and then tap “BEGIN”. 2. Swipe the touch screen from right to left as many times as necessary to display the “Settings” Screen. Next, tap D. 3. On the setting menu that appears, swipe upwards and downwards until “Auto Record” is displayed, and then tap it. ● Each tap toggles between “ON” and “OFF”. ● Important! The “Auto Record” setting can be modified only on the setting menu you display using steps 1 and 2 above.
Map Type (AC/MS/LM) Operation Each tap of this setting item toggles between “Google Maps” and “Mapbox”. Description This setting lets you select either Google Maps or Mapbox as the map type displayed by the Activity app and Location Memory app. Important! Maps displayed while “Mapbox” is selected use geographic information from OpenStreetMap. OpenStreetMap geographic information can be freely edited by anyone, which means that information displayed on a map may not be correct.
Download Map (AC/MS/LM/EX) Operation 1. Tap “Download Map”. ● This displays a list of map skin names. 2. Scroll the list upwards and downwards. When the skin name you want is displayed, tap it. ● This displays a map with your current location in the center. 3. Scroll the map so the location that you want to be in the center of the map you download is in the center of the watch screen. ● You can scroll the map after using the TOOL (-) button to reduce the size of the map and increase the display area.
Description This item is for configuring settings related to the Activity app and the Location Memory app. It is for downloading a map to watch memory when “Mapbox” is selected for “Map Type”. If you want to use the map in an area where a network connection is not available, use this item beforehand in an area where a network connection is available to download the desired map. Downloaded Map (AC/MS/LM/EX) Operation Tapping this setting displays the map you downloaded.
All Off (MS) Operation 1. Tap this item and a confirmation dialog box will appear asking if you want to disable all MOMENT SETTER notifications. 2. Tap “Turn off.” to disable notifications or “Cancel” to leave notifications enabled. Description Removing all check marks from the MOMENT SETTER app menu disables all notifications. Note that once you perform this operation, there is no single batch operation to re-enable notifications.
Troubleshooting Refer to this section whenever you are experiencing problems with watch operation. If you don’t find the solution to your problem here, visit the website below. https://support.casio.com/en/support/faq.php?cid=019 Restoring Watch Operation If you find yourself unable to obtain proper operation from the watch for some reason, restart it and then try performing the operation again. For information about restarting the watch, visit the website below. https://support.google.
Error Code Error Message 1021 Data acquisition from the sensor may have failed. Use the Settings screen to perform a System Restart operation. 9000 Some problem occurred with the watch. Power will turn off shortly. 9001, 9002, 9003 Some problem occurred with the watch. Power will turn off shortly. 9010 Watch temperature is high. Power will turn off to protect it.
Important! Note the precautions in this section whenever using this watch. Precautions During Use Display Information Accuracy Tide Graph Precautions For Japan area oceans, tide times and level changes are predictively calculated using harmonic constant data obtained from Bibliography 742 Tidal Harmonic Constants Tables, Japanese Coast (February 1992) published by the Hydrographic Department of the Japan Coast Guard, and from the List of Tidal Stations (2015) published by the Japan Meteorological Agency.
Moon Age Precautions Moon ages displayed by this watch are based on the calculation described below. (1) Elongation is calculated using solar and lunar coordinates produced by functional calculus. (2) Moon age is calculated based on the correlation between the elongation and average moon age. Though the lunar period averages 29.53 days, it actually fluctuates by as much as ±1 day, so this calculation produces an error of up to ±1 day.
The inside surface of the watch glass may fog when the watch is exposed to a sudden drop in temperature. No problem is indicated if the fogging clears up relatively quickly. Sudden and extreme temperature changes (such as coming into an air conditioned room in the summer and standing close to an air conditioner outlet, or leaving a heated room in the winter and allowing your watch to come into contact with snow) can cause it to take longer for glass fogging to clear up.
Using GPS Outside Your Country Some countries or geographic areas put legal restrictions on the use of GPS, on the collection and logging of location information, etc.
Using this watch in the vicinity of a mobile phone or other device that uses 1.5 GHz band radio waves may make signal reception impossible. Depending on reception conditions, GPS positioning information may include error up to several hundred meters. ● Location information is not acquired while flying on an aircraft or otherwise moving at very high speed. ● Never use the GPS function of this watch for surveying or any other measuring that requires high accuracy.
MIL-STD-810G This watch has been tested for the items described below in accordance with the MIL-STD-810G standard established by the U.S. Department of Defense. ● Shock resistance is based on the assumption of normal daily use. Throwing the watch, or subjecting it to excessive dropping or other extreme shock can cause it to break. ● Be sure to read the information in this manual under “Precautions During Use” and “User Maintenance” in order to ensure proper use of this watch.
Charging The watch and AC adaptor may become warm to the touch during charging. This is normal and does not indicate malfunction. Do not charge the watch while its charge level is high enough for watch operation. Waiting until the charge level is low until you charge will help to extend battery life. Disconnecting the charger cable from the watch after it reaches a full charge is recommended. Any of the following can hasten battery deterioration and should be avoided.
Band Tightening the band too tightly can cause you to sweat and make it difficult for air to pass under the band, which can lead to skin irritation. Do not fasten the band too tightly. There should be enough room between the band and your wrist so you can insert your finger. ● Deterioration, rust, and other conditions can cause the band to break or come off of your watch, which in turn can cause band pins to fly out of position or to fall out.
Magnetism ● Some watch functions may not operate normally in a location where magnetism is present. Very strong magnetism (from medical equipment, etc.) should be avoided because it can cause malfunction of your watch and damage to electronic components. Chemicals ● Do not allow your watch to come into contact with thinner, gasoline, solvents, oils, or fats, or with any cleaners, adhesives, paints, medicines, or cosmetics that contain such ingredients.
Watch Sensors ● A watch sensor is a precision instrument. Never try to take it apart. Never try to insert any objects into the openings of a sensor, and take care to ensure that dirt, dust, or other foreign matter does not get into it. After using your watch where it has been immersed in saltwater, rinse it thoroughly with fresh water. Metal Components Failure to clean dirt from metal components can lead to formation of rust, even if components are stainless steel or plated.
User Maintenance Caring for Your Watch Remember that you wear your watch next to your skin, just like a piece of clothing. To ensure your watch performs at the level for which it is designed, keep it clean by frequently wiping with a soft cloth to keep your watch and band free of dirt, sweat, water and other foreign matter. ● Whenever your watch is exposed to sea water or mud, rinse it off with clean fresh water. ● For a resin band, wash with water and then wipe dry with a soft cloth.
Premature Wear ● Leaving sweat or water on a resin band or bezel, or storing your watch in an area subject to high moisture can lead to premature wear, cuts, and breaks. Skin Irritation ● Individuals with sensitive skin or in poor physical condition may experience skin irritation when wearing a watch. Such individuals should keep their leather band or resin band particularly clean.
Main Specifications 1.2-inch dual layer display, Color organic electroluminescence (EL) (390 × 390 pixels) + Monochrome LCD Capacitive touch panel ● Microphone ● Vibration ● ● ● Battery: Type: Lithium-ion battery Charging time: Approximately 3 hours at room temperature (Be sure to use the special charger cable and AC adaptor.) Bluetooth: Bluetooth® 4.1 (Low Energy support) Wi-Fi: IEEE802.
● Watch: Auto time correction: By communication with smartphone (Time can be adjusted manually.) By GPS information (Can be corrected manually.) Time zones (world time function): Supports multiple world time zones (Types depend on system time zones.) 12/24-hour timekeeping Full auto-calendar: Auto switching by linking with smartphone Summer time: Auto switching by linking with smartphone Watch faces: Three favorites, more can be added.
● TOOL App: Compass: Measurement range: 0° to 359° Measurement unit: 1° Continuous measurement duration: 1 minute North Indication hand, Magnetic declination calibration, Bearing memory, Gradient calibration Altimeter: Measurement range: –700 to 10,000 m (–2,300 to 32,800 ft) Measurement unit: 1 m (5 ft) Measurement accuracy: within ±75 m (within ±250 ft) (When frequent manual calibration is performed) Shortest measurement interval: 1 minute Altitude graph: Past 24 hours Manual altitude calibration, Auto a
Activity App: Trekking, Fishing, Cycling, Paddle, Snow MOMENT SETTER App: Trekking, Fishing, Cycling, Paddle, Snow notifications ● Screen brightness setting: Auto, 5 levels ● Watch battery level indicator: Integer value, 0 to 100% ● ● ● ● Charger (AC adaptor): INPUT: AC 100 V to 240 V 50 Hz/60 Hz OUTPUT: 5.0 V Charger cable: Length: Approximately 0.75 m (2.
● About MIL-STD-810G (United States military standard issued by the U.S. Department of Defense): Description: 1. Shock 2. Vibration 3. Humidity 4. Low Pressure Transport 5. Low Pressure Operation 6. High Temperature Transport 7. Low Temperature Transport 8. Temperature Shock 9. Ice Accretion Procedure: MIL-STD-810G, w/change1 1: Method 516.7 ProcedureⅣ 2: Method 514.7 ProcedureⅠ 3: Method 507.6 ProcedureⅡ 4: Method 500.6 ProcedureⅠ 5: Method 500.6 ProcedureⅡ 6: Method 501.6 ProcedureⅠ 7: Method 502.
*1 CASIO test conditions *2 In order to be able to use these functions your Android phone must have the CASIO MOMENT SETTER+ app installed, and there must be a connection between the phone and watch. These functions are not supported in the case of iOS. *3 GPS altitude information is used, so the indicated altitude may not exactly match the actual above sea level elevation or altitude. *4 Default: OFF *5 Displaying the step count reduces the battery operating time.
Supplementary Information Open Source Information CASIO uses GPL, LGPL and other source code that comes under an open source license in this product. CASIO discloses the source code in accordance with each open source license. For source codes and details about each open source license, visit the CASIO website. Source code is provided “as-is” without any guarantees. However, this does not affect warranty conditions by CASIO concerning product defects (including defects in the source code).
This device complies with part 15 of FCC Rules and Industry Canada’s licence-exempt RSSs. Operation is subject to the following two conditions: (1) this device may not cause harmful interference, and (2) this device must accept any interference received, including interference that may cause undesired operation. FCC CAUTION Changes or modifications not expressly approved by the party responsible for compliance could void the user’s authority to operate the equipment.
The available scientific evidence does not show that any health problems are associated with using low power wireless devices. There is no proof, however, that these low power wireless devices are absolutely safe. Low power Wireless devices emit low levels of radio frequency energy (RF) in the microwave range while being used. Whereas high levels of RF can produce health effects (by heating tissue), exposure of low-level RF that does not produce heating effects causes no known adverse health effects.
CASIO COMPUTER CO., LTD.