
Electronic Keyboard User Manual

E-50
USB Flash Drive
5.
Use the
ct
(w, q) buttons to select the file
number (01 to 99) you want to assign to the
data when it is saved to the USB flash drive.
• The file number is the final two characters of the file
name
*
that appears on the display. By changing this
within the range of 01 to 99 for each save, up to 99
files of the same data type can be stored on the USB
flash drive.
* The first six characters of the file name indicate the
data type as shown below. These characters are
fixed and cannot be changed.
6.
Press the
dp
(ENTER) button.
• The message “Please Wait” will remain on the
display while the save operation is being performed.
Do not perform any Digital Piano operation while
this message is on the display. “Complete” appears
on the display after data save is complete.
• If there is already a file with the same name on the
USB flash drive, a message “Replace?” will appear
asking if you want to overwrite it with the new data.
Press the
ct
(YES) button to overwrite or the
ct
(NO)
button to cancel the save operation.
■ USB Flash Drive Data (File) Storage
Locations
The above procedure stores Digital Piano data in a data
folder on the USB flash drive. The data folder where
the data is stored depends on the data type.
• The above data folders are created automatically
when you format the USB flash drive on the Digital
Piano (page E-49).
• Note that a file not in one of the data folders cannot
be loaded, deleted, or renamed by the Digital Piano.
You also will not be able to recall, delete, or play any
file stored in any subfolder inside one of the data
folders.
You can use the procedure below to load data from a
USB flash drive into Digital Piano memory.
IMPORTANT!
• Make sure that the data you want to load is in one of
the data folders described under the procedure in
the preceding section of this manual. Note that if you
put data into a music data play-only folder (such as
the PLAY folder), you will not be able to load the file
into Digital Piano memory.
1.
Insert the USB flash drive into the Digital
Piano’s USB flash drive port.
2.
Select the data you want to load.
* For more information about data types, see page
E-47.
3.
Hold down the
ds
(AUDIO RECORDER)
button until the “LOAD” screen appears for
the data you selected.
• You can cancel the LOAD/SAVE operation any time
by pressing the
dm
(EXIT) button.
4.
Use the
ct
(w, q) buttons to select the file
you want.
5.
Press the
dp
(ENTER) button.
• The message “Please Wait” will remain on the
display while the load operation is being performed.
Do not perform any Digital Piano operation while
this message is on the display. “Complete” appears
on the display after data loading is complete.
• If there already is a file with the same name in the
Digital Piano memory, a message (Replace?) will
appear asking if you want to replace it with the new
data. Press the
ct
(YES) button to overwrite or the
ct
(NO) button to cancel the load operation.
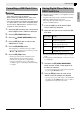
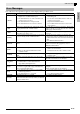
Data Type
File Name
(** = file number)
User rhythms USRRHY**
User Music Preset USRMPS**
Recorder songs RECSNG**
Registrations REGIST**
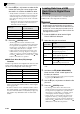
Data Type Data Folder Name
User rhythms RHYTHMAC
User songs MUSICLIB
User music presets MUSICPST
Song recorder songs RECORDER
Registrations REGISTMR
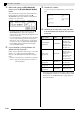
Loading Data from a USB
Flash Drive to Digital Piano
Memory
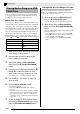
To load this
type of data*
Do this:
User rhythms Select from among user rhythms 001
through 010 (page E-21).
User songs Select from among user songs 001
through 010 (page E-25).
User Music
Preset
Select from among user Music Presets
001 through 050 (page E-29).
Recorder songs Select from among recorder songs 1
through 5 (page E-35).
Registrations Press the
bn
(RHYTHM) button so the
RHYTHM lamp next to it is lit.