
User Manual
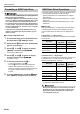
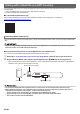
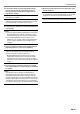
Table Of Contents
- Cover
- Contents
- Overview and Setup
- Operations Common to All Modes
- Digital Piano Operations
- Listening to Demo Play
- Selecting a Tone
- Changing Keyboard Response to Touch Pressure (Touch Response)
- Changing the Pitch
- Using the Sound Mode Effects (Hall Simulator/Reverb and Surround)
- Using a DSP
- Using Chorus
- Using Brilliance
- Adjusting Acoustic Piano Sound Characteristics (Acoustic Simulator)
- Using the Knobs
- Using the Pitch Bend Wheel
- Using the Arpeggiator
- Splitting the Keyboard for Duet Play
- Changing the Scale Tuning (Temperament) of the Keyboard
- Using Auto Accompaniment
- Selecting a Rhythm
- Playing Auto Accompaniment
- Auto Accompaniment Pattern Variations
- Triggering Auto Accompaniment Play with Accompaniment Keyboard Input (Synchro Start)
- Using the Keyboard to Control the Auto Accompaniment Pattern (Keyboard Controller Mode)
- Selecting a Chord Input Mode
- Using One-Touch Preset
- Using Auto Harmonize
- Changing the Auto Accompaniment and Song Tempo
- Using Music Preset
- Registering and Restoring a Setup (Registration)
- Using the MIDI Recorder to Record Performances
- Using the Audio Recorder to Record Performances
- Listening to Songs (MIDI Player)
- Configuring Function Settings (FUNCTION Mode)
- Using Operation Lock
- Configuring MIDI Settings
- Deleting All Data in Digital Piano Memory
- USB Flash Drive
- Supported USB Flash Drives
- USB Flash Drive and USB Type A Port Handling Precautions
- Connecting a USB Flash Drive to and Detaching It from the Digital Piano
- Formatting a USB Flash Drive
- USB Flash Drive Operations
- Using a Computer to Copy General Song Data to a USB Flash Drive
- Storing Standard Audio Data (WAV Files) to a USB Flash Drive
- Linking with a Smart Device (APP Function)
- Troubleshooting
- Reference
- MIDI Implementation Chart

EN-66
You can use the APP Function to connect the Digital Piano with a phone, tablet or other smart device and perform the operations
described below.
• Control the Digital Piano from a smart device (Piano Remote Controller)
• Transfer music data from a smart device
■ To download the smart device app
Download the smart device app from the CASIO website and install it on the smart device you want to use.
https://support.casio.com/global/en/emi/manual/PX-S3100/
There are two ways to connect with a smart device: connect via the Bluetooth function and/or use a commercially available USB
cable.
• If you are using a CASIO smart device app, do not have the Digital Piano connected with the smart device using the
Bluetooth function and a USB cable at the same time.
■ Using the Bluetooth Function to Link the Digital Piano with a Smart Device
You can use the Wireless MIDI & audio adaptor for the Bluetooth function linking.
1.
Referring to “To download the smart device app” (page EN-66), install the app on the smart device.
2.
Plug the Wireless MIDI & audio adaptor into the Digital Piano’s cq USB Type A port (page EN-10).
• After connecting the smart device to the Digital Piano, use the smart device app to perform operations. For details about
operations, refer to the user documentation of the app.
• Do not perform any Digital Piano operation while it is in the process of connecting with the smart device app.
• With a Bluetooth connection, some communication environments and use of smart device functions may cause a
noticeable sound distortion. If this happens, try the countermeasures below.
− Refer to the app’s user documentation for information about MIDI playback quality.
− If your smart device is connected by Wi-Fi to another device, turn off the smart device Wi-Fi.
− Use a cable connection instead of Bluetooth.
Linking with a Smart Device (APP Function)
Connecting with a Smart Device
Wireless MIDI & audio adaptor
Smart Device cq USB Type A port