
User Manual
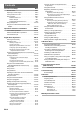
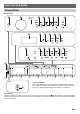

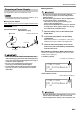
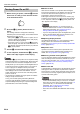
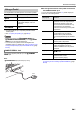
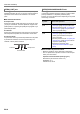
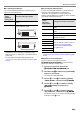
Table Of Contents
- Cover
- Contents
- Overview and Setup
- Operations Common to All Modes
- Digital Piano Operations
- Listening to Demo Play
- Selecting a Tone
- Changing Keyboard Response to Touch Pressure (Touch Response)
- Changing the Pitch
- Using the Sound Mode Effects (Hall Simulator/Reverb and Surround)
- Using a DSP
- Using Chorus
- Using Brilliance
- Adjusting Acoustic Piano Sound Characteristics (Acoustic Simulator)
- Using the Knobs
- Using the Pitch Bend Wheel
- Using the Arpeggiator
- Splitting the Keyboard for Duet Play
- Changing the Scale Tuning (Temperament) of the Keyboard
- Using Auto Accompaniment
- Selecting a Rhythm
- Playing Auto Accompaniment
- Auto Accompaniment Pattern Variations
- Triggering Auto Accompaniment Play with Accompaniment Keyboard Input (Synchro Start)
- Using the Keyboard to Control the Auto Accompaniment Pattern (Keyboard Controller Mode)
- Selecting a Chord Input Mode
- Using One-Touch Preset
- Using Auto Harmonize
- Changing the Auto Accompaniment and Song Tempo
- Using Music Preset
- Registering and Restoring a Setup (Registration)
- Using the MIDI Recorder to Record Performances
- Using the Audio Recorder to Record Performances
- Listening to Songs (MIDI Player)
- Configuring Function Settings (FUNCTION Mode)
- Using Operation Lock
- Configuring MIDI Settings
- Deleting All Data in Digital Piano Memory
- USB Flash Drive
- Supported USB Flash Drives
- USB Flash Drive and USB Type A Port Handling Precautions
- Connecting a USB Flash Drive to and Detaching It from the Digital Piano
- Formatting a USB Flash Drive
- USB Flash Drive Operations
- Using a Computer to Copy General Song Data to a USB Flash Drive
- Storing Standard Audio Data (WAV Files) to a USB Flash Drive
- Linking with a Smart Device (APP Function)
- Troubleshooting
- Reference
- MIDI Implementation Chart

EN-5
Overview and Setup
Your Digital Piano uses an AC adaptor for power.
• Though this Digital Piano supports battery operation, use of
an AC adaptor is generally recommended.
■ Using the AC Adaptor
Make sure that you use only the AC adaptor specified for this
Digital Piano. Use of a different type AC adaptor can cause
smoking or malfunction.
• Never connect the AC adaptor (JEITA Standard, with
unified polarity plug) that comes with this Digital Piano
to any other device besides this Digital Piano. Doing so
creates the risk of malfunction.
• Be sure to turn off Digital Piano power before
connecting or disconnecting the AC adaptor.
• The AC adaptor will become warm to the touch after
very long use. This is normal and does not indicate
malfunction.
■ Using Batteries
• Be sure to turn off power before loading batteries.
• It is up to you to prepare six commercially available
alkaline batteries.
• Note the following precautions while the Digital Piano
is turned upside down to load batteries.
− Take care to avoid injury due to pinching your
fingers under the Digital Piano.
− Do not allow the Digital Piano to tip over or otherwise
be subjected to strong impact. Impact can damage
the volume knob and keyboard keys.
1.
Open the battery cover on the bottom of the
Digital Piano.
2.
Load six AA-size batteries into the battery
compartment.
Make sure the positive + and negative - ends of the
batteries are facing as marked on the Digital Piano.
3.
Insert the tabs of the battery cover into the
holes on the side of the battery compartment,
and close the cover.
■ Low Battery and Replace Battery Notifications
A battery icon appears on the display to let you know when
battery power is getting low.
Low Battery Indicator
Replace Battery Indicator
• Using the Digital Piano while batteries are very low can
cause it to turn off suddenly. This can cause data
stored in Digital Piano memory to be corrupted or lost.
Preparing a Power Supply
Specified AC Adaptor: AD-A12150LW
(JEITA Standard plug)
Household power outlet
AC adaptor
dm DC 12V
Power cord
[
TONE
]
PIANO
T : 120
001 :GrPnoConce r t
Low battery icon (not flashing)
[
TONE
]
PIANO
T : 120
001 :GrPnoConce r t
Replace battery icon (flashing)