
User Manual
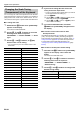
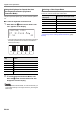

Table Of Contents
- Cover
- Contents
- Overview and Setup
- Operations Common to All Modes
- Digital Piano Operations
- Listening to Demo Play
- Selecting a Tone
- Changing Keyboard Response to Touch Pressure (Touch Response)
- Changing the Pitch
- Using the Sound Mode Effects (Hall Simulator/Reverb and Surround)
- Using a DSP
- Using Chorus
- Using Brilliance
- Adjusting Acoustic Piano Sound Characteristics (Acoustic Simulator)
- Using the Knobs
- Using the Pitch Bend Wheel
- Using the Arpeggiator
- Splitting the Keyboard for Duet Play
- Changing the Scale Tuning (Temperament) of the Keyboard
- Using Auto Accompaniment
- Selecting a Rhythm
- Playing Auto Accompaniment
- Auto Accompaniment Pattern Variations
- Triggering Auto Accompaniment Play with Accompaniment Keyboard Input (Synchro Start)
- Using the Keyboard to Control the Auto Accompaniment Pattern (Keyboard Controller Mode)
- Selecting a Chord Input Mode
- Using One-Touch Preset
- Using Auto Harmonize
- Changing the Auto Accompaniment and Song Tempo
- Using Music Preset
- Registering and Restoring a Setup (Registration)
- Using the MIDI Recorder to Record Performances
- Using the Audio Recorder to Record Performances
- Listening to Songs (MIDI Player)
- Configuring Function Settings (FUNCTION Mode)
- Using Operation Lock
- Configuring MIDI Settings
- Deleting All Data in Digital Piano Memory
- USB Flash Drive
- Supported USB Flash Drives
- USB Flash Drive and USB Type A Port Handling Precautions
- Connecting a USB Flash Drive to and Detaching It from the Digital Piano
- Formatting a USB Flash Drive
- USB Flash Drive Operations
- Using a Computer to Copy General Song Data to a USB Flash Drive
- Storing Standard Audio Data (WAV Files) to a USB Flash Drive
- Linking with a Smart Device (APP Function)
- Troubleshooting
- Reference
- MIDI Implementation Chart

EN-33
Digital Piano Operations
■ Fill-in
These accompaniment patterns are used to insert short one-
or two-measure fill-ins into a piece. A fill-in pattern starts to
play as soon as you touch one of the fill-in buttons (see
below). Accompaniment play returns to the original normal or
variation pattern from beat one after the one- or two-measure
fill-in is complete.
■ Intro
This is an accompaniment pattern that can be used at the
beginning of a song. Normal accompaniment pattern play will
start after the measures of the intro accompaniment pattern is
complete.
■ Ending
This is an accompaniment pattern that can be used at the end
of a piece. After a multiple-measure ending sounds, Auto
Accompaniment ends.
Use the procedure below to configure the Digital Piano to start
Auto Accompaniment play as soon as you press a keyboard
key.
■ To trigger Auto Accompaniment play with chord
keyboard input
1.
While Auto Accompaniment play is stopped,
touch 7 SYNCHRO/ENDING.
This enters synchro start standby, which is indicated by
the LEDs above the 8 START/STOP button flashing
between yellow and red.
• If you want to start with an intro, touch 4 INTRO
here.
• If you want to start with a variation, touch
6 VARIATION/FILL-IN here.
2.
Finger a chord on the accompaniment
keyboard.
This starts Auto Accompaniment.
• To exit synchro start standby, touch 7 SYNCHRO/
ENDING.
To play this
accompaniment
pattern:
Do this:
Normal Fill-in While a normal pattern is playing,
touch 5 NORMAL/FILL-IN.
Variation Fill-in While a variation pattern is playing,
touch 6 VARIATION/FILL-IN.
To play this
accompaniment
pattern:
Do this:
Intro Touch 4 INTRO.
To play this
accompaniment
pattern:
Do this:
Ending While an Auto Accompaniment is
playing, touch 7 SYNCHRO/
ENDING.
Triggering Auto Accompaniment Play with
Accompaniment Keyboard Input (Synchro
Start)