
User Manual
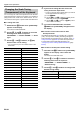
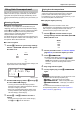
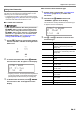

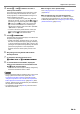
Table Of Contents
- Cover
- Contents
- Overview and Setup
- Operations Common to All Modes
- Digital Piano Operations
- Listening to Demo Play
- Selecting a Tone
- Changing Keyboard Response to Touch Pressure (Touch Response)
- Changing the Pitch
- Using the Sound Mode Effects (Hall Simulator/Reverb and Surround)
- Using a DSP
- Using Chorus
- Using Brilliance
- Adjusting Acoustic Piano Sound Characteristics (Acoustic Simulator)
- Using the Knobs
- Using the Pitch Bend Wheel
- Using the Arpeggiator
- Splitting the Keyboard for Duet Play
- Changing the Scale Tuning (Temperament) of the Keyboard
- Using Auto Accompaniment
- Selecting a Rhythm
- Playing Auto Accompaniment
- Auto Accompaniment Pattern Variations
- Triggering Auto Accompaniment Play with Accompaniment Keyboard Input (Synchro Start)
- Using the Keyboard to Control the Auto Accompaniment Pattern (Keyboard Controller Mode)
- Selecting a Chord Input Mode
- Using One-Touch Preset
- Using Auto Harmonize
- Changing the Auto Accompaniment and Song Tempo
- Using Music Preset
- Registering and Restoring a Setup (Registration)
- Using the MIDI Recorder to Record Performances
- Using the Audio Recorder to Record Performances
- Listening to Songs (MIDI Player)
- Configuring Function Settings (FUNCTION Mode)
- Using Operation Lock
- Configuring MIDI Settings
- Deleting All Data in Digital Piano Memory
- USB Flash Drive
- Supported USB Flash Drives
- USB Flash Drive and USB Type A Port Handling Precautions
- Connecting a USB Flash Drive to and Detaching It from the Digital Piano
- Formatting a USB Flash Drive
- USB Flash Drive Operations
- Using a Computer to Copy General Song Data to a USB Flash Drive
- Storing Standard Audio Data (WAV Files) to a USB Flash Drive
- Linking with a Smart Device (APP Function)
- Troubleshooting
- Reference
- MIDI Implementation Chart

EN-31
Digital Piano Operations
With Auto Accompaniment, simply select an accompaniment
pattern. Each time you play a chord with your left hand the
appropriate accompaniment will play automatically. It’s like
having a personal backup group along with you wherever you
go.
■ Rhythms and Categories
The rhythms of your Digital Piano are divided among six
categories, which you can access using RHYTHM category
buttons bq through cl. Each of the six categories is divided
further into sub-categories, and touching the RHYTHM
category button for a particular category will cycle in
sequence between its sub-categories.
For details about rhythm categories and sub-categories, and
the names of rhythms included in each sub-category, refer to
the separate “Built-in Music Data Lists”.
■ To select a rhythm
1.
Use the bp^ button to cycle through settings
until the “^RHYTHM” indicator to the right of
the button is lit.
The names of the currently selected rhythm category and
rhythm will be shown on the display.
2.
Use RHYTHM category buttons bq through cl
to select a RHYTHM category.
• Touching one of the RHYTHM category buttons
switches to the rhythm that was selected the last time
that rhythm category was exited.
• Each touch of the RHYTHM category button of the
currently selected rhythm category will cycle to the
next sub-category of that category.
3.
Use the bk – and bl + buttons to select a
rhythm.
• To jump to the first rhythm in the current category,
touch bk – and bl + at the same time.
The Auto Accompaniments of this Digital Piano consist of a
“rhythm part” (drums and percussion) and a “chord part”
(various musical instruments). When playing an Auto
Accompaniment, you can sound the rhythm part only, or you
can sound both parts at the same time.
■ To play the rhythm part only
• The rhythm part is the foundation of each Auto
Accompaniment. Your Digital Piano comes with a variety of
built-in rhythms, including 8-beat and waltz. Use the
procedure below to play the basic rhythm part.
1.
Use the 3 mode selector button to cycle
through settings until the “RHYTHM” (RHYTHM
Mode) indicator is lit.
2.
Use the procedure under “To select a rhythm”
(page EN-31) to select the rhythm you want.
3.
Touch 8 START/STOP.
This starts normal pattern (page EN-32) rhythm play.
• The yellow and red LEDs above the 8 START/
STOP button will flash in time with the rhythm (yellow
for beat 1, red for the remaining beats of each
measure).
4.
Play along with the rhythm.
5.
To stop rhythm play, touch 8 START/STOP
again.
• In step 3 of the above procedure, you can also touch one of
the buttons below to start rhythm pattern play.
– 4 INTRO … Starts play with an intro pattern.
– 5 NORMAL/FILL-IN … Starts normal pattern play.
– 6 VARIATION/FILL-IN … Starts play of a variation
pattern.
For information about the different rhythm (Auto
Accompaniment) patterns, see “Auto Accompaniment
Pattern Variations” (page EN-32).
Using Auto Accompaniment
Selecting a Rhythm
[
RHYTH
M
]
POPS
T : 120
01 :E.Funk Po
p
Rhythm name Category name
Playing Auto Accompaniment