
User Manual
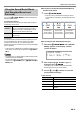
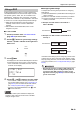
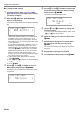
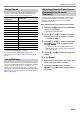
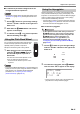
Table Of Contents
- Cover
- Contents
- Overview and Setup
- Operations Common to All Modes
- Digital Piano Operations
- Listening to Demo Play
- Selecting a Tone
- Changing Keyboard Response to Touch Pressure (Touch Response)
- Changing the Pitch
- Using the Sound Mode Effects (Hall Simulator/Reverb and Surround)
- Using a DSP
- Using Chorus
- Using Brilliance
- Adjusting Acoustic Piano Sound Characteristics (Acoustic Simulator)
- Using the Knobs
- Using the Pitch Bend Wheel
- Using the Arpeggiator
- Splitting the Keyboard for Duet Play
- Changing the Scale Tuning (Temperament) of the Keyboard
- Using Auto Accompaniment
- Selecting a Rhythm
- Playing Auto Accompaniment
- Auto Accompaniment Pattern Variations
- Triggering Auto Accompaniment Play with Accompaniment Keyboard Input (Synchro Start)
- Using the Keyboard to Control the Auto Accompaniment Pattern (Keyboard Controller Mode)
- Selecting a Chord Input Mode
- Using One-Touch Preset
- Using Auto Harmonize
- Changing the Auto Accompaniment and Song Tempo
- Using Music Preset
- Registering and Restoring a Setup (Registration)
- Using the MIDI Recorder to Record Performances
- Using the Audio Recorder to Record Performances
- Listening to Songs (MIDI Player)
- Configuring Function Settings (FUNCTION Mode)
- Using Operation Lock
- Configuring MIDI Settings
- Deleting All Data in Digital Piano Memory
- USB Flash Drive
- Supported USB Flash Drives
- USB Flash Drive and USB Type A Port Handling Precautions
- Connecting a USB Flash Drive to and Detaching It from the Digital Piano
- Formatting a USB Flash Drive
- USB Flash Drive Operations
- Using a Computer to Copy General Song Data to a USB Flash Drive
- Storing Standard Audio Data (WAV Files) to a USB Flash Drive
- Linking with a Smart Device (APP Function)
- Troubleshooting
- Reference
- MIDI Implementation Chart

EN-25
Digital Piano Operations
Chorus is a function that adds depth and breadth to notes.
To select a chorus setting, use FUNCTION parameter 9
(“Chorus Type”) to select one of the settings below.
* Specifies the initial setting of each tone.
For information about FUNCTION parameters, see
“Configuring Function Settings (FUNCTION Mode)” (page
EN-53).
Brilliance can be used to make a sound brighter or mellower.
You can use FUNCTION parameter 10 (“Brilliance”) to adjust
brilliance within the range of –3 to +3. A setting of +1 or
greater gives notes a brighter feel, while –1 or less makes
notes sound more mellow. For information about FUNCTION
parameters, see “Configuring Function Settings (FUNCTION
Mode)” (page EN-53).
The tones of your Digital Piano have built-in elements that
give them the reverberation characteristics of an acoustic
piano. You can use the procedure below to adjust the
characteristics of notes.
■ To adjust acoustic piano sound characteristics
1.
Hold down the bp^ button until “[FUNCTION]”
appears on the display.
This enters the FUNCTION Mode.
2.
Use the bk U and bl I buttons to select the
following menu items in sequence: “SOUND”
3 “ACOUSTIC SIMU.”.
3.
Use the bk U and bl I buttons to display the
setting item you want to configure and then
touch bm ENTER.
• For more information about setting items and their
settings, see the “List of Acoustic Piano Sound Setting
Items” (page EN-26).
4.
Use the bk – and bl + buttons to change the
setting.
5.
Touch bp EXIT.
6.
Repeat steps 3 through 5 for each of the items
whose setting you want to configure.
7.
To exit the FUNCTION mode, hold down
bp EXIT until “[FUNCTION]” disappears from
the display.
Using Chorus
This setting
(displayed):
Chorus Type:
Tone* Tone
Chorus 1 Chorus 1
Chorus 2 Chorus 2
Chorus 3 Chorus 3
Chorus 4 Chorus 4
FB Chorus Feedback Chorus
Deep Chorus Deep Chorus
Flanger 1 Flanger 1
Flanger 2 Flanger 2
Flanger 3 Flanger 3
Flanger 4 Flanger 4
Short Delay 1 Short Delay 1
Short Delay 2 Short Delay 2
Using Brilliance
Adjusting Acoustic Piano Sound
Characteristics (Acoustic
Simulator)