
User Manual
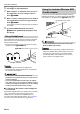
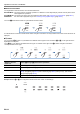
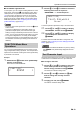
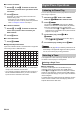
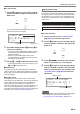
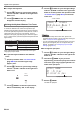

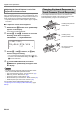
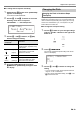
Table Of Contents
- Cover
- Contents
- Overview and Setup
- Operations Common to All Modes
- Digital Piano Operations
- Listening to Demo Play
- Selecting a Tone
- Changing Keyboard Response to Touch Pressure (Touch Response)
- Changing the Pitch
- Using the Sound Mode Effects (Hall Simulator/Reverb and Surround)
- Using a DSP
- Using Chorus
- Using Brilliance
- Adjusting Acoustic Piano Sound Characteristics (Acoustic Simulator)
- Using the Knobs
- Using the Pitch Bend Wheel
- Using the Arpeggiator
- Splitting the Keyboard for Duet Play
- Changing the Scale Tuning (Temperament) of the Keyboard
- Using Auto Accompaniment
- Selecting a Rhythm
- Playing Auto Accompaniment
- Auto Accompaniment Pattern Variations
- Triggering Auto Accompaniment Play with Accompaniment Keyboard Input (Synchro Start)
- Using the Keyboard to Control the Auto Accompaniment Pattern (Keyboard Controller Mode)
- Selecting a Chord Input Mode
- Using One-Touch Preset
- Using Auto Harmonize
- Changing the Auto Accompaniment and Song Tempo
- Using Music Preset
- Registering and Restoring a Setup (Registration)
- Using the MIDI Recorder to Record Performances
- Using the Audio Recorder to Record Performances
- Listening to Songs (MIDI Player)
- Configuring Function Settings (FUNCTION Mode)
- Using Operation Lock
- Configuring MIDI Settings
- Deleting All Data in Digital Piano Memory
- USB Flash Drive
- Supported USB Flash Drives
- USB Flash Drive and USB Type A Port Handling Precautions
- Connecting a USB Flash Drive to and Detaching It from the Digital Piano
- Formatting a USB Flash Drive
- USB Flash Drive Operations
- Using a Computer to Copy General Song Data to a USB Flash Drive
- Storing Standard Audio Data (WAV Files) to a USB Flash Drive
- Linking with a Smart Device (APP Function)
- Troubleshooting
- Reference
- MIDI Implementation Chart

EN-15
Digital Piano Operations
■ To select a tone
1.
Use the bp^ button to cycle through settings
until the “^TONE” indicator to the right of the
button is lit.
The currently selected tone category name and tone
name will be shown on the display.
2.
Use TONE category buttons bq through cl to
select a tone category.
• Touching one of the TONE category buttons switches
to the tone that was selected the last time that tone
category was exited.
• Each touch of the TONE category button of the
currently selected tone category will cycle to the next
sub-category of that category.
3.
Use the bk – and bl + buttons to select a tone.
• To jump to the first tone in the current category, touch
bk – and bl + at the same time.
■ Guitar Tones
The built-in guitar tones of this Digital Piano include strum
noise and other sound effects that are applied in accordance
with the pitch (note number) and/or intensity (velocity) of the
notes being played.
■ Versatile Tones
The Digital Piano’s built-in tones include “versatile tones”
(three guitar tones, two bass tones, and two brass tones) that
can be used for creating computer music. Versatile tones
assign performance sounds that are characteristic of a
particular musical instrument (such as a guitar glissando, fret
noise, etc.) to each keyboard key (note) and velocity. For
information about the sounds assigned for each versatile tone
and velocity, see “Versatile Tone Map” (page EN-77).
Layering makes it possible to sound with two different tones at
the same time. The tone that is layered onto another tone is
the “Upper2 part tone”, which in this manual is referred to as
the “Upper2 tone”. The tone upon which the Upper2 tone is
layered is the “Upper1 part tone”, which is referred to as the
“Upper1 tone”.
■ To layer two tones
1.
Use the procedure under “To select a tone”
(page EN-15) to select the Upper1 tone.
2.
Use the bp^ button to cycle through settings
until the “^CTRL” indicator to the right of the
button is lit.
3.
Touch cl LAYER to enable the layer function,
which is indicated by “LY” on the display.
4.
Use the bp^ button to cycle through settings
until the “^TONE” indicator to the right of the
button is lit. Next, perform the operation under
“To select a tone” (page EN-15) to select the
Upper2 tone.
• You can adjust the volume of the Upper1 and Upper2 parts,
and configure other part settings. For details, see
“Configuring Layer and Split Settings” (page EN-17).
[
TONE
]
PIANO
T : 120
001 :GrPnoConce r t
Tone name Category name
Layering Two Tones
Upper1
Upper2
[
TONE
]
U2 STR I NGS
T : 120 LY
002 :
M
el low Str.1
Layer enabled indicator
“
Upper2” indicator