
User Manual
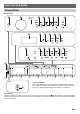

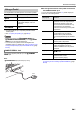
Table Of Contents
- Cover
- Contents
- Overview and Setup
- Operations Common to All Modes
- Digital Piano Operations
- Listening to Demo Play
- Selecting a Tone
- Changing Keyboard Response to Touch Pressure (Touch Response)
- Changing the Pitch
- Using the Sound Mode Effects (Hall Simulator/Reverb and Surround)
- Using a DSP
- Using Chorus
- Using Brilliance
- Adjusting Acoustic Piano Sound Characteristics (Acoustic Simulator)
- Using the Knobs
- Using the Pitch Bend Wheel
- Using the Arpeggiator
- Splitting the Keyboard for Duet Play
- Changing the Scale Tuning (Temperament) of the Keyboard
- Using Auto Accompaniment
- Selecting a Rhythm
- Playing Auto Accompaniment
- Auto Accompaniment Pattern Variations
- Triggering Auto Accompaniment Play with Accompaniment Keyboard Input (Synchro Start)
- Using the Keyboard to Control the Auto Accompaniment Pattern (Keyboard Controller Mode)
- Selecting a Chord Input Mode
- Using One-Touch Preset
- Using Auto Harmonize
- Changing the Auto Accompaniment and Song Tempo
- Using Music Preset
- Registering and Restoring a Setup (Registration)
- Using the MIDI Recorder to Record Performances
- Using the Audio Recorder to Record Performances
- Listening to Songs (MIDI Player)
- Configuring Function Settings (FUNCTION Mode)
- Using Operation Lock
- Configuring MIDI Settings
- Deleting All Data in Digital Piano Memory
- USB Flash Drive
- Supported USB Flash Drives
- USB Flash Drive and USB Type A Port Handling Precautions
- Connecting a USB Flash Drive to and Detaching It from the Digital Piano
- Formatting a USB Flash Drive
- USB Flash Drive Operations
- Using a Computer to Copy General Song Data to a USB Flash Drive
- Storing Standard Audio Data (WAV Files) to a USB Flash Drive
- Linking with a Smart Device (APP Function)
- Troubleshooting
- Reference
- MIDI Implementation Chart

EN-9
Overview and Setup
■ To specify the pedal type
You can use FUNCTION parameter 42 (“Pedal Type”) to
select one of the settings below.
• Note that the expression pedal polarity type depends on the
manufacturer. When connecting an expression pedal,
select “Exp.Type1” or “Exp.Type2” in accordance with its
polarity type.
• For information about FUNCTION parameters, see
“Configuring Function Settings (FUNCTION Mode)” (page
EN-53).
■ To specify the pedal function
You can use FUNCTION parameter 43 (“Pedal Target”) to
select one of the settings below. The settings from
“Expression” to “Layer Balance” are expression pedal
settings, while the settings from “Sustain” to “Fill-in” are switch
type (CASIO sustain) pedal settings.
• For information about FUNCTION parameters, see
“Configuring Function Settings (FUNCTION Mode)” (page
EN-53).
■ Expression Pedal Calibration
When connecting an expression pedal to the
dl EXPRESSION/ASSIGNABLE jack for the first time,
perform the calibration operation below.
1.
Connect an expression pedal to the
dl EXPRESSION/ASSIGNABLE jack.
2.
Hold down the bp^ button until “[FUNCTION]”
appears on the display.
This enters the FUNCTION Mode.
3.
Use the bk U and bl I buttons to display
“PEDAL/WHEEL” and then touch bm ENTER.
4.
Use the bk U and bl I buttons to display
“EXP/ASGN PEDAL” and then touch
bm ENTER.
5.
Use the bk U and bl I buttons to display
“Exp Calibration” and then touch bm ENTER.
This displays “Sure?”. If you want to cancel the operation
at this point, touch bk – here.
Select this
setting
(displayed
setting name):
To connect this type of pedal:
SW Switch type pedal (CASIO sustain
pedal)
Exp.Type1 Polarity Type 1 (see the illustration
below) expression pedal
Exp.Type2 Polarity Type 2 (see the illustration
below) expression pedal
Select this
setting
(displayed
setting name):
To assign this function to the pedal:
Expression Expression (MIDI Control Change 11)
control
Master Volume Overall Digital Piano volume level
control
Tempo Tempo control
Layer Balance Upper1 part and Upper2 part volume
level balance control
Sustain
Same as “Sustain” to “Fill-in” under “To
change the function of the pedal
connected to the DAMPER PEDAL
jack” (page EN-7).
Sostenuto
Soft
Arpeggio Hold
Play/Stop
Fill-in