
User Manual
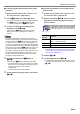


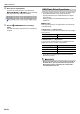

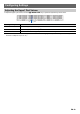
Table Of Contents
- Cover
- Contents
- Overview and Setup
- Operations Common to All Modes
- Digital Piano Operations
- Listening to Demo Play
- Selecting a Tone
- Changing Keyboard Response to Touch Pressure (Touch Response)
- Changing the Pitch in Semitone Steps (Transpose)
- Fine Tuning a Pitch (Tuning)
- Changing the Pitch in Octave Units (Octave Shift)
- Using the Sound Mode Effects (Hall Simulator and Surround)
- Using Chorus
- Using Brilliance
- Adjusting Acoustic Piano Sound Characteristics (Acoustic Simulator)
- Using the Metronome
- Specifying the Tempo
- Splitting the Keyboard for Duet Play
- Changing the Scale Tuning (Temperament) of the Keyboard
- Listening to Songs (Music Library)
- Using the MIDI Recorder to Record or Playback Performances
- Using the Audio Recorder to Record Performances
- Listening to Songs (MIDI Player)
- USB Flash Drive
- Supported USB Flash Drives
- USB Flash Drive and USB Type A Port Handling Precautions
- Connecting a USB Flash Drive to and Detaching It from the Digital Piano
- Formatting a USB Flash Drive
- USB Flash Drive Operations
- Using a Computer to Copy General Song Data to a USB Flash Drive
- Storing Standard Audio Data (WAV Files) to a USB Flash Drive
- Configuring Settings
- Linking with a Smart Device (APP Function)
- Troubleshooting
- Reference
- MIDI Implementation Chart

EN-35
USB Flash Drive
• When you perform a USB flash drive operation or turn
on the Digital Piano while a USB flash drive is plugged
in, the Digital Piano initially needs to perform a
“mounting” process to prepare for data exchange with
the USB flash drive. Digital Piano operations are
momentarily disabled while a mounting process is
being performed. The LEDs above 4 SOUND MODE
and 6 a will light sequentially from left to right
during the mounting process. It may take up to 10 or 20
seconds or even longer for USB flash drive mounting
to finish. Do not attempt to perform any operation on
the Digital Piano while mounting is in progress.
Mounting needs to be performed each time a USB flash
drive is connected to the Digital Piano.
• Mounting a USB flash drive on the Digital Piano will create
a folder named MUSICDAT in the drive’s root directory if a
MUSICDAT folder does not already exist there. Use this
folder when exchanging data between the Digital Piano and
USB flash drive.
■ To connect a USB flash drive
1.
As shown in the illustration below, insert the
USB flash drive into the Digital Piano’s bl USB
Type A port.
• Carefully push the USB flash drive in as far as it will
go. Do not use undue force when inserting the USB
flash drive.
■ To disconnect a USB flash drive
1.
Check to confirm that there is no data
exchange operation being performed, and then
pull the USB flash drive straight out.
• Be sure to format a USB flash drive on the Digital Piano
before using it for the first time.
• Formatting a USB flash drive deletes all data currently
stored on it. Before formatting a USB flash drive, make
sure it does not have any valuable data stored on it.
• The format operation performed by this Digital Piano is
a “quick format”. If you want to completely delete all of
the data in USB flash drive, format it on your computer
or some other device.
• In the case of an exFAT format USB flash drive, the
number of importable files may be limited if long file
names are used.
■ To format a USB flash drive
USB Flash Drive Folder Structure Diagram
Formatting a USB flash drive on the Digital Piano will
automatically create the folders shown in the diagram below.
1.
Insert the USB flash drive to be formatted into
the Digital Piano’s bl USB Type A port.
2.
Hold down 3 FUNCTION.
• Do not release 3 FUNCTION until step 5, below.
3.
Press the B1 keyboard key.
This causes the 6 a LED (right) to flash, indicating
format standby.
Connecting a USB Flash Drive to
and Detaching It from the Digital
Piano
bl USB Type A port
USB flash drive
Formatting a USB Flash Drive
TAKE01.WAV
TAKE02.WAV
TAKE99.WAV
AAAA.MID
BBBB.CMF
\70
\62
\61
\RECORDER
\
\MUSICDAT
USB flash drive
.MID files, .CMF files, .WAV files
C1
A0
C2 C3 C4 C5 C6 C7
C8
B1