Chapter 16 Technical Reference This section contains technical information about the PV Unit. Date Formats The following describes the date formats that can be set for the system (page 168). Format Description M/D/Y Month/Day/Year. Example: Jan/31/2001 D/M/Y Day/Month/Year. Example: 31/Jan/2001 Y/M/D Year/Month/Day. Example: 2001/1/31 Time Formats The following describes the time formats that can be set for the system (page 168).
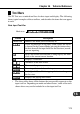
Chapter 16 Technical Reference Tool Bars The PV Unit uses standard tool bars for data input and display. The following shows typical examples of these toolbars, and describes the items that can appear in each. Data Input Tool Bar Mode icon Button Mode icon Description Indicates the mode you are currently in. Clears all characters in the entry (field) where the cursor is located.
Data Display Tool Bar Mode icon Button Mode icon Description Indicates the mode you are currently in. Displays a menu of other views that can be used to display data. In the Scheduler and Expense Manager modes, jumps to today’s date as kept by the PV Unit’s built-in clock. Advances to the next item. Returns to the previous item. Displays the new data input screen. Returns to the list screen from a Contacts, Memo, Expense Manager, and Quick-Memo mode data screen.
Chapter 16 Technical Reference Keyboard Formats The PV Unit provides you with a selection of keyboard formats. QWERTY This format is automatically selected when English, Spanish, or Italian is set as the system language. AZERTY This format is automatically selected when French is set as the system language. QWERTZ This format is automatically selected when German is set as the system language.
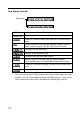
Input Limits The following table shows the maximum number of characters that can be input into various fields.
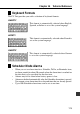
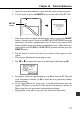
Chapter 16 Technical Reference 1. Open the cover and touch the screen with the stylus to turn on power. 2. Use the stylus to press the RESET button on the back of the PV Unit. RESET button • RESET ➜ If the above does not appear on the display when you press the RESET button, slide the battery switch to the REPLACE BATTERIES position and remove the battery compartment cover. Use the stylus to press the P button and then replace the battery compartment cover.
. After the reset procedure is complete, tap the button next to the language you want to select as the system language. 8. Tap Set to change to the pop up tool screen. 9. Check the time setting and correct it if necessary (page 166). • Following are the initial settings of the PV Unit after you perform the RESET operation.
Chapter 16 Technical Reference Storage Capacity The memory capacity of the PV-S450 is 4-Mbyte (2-Mbyte for the PV-S250). The following shows the number of items that can be stored. Scheduler Approximately 32,000 items (24,400 for the PV-S250) with 20-character description. Approximately 27,320 items (12,200 for the PV-S250) with 60-character description. Contacts Approximately 32,000 items (24,400 for the PV-S250), under the following conditions.
Auto Sort Sequence The following table shows the sequence used for alphabetical data sorts.
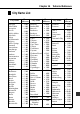
Chapter 16 Technical Reference City Name List City Name Time Difference Abidjan Abu Dhabi Acapulco Accra Addis Ababa Adelaide Aden Al Manamah Algiers Alice Springs Amman Amsterdam Anchorage Andorra Ankara Antananarivo Asuncion Athens Atlanta Auckland Azores – 0:00 + 4:00 – 6:00 – 0:00 + 3:00 + 9:30 + 3:00 + 3:00 + 1:00 + 9:30 + 2:00 + 1:00 – 9:00 + 1:00 + 2:00 + 3:00 – 4:00 + 2:00 – 5:00 +12:00 – 1:00 Baghdad Baltimore Bangkok Barcelona Basel Beirut Belgrade Bergen Berlin Birmingham Bismarck Bogota Boi
City Name Time Difference Lagos Las Palmas Lilongwe Lima Lisbon Lome London Los Angeles Luanda Lusaka Luxembourg + – + – – – – – + + + Madrid Managua Manaus Manila Maputo Marseille Melbourne Memphis Mexico City Miami Midway Is.
Chapter 16 Technical Reference Message Table 100 alarms are already set! Cause: The maximum allowable limit of 100 alarms are already set. Action: Wait until some of the existing alarms are used, or delete alarms you do not need to make room for new ones. All dates you select must be within the same year. Cause: You are trying to highlight dates for a period that spans multiple years. Action: The range of dates when specifying highlights must be within one single year.
Communication error! Cause: An error occurred during data communication. Action: Correct the cause of the error and try again. Data error! Consult your User’s Guide for correct procedure. Cause: An internal data error has corrupted memory data. Action: See page 15 of this User’s Guide for the correct procedure.
Chapter 16 Technical Reference Make sure you are inputting the date correctly. Cause: You are trying to use invalid values for a date. Action: Input the date correctly. Make sure you are inputting the time correctly. Cause: You are inputting invalid values for a time setting. Action: Input proper values for the time. Memory is full! Cause: You are trying to input data or receive data while memory is already full.
That date is outside of the specified period. Cause: You are specifying a Reminder date that is outside the period specified by the start date and end date. Action: Check the specified period and set the date correctly. That name is already used! Cause: You are trying to assign a name that is already used when naming a payment type or expense type. Action: Use a different name.
Chapter 16 Technical Reference You cannot specify more than 60 repeats! Cause: You specified more than 60 repeats for a Reminder data item. Action: Shorten the specified period of the Reminder item to reduce the number of repeats. Wrong password! Cause: The password you input while trying to enter the secret memory area does not match the password that is registered. Action: Input the correct password.
Troubleshooting Power Supply Problem: The PV Unit does not operate normally after batteries are replaced. Possible Cause Problem with PV Unit operational settings Recommended Action Perform the following procedure. 1. Slide the battery switch to the REPLACE BATTERIES position, and remove the battery compartment cover. 2. Use the stylus to press the P button inside the battery compartment. REPLACE BATTERIES NORMAL OPERATION P 3.
Chapter 16 Technical Reference Problem: Nothing appears on the display when power is turned on. Possible Causes 1. The battery switch on the back of the unit is set to REPLACE BATTERIES. 2. Battery power is low. 3. Display contrast is too light. 4. Screen tap power on feature is turned off. Recommended Actions 1. Slide the battery switch to NORMAL OPERATION. 2. Replace batteries (page 19). 3. Adjust display contrast (page 169). 4.
Operation Problem: Nothing happens when you tap the screen. Possible Causes 1. Battery power is low. 2. Exposure of the PV Unit to some external condition is interfering with proper operation. 3. The touch screen is damaged. Recommended Actions 1. Replace batteries (page 19). 2. Press the P button and then the RESET button. See procedure above. 3. The touch screen must be replaced. Contact your nearest CASIO dealer to have the touch screen replaced. You will be charged for this replacement.
Chapter 16 Technical Reference Data Communication Problem: You are having problems performing data communication. Possible Causes 1. Equipment is not connected correctly. 2. Cradle contacts are dirty. • Recommended Actions 1. Carefully follow the procedures on page 127 and connect the equipment correctly. 2. Clean the contacts on the bottom of the PV Unit and inside the cradle by wiping them with a cotton swab.
Specifications Model: PV-S250/PV-S450 Main Modes: Scheduler (Schedule, To Do, Reminder); Contacts; Memo; Expense Manager; Currency Converter; Quick-Memo; Pocket Sheet; Pop Up Tools (Clock, Calendar, Calculator); Game Data storage: Storage and recall of Schedule, To Do, Reminder, Contacts, Memo, Expense, QuickMemo, Pocket Sheet data; calendar display; secret memory area; editing; memory status display Clock: World Time; Schedule alarm; To Do alarm; Reminder alarm; Daily alarm; accuracy under normal temperat