
User Manual


67
Chapter 3 Contacts
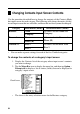
3. Tap the category name or one of the entry names, and make any changes
you want. Repeat this step for as many names as you want to change.
• You can assign category names up to 14 characters long, and entry names
up to 10 characters long.
4. After everything is the way you want, tap Save to store the data.
Exporting Contacts Data Into a Schedule Item
The following procedure lets you export Contacts data into the description text of
a Schedule item, which provides you with handy reference information about the
person you are planning to meet.
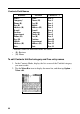
To export Contacts data into a Schedule item
1. Display the data item (record) you want to export.
2. Tap New – Appointment.
3. Input the date, time, alarm time, and any additional description text you
want.
4. Tap Save to store the item.
• The applicable entries (fields) of the Contacts item are exported into the
Schedule item. See “Importing Contacts Data Into a Schedule Item” on
page 36 for details on which entries are exported.
• Note that Contacts data can be exported to create a new Schedule item
only. You cannot use this procedure to export into an existing Schedule
item.
Time bar