E Panorama Editor Version 1.
• Windows is a trademark of Microsoft Corporation. • QuickTime and QuickTime VR are trademarks of Apple Computer, Inc. • Other company and product names are trademarks or registered trademarks of the respective companies. • The contents of this document are subject to change without notice. • The document has been prepared with our utmost effort. However, please contact us if there are any queries or errors. Panorama Editor is published by CASIO COMPUTER CO., LTD. and CASIO COMPUTER CO., LTD.
Introduction This document describes the Panorama Editor image editing software (hereafter called Panorama Editor in this document). Panorama Editor is a software application that runs on Windows. This document does not describe how to use Windows. This document assumes that Panorama Editor users are familiar with the following basic operations.
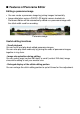
■ Features of Panorama Editor Editing a panorama image • You can create a panorama image by joining images horizontally. • Image data taken using a CASIO LCD digital camera loaded into Panorama Editor will be automatically edited as a panorama image with the stitch width used for recording. Panorama image Useful editing functions • Scroll playback You can scroll and play back edited panorama images. You can also play back endlessly by joining the ends of panorama images together in ring form.
Toolbar Clicking buttons on the toolbar works in the same way as when the corresponding command is selected from the menu. (This document mainly describes how to select commands from the menu.
■ How to read this instruction manual Operation conventions All operations on this manual are described for Windows 98. The description assumes that a mouse is used. In this document, the operation for selecting [File(F)] and then [New(N)...] is described as selecting [File(F)] → [New(N)...]. Display screens • The display screens in this document are from Windows 98 and may differ slightly from other versions of Windows.
Table of contents Introduction ................................................................... 2 ■ To first-time users of Panorama Editor .................................. ■ Features of Panorama Editor .................................................. Editing a panorama image ......................................................... Useful editing functions .............................................................. Toolbar ...........................................................................
■ Saving a panorama image ..................................................... Saving in CPI format ................................................................ Saving in JPEG format ............................................................. Saving in QuickTime VR format ............................................... 28 28 29 31 Changing Panorama Editor preferences .................. 32 Enlarging/reducing display size during editing ......................... 32 Setting stitch width ..............
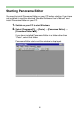
Starting Panorama Editor You need to install Panorama Editor on your PC before starting. If you have not installed it, read the attached “Bundled Software User’s Manual” and install Panorama Editor on your PC. 1. Switch on your PC to start Windows. 2. Select [Programs(P)] → [Casio] → [Panorama Editor] → [Panorama Editor1.0E]. If you have installed Panorama Editor in a folder other than “Casio”, select that folder. Panorama Editor starts and the window is displayed.
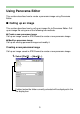
Using Panorama Editor This section describes how to create a panorama image using Panorama Editor. ■ Calling up an image This section describes how to call up an image file to Panorama Editor. Call up an image file using one of the following two methods. ● Create a new panorama image Call up an image saved in JPEG format to create a new panorama image. ● Modify a panorama image Call up an existing panorama image and modify it.
2. Select the folder in which the image to be edited as a panorama image is saved. • Click the [To next folder above] button to select a folder a level above the current one. The upper level folder will be displayed in the file display box. Continue clicking the [To next folder above] button until the level where the folder with the image exists is reached. • Select the target folder from the [Look in] menu to select a folder at the same level as the current one.
3. Select an image file to be edited as a panorama image. • To select a series of image files, click the first file and then click the last one while pressing the [Shift] key. • To select multiple files one by one, click the desired files while pressing the [Ctrl] key. The file name currently selected will be displayed. Note: Only JPEG format image files can be selected here. 4. Click the [Open] button. The selected files will be displayed from the left in file name order in Panorama Editor window.
An image called up in the Panorama Editor window will be automatically edited as a panorama image. 5. Go to “Editing a panorama image” (page 16) Important! To call up images, use the size of the image first called up to check the subsequent image size. If a different size image is found, an error message will be displayed, and calling up images will be cancelled. * If this occurs, image data called up before cancellation can still be edited.
Modifying a panorama image Call up a panorama edit file saved in CPI format. 1. Select [File(F)] → [Open(O)...]. Folders below the folder currently selected will be displayed in the file display box. 2. Select the folder in which the panorama image (panorama edit file saved in CPI format) exists. • Click [To next folder above] to select a folder a level above the current one. The upper level folder will be displayed in the file display box.
You can change the display in the file display box using the [List] and [Detail] buttons. [To next folder above] button 3. Select a panorama image to be modified. The currently selected file name will be displayed. Note: Only CPI format files can be selected here.
4. Click the [Open] button. The files selected will be displayed in the Panorama Editor window. The image will be displayed in the display size previously used, which is either [Enlarged display(L)] or [Reduced display(S)]. → Page 32 “Enlarging/reducing display size during editing” 5. Go to “Editing a panorama image” (page 16).
■ Editing a panorama image This section describes how to edit a panorama image. ● Fine-adjusting a panorama image Adjust stitch width (overlapping portion) between images and cutoff position for vertical size. ● Other editing You can add and delete an image to/from a panorama image. You can also join both ends of the panorama image in a ring form. Fine-adjusting a panorama image You can adjust a panorama image by editing a stitch or by cropping.
Editing a stitch 1. Click an image to edit its stitch. Corner pads will be displayed on the image selected. Corner pad The pointer changes to on the screen selected. Note: • The corner pads are displayed at the four corners of the image selected.
2. Drag the selected image sideways to adjust its stitch width. Adjustment is allowed up to half the image size. You cannot move the selected image beyond this limit. Stitch width 3. Adjust the horizontal level of the image by dragging the selected image up or down.
4. You can further fine-adjust the image by dragging the corner pad on the left-hand corner of the selected image.
■ Enlarging the stitch editing area You can enlarge the stitch editing area displayed. Select [View(V)] → [Display enlarged window(Z)]. • The area to be enlarged is enclosed in a blue frame. • The area enclosed in the frame will be displayed in a separate window. Enlarged display area Note: • The image will be displayed in accordance with the window enlarged by dragging the blue frame.
Cropping 1. Select [View(V)] → [Display cropping lines(C)]. • Cropping lines appear on the image being edited. • Selecting [Display cropping lines(C)] switches between display and hide.
2. Drag the cropping lines up or down to specify the cropping positions (upper and lower cutoff positions). ■ Functions during stitch editing and cropping • Undo Select [Edit(E)] → [Undo(U)]. Cancels the previous operation. Only [Edit stitch] and [Edit cropping] operations can be cancelled. • Canceling [Undo] Select [Edit(E)] → [Redo(R)]. Restores the [Edit stitch] or [Edit cropping] operations cancelled by [Undo(U)] to the condition before the [Undo(U)] operation.
Other editing Adding an image to a panorama image Adds an image after the panorama image being edited. 1. Select [Edit(E)] → [Add image(A)...]. 2. Select the image to be added. 3. Click [Open]. The image selected will be appended to the panorama image being edited.
Note: • You can only select JPEG format images here. • You can only add one image at a time. • If you try to add a different size image, an error message will be displayed and the image will not be added. Inserting an image into a panorama image Inserts an image into a panorama image being edited. 1. Click the portion into which you want to insert an image. The image will be inserted in front of (to the left of) the image selected. 2. Select [Edit(E)] → [Insert image(I)...]. 3.
4. Click [Open]. The image selected will be inserted into the panorama image being edited. Note: • You can only select JPEG format images here. • If you try to insert a different size image, an error message will be displayed and the image will not be inserted. Deleting an image from a panorama image Deletes an unnecessary image from the panorama image being edited. 1. Click the image to be deleted. 2. Select [Edit(E)] → [Delete image(D)]. The image selected will be deleted.
Joining panorama images in ring form You can make a panorama image in a ring form by joining the front (left-hand edge) to the rear (right-hand edge) image. This is effective when saving in QuickTime VR format or when scrolling and playing back on the edit screen. 1. Select [Edit(E)] → [Form ring(O)]. The left- and right-hand edges of the panorama image being edited will be joined. Note: • If you play back the panorama image in this state, the image will be scrolled and played back endlessly.
Playing back by scrolling 1. Select [Playback(P)] → [To right → (R)]. • The panorama image being edited will be scrolled and played back to the right. • Select [← To left(L)] to scroll and play back to the left. 2. To stop playback, click the mouse or press any key on the keyboard. Note: • The panorama image being edited will not be scrolled if the width is less than the monitor width plus 64 dots.
Adjusting playback speed You can adjust the playback (scroll) speed. You can select from [Fast(F)], [Normal(N)] and [Slow(S)] playback speeds. 1. Select [Playback(P)] → [Speed setting(S)]. 2. Check the desired playback speed. ■ Saving a panorama image This section describes how to save a panorama image, which you have created or edited. Panorama images can be saved in the following three formats.
3. Enter the file name in the [File name] box. 4. Click the [Save] button. • The panorama image is saved. The extension is “.cpi.” • If the same file name exists in the folder specified, a confirmation message will be displayed. Click [Yes(Y)] button to overwrite, or else click the [No(N)] button. 5. The panorama image edit screen is resumed when the image has been saved. Saving in JPEG format 1. Select [File(F)] → [Save(S)] → [Save as JPEG(J)...]. 2.
3. Enter the file name in [File name] box. 4. Select an image size from [Select size for saving]. Select from 1/1, 1/2, 1/4 and 1/8. 5. Select a compression ratio from [Select compression ratio for saving]. Select a compression ratio of the image data to be saved from the 9 levels ranging from high compression ratio (low image quality) to low compression ratio (high image quality). 6. Click the [Save] button. • The panorama image is saved. The extension is “.jpg”.
Saving in QuickTime VR format 1. Select [File(F)] → [Save(S)] → [Save as VR file(M)...]. 2. Select the folder in which to save the panorama image. 3. Enter the file name in [File name] box. 4. Select an image size. Select from [Normal(320×240 dots)] and [Wide(480×240 dots)]. 5. Click the [Save] button. • The panorama image is saved. The extension is “.mov”. • If the same file name exists in the folder specified, a confirmation message will be displayed.
Changing Panorama Editor preferences Change various Panorama Editor preferences here. ● You can change the panorama image edit screen display. ● You can set up stitch width (overlapping portion of the image) to create a new panorama file. Enlarging/reducing display size during editing 1. Select [View(V)] → [Enlarged display(L)]. • The vertical size of the image being edited will be changed to 480 dots. • To reduce the edit window, select [View(V)] → [Reduced display(S)].
Viewing help 1. Select [Help(H)] → [Using software(H)...]. 2. Double-click the desired item. The item double-clicked will be opened.
Exiting from Panorama Editor 1. Select [File(F)] → [Exit(X)]. Panorama Editor program ends. Note: If you are editing a panorama image, you are requested to confirm whether to save the image data. If you click [Yes(Y)], the window to save the image will be displayed. If you click [No(N)], Panorama Editor program ends without saving the image data. * Data can only be saved in CPI format here.