PA-2400/PA-2500 Connection Method For File Transfer Manual (Version 1.00 ) March 1998 Casio Computer Co., Ltd. Copyright ©1998. All rights reserved.
Table of Contents Chapter 1. Chapter 2. 2.1 2.1.1 2.1.2 2.1.3 2.2 2.3 2.4 2.5 Chapter 3. 3.1 3.1.1 3.1.2 3.2 3.2.1 3.2.
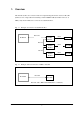
1. Overview This manual describes the connection method for implementing file transfers between a Host PC (Windows-version Upload/Download Utility) and PA-2400/PA-2500 (hereinafter referred to as H/PC). Only the PA-2400 can be connected via a Satellite I/O Box. Fig. 1.1 Example of Connection via Satellite I/O Box RS-232C Satellite PC HOST IrDA PA-2400 I/O Box RS-422 Satellite IrDA PA-2400 I/O Box RS-422 Satellite IrDA I/O Box Fig. 1.
2. Installation 2.1 Installation of PC 2.1.1 Connection Plug the connection cable into the COM1 connector of the Host PC. Note: There are two types of connection cables: one is for direct connection to an H/PC, and the other is for connection via the I/O Box. 2.1.2 Start Up Turn on the power to the PC to boot Windows95, then execute the Upload/Download Utility. Make sure that the main menu screen of the Upload/Download Utility appears. Fig. 2.
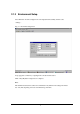
2.1.3 Environment Setup Select "RS-232C" from the Configure menu of the Upload/Download Utility, and then select “Settings”.. Fig. 2.2 Environment Setup Screen Set up appropriate conditions by comparing them to the data described above. Click on the [OK] button if setup has been completed. Note: The maximum baud rate that is achieved in communication may differ from the setting in the "Baud rate" entry field, depending on the state of the PC at that point in time.
2.2 Direct Connection of H/PC to Host PC Connection Plug the communication cable into the 16-pin interface of the H/PC to connect the Host PC. Start-up Turn on the power of the H/PC. 2.3 Connection of H/PC to Host PC via I/O Box Connection Mount the H/PC on the I/O Box. Start-up Turn on the power of the H/PC.
2.4 Installation of Satellite I/O Box (1 unit) Environment Setup 1) Make sure that the POWER switch of the I/O Box is set to OFF. 2) Set the DIP switches provided on the rear panel to the following. Table 2.1 1 2 ON OFF 3 OFF 4 OFF 5 ON 6 OFF 7 ON 8 ON 9 ON 10 ON Note: The above settings assume that the communication speed is set to 115,200 bps. To set a different baud rate modify the SW6, SW7, and SW8 settings as follows: Table 2.
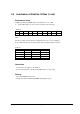
2.5 Installation of Satellite I/O Box (multiple units) Note that the DIP switch settings should be made according to whether the I/O Box is connected directly to the PC or daisy-chained to other I/O Boxes. The following environment setup example assumes a baud rate of 115.2 Kbps has been set. Environment setup 1) Make sure that the POWER switch is set to OFF. 2) Set the DIP switches of the I/O Box to be connected with the PC as follows. Table 2.
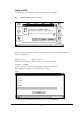
3. File Transmission/Reception 3.1 File Upload Transfers the files on the H/PC to the PC side. 3.1.1 Specifying File from PC Side Setup at Host PC Initiate the Upload/Download Utility on the PC, then select "Command" from the "Execute" menu to invoke the Communication Command screen. Fig. 3.1 Communication Command Screen In the Communication Command screen set up the following communication options: Set the "Command" field to "Receive".
Setup at H/PC Execute "Run by specifying the file name" of the Start menu on the H/PC. Fig. 3.2 H/PC File Name Specification Screen Enter the following commands, according to the connection method used with the Host PC, and click on the [OK] button. Windows flce.exe If RS-232C cable is used: Windows flce.exe If I/O Box is used : /Y={com1, 115200, } (baud rate: 115.2 Kbps) Creation of the above described shortcut enables start-up from the shortcut.
3.1.2 Specifying File from H/PC Side Setup at Host PC Initiate the Upload/Download Utility on the PC, then select "LinkManager" from the "Execute" menu. Fig. 3.
Setup at H/PC Execute "Run by specifying the file name" from the Start menu on the H/PC. Fig. 3.5 H/PC File Name Specification Screen Enter the following commands, according to the connection method used with the host PC, and click on the [OK] button. The following example command assumes that the "a.dat" file on the H/PC is transmitted to the drive C: on the Host PC. Windows flce.exe If RS-232C cable is used: Windows flce.exe If I/O Box is used : /s " a.
For information about the File Transfer Utility refer to the C Library Manual. If connecting via the I/O Box, mount the PA-2400 on the I/O Box. If the setup has been completed, the PA-2400 restores the screen that was displayed before the utility was initiated. 3.2 File Download Transfers the files on the Host PC to the H/PC side. 3.2.1 Specifying File from PC Side Setup at Host PC Select "Command" from the "Execute" menu of the Upload/Download Utility to invoke the Communication Command screen. Fig. 3.
Setup at H/PC Execute "Run by specifying the file name" from the Start menu on the H/PC. Fig. 3.8 H/PC File Name Specification Screen Enter the following commands, according to the connection method used with the Host PC, and click on the [OK] button. Windows flce.exe If RS-232C cable is used: Windows flce.exe If I/O Box is used : /Y={com1, 115200, } Creation of the above described shortcut enables start-up from the shortcut. If the [OK] button is clicked on, the following screen appears. Fig. 3.
For information about the File Transfer Utility refer to the C Library Manual. If connecting via the I/O Box, mount the PA-2400 on the I/O Box. If the setup has been completed, the PA-2400 restores the screen that was displayed before the utility was initiated. 3.2.2 Specifying File from H/PC Side Setup at Host PC Initiate the Upload/Download Utility on the Host PC, then select "LinkManager" from the "Execute" menu. Fig. 3.
Setup at H/PC Execute "Run by specifying the file name" from the Start menu on the H/PC. Fig. 3.11 H/PC File Name Specification Screen Enter the following commands, according to the connection method used with the host PC, and click on the [OK] button. The following example command assumes that the "C: a.dat" file on the PC is received under the " " directory on the H/PC side. Windows flce.exe /r "C: a.dat" " " If RS-232C cable is used: Windows flce.exe /Y={com1, 115200, } /r "C: a.
For information about the File Transfer Utility refer to the C Library Manual. If connecting via the I/O Box, mount the PA-2400 on the I/O Box. If the setup has been completed, the PA-2400 restores the screen that was displayed before the utility was booted up.