FIVA User’s Guide (Product No: MPC-701 series) Thank you for purchasing the CASIO MPC-701 series. This guide describes the basic operations of the MPC-701 series. Read this guide in its entirely before handling or operating the product, and keep it close at hand so it can be easily referenced. FIVAMPC701M50E#Hyo_1~4 1 02.11.
International ENERGY STAR® Program As a member of the International ENERGY STAR® Program, CASIO products have been judged to meet International ENERGY STAR® standards. ENERGY STAR® is a U.S. registered mark. Power Plug and AC Adapter Note AC cord plug and wall outlet illustrated in this User’s Guide shows the two-pin plug type. It may not be the same shape of AC cord plug used in your area.
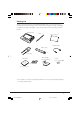
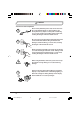
Packing List Thank you for purchasing the CASSIOPEIA FIVA MPC-701 series. A list of the items included with this product is given below. Confirm that nothing is missing or damaged. If anything is missing or damaged, contact the dealer from which you purchased this product.
Safety Precautions • To use this product safely and correctly, read this User’s Guide thoroughly and operate as instructed. After reading this guide, keep it close at hand for easy reference. Please keep all informations for future reference. • Always observe the warnings and cautions indicated on the product. • If this guide is misplaced or damaged so as to be unreadable, a new one can be ordered. To obtain a new User’s Guide, contact the dealer from which this product was purchased.
Warning! Handling FIVA Should FIVA malfunction, start to emit smoke or a strange odor, or otherwise behave abnormally, immediately shut down the power, remove batteries, and unplug the AC adapter from the power outlet. Continued use creates the danger of fire and electric shock. • Contact your original retailer or authorized distributor. Do not place containers of liquids near FIVA and do not allow any foreign matter to get into it.
Warning! The liquid inside the LCD is harmful to humans. Never touch it or allow it to get in your mouth. • Should liquid from the LCD panel accidentally get into your mouth immediately wash out your mouth with clean water. If it gets onto your skin, immediately rinse for at least 15 minutes with clean tap water. In either case, consult a physician. Should lightning strike nearby, stop using FIVA, and disconnect modular cable or the power cord from the power outlet.
Warning! Use a dry cloth to periodically wipe off any dust built up on the prongs of the plug. Humidity can cause poor insulation and create the danger of electric shock and fire if dust stays on the prongs. Do not allow the power cord or plug to become damaged, and never try to modify them in any way. Continued use of a damaged power cord can cause deterioration of the insulation, exposure of internal wiring, and shorting, which creates the danger of electric shock and fire.
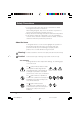
Warning! Battery Pack Use only the battery pack that comes with FIVA. When the battery pack reaches the end of its life, replace it with a new battery pack as specified by CASIO. Other types of batteries have different voltage rating and polarity, which creates the danger of fire and bursting of the batteries. Battery (included) Never try to take the battery pack apart or modify it in any way. Doing so creates the danger of overheating, fire, and bursting of the battery pack.
Caution! Handling FIVA Do not place FIVA on an unstable or uneven surface. Doing so can cause FIVA to fall, creating the danger of malfunction, fire, and electric shock. Do not leave FIVA in the following areas. • Areas where FIVA will be subject to large amounts of humidity or dust, or directly exposed to hot or cold air. • Areas exposed to direct sunlight, in a close motor vehicle, or any other area subject to very high temperatures.
Caution! Power Cord and Peripherals Do not overly bend the power cord, do not allow it to be caught between desks or other furniture, and never place heavy objects on the power cord. Doing so can cause shorting or breaking of the power cord, creating the danger of fire and electric shock. Be sure to grasp the plug when unplugging the power cord from the wall outlet. Pulling on the cord can damage it, break the wiring, or cause short, creating the danger of fire and electric shock.
Before Using FIVA • This product has been designed and manufactured under stringent quality control. Should you suspect FIVA is defective or malfunctioning, contact your original dealer or authorized distributor. Repair and maintenance are subject to the terms and conditions of the Warranty. The mis-operation of electronic product may create a risk of injury caused by a fire or electric shock, etc. To avoid the accident, be sure to follow the instructions below.
System Recovery • This product comes with Windows 2000 operating system and a collection of utility software pre-installed on its hard disk. Should the system start to malfunction or produce errors, you can use the “Product Recovery CD-ROM” that comes with FIVA to restore the factory default system. This returns FIVA the same settings and state it was in when you originally purchased it. Computer Viruses Avoiding Computer Viruses A computer virus is a program.
FIVA Precaution Label • The label shown above is affixed to the bottom of FIVA. Be sure to carefully observe these precautions at all times. Never remove this label. Should this label ever start to come off or should its contents become unreadable, contact your original dealer or authorized distributor. Caution • Turn off this product before connecting or disconnecting peripherals. • Never apply impact or vibration. • Never take this product apart. • Use only the specified AC adapter.
Avoid Strong Vibration and Impact • Strong vibration or impact can cause malfunction. Be particularly careful when FIVA is turned on. Vibration and impact can cause corruption of data on built-in hard disk. • Do not press down hard on the periphery of the screen. If any entry field near the periphery, right or left side of the screen as shown, suppose to be located, the area may be activated accidentally by the pressure. Do not press down hard on these sections. FIVA conforms to drip-proof specifications.
Options Non-CASIO options • Check with each manufacturer for compatibility before using any non-CASIO options with this unit. • CASIO assumes no responsibility for any loss (including but not limited to personal injury, material loss, damage to FIVA) suffered by you or other arising out of the use of a non-CASIO option. Use Only as Directed • Be sure to connect or disconnect an option only as expressly directed in the documentation that comes with the option.
Cautions When Carrying FIVA Around • Do not carry FIVA around in a bag containing hard objects with protrusions. If these objects bump against FIVA or force is applied from above, the display may be scratched or FIVA may malfunction. • Before moving FIVA, be sure to shut down the power, and make sure that all peripheral devices (FDD unit, etc.) are disconnected. Then, move FIVA separately from these devices.
Maintenance and Care Normal Care Shut down the power and unplug the power cord from the power outlet before cleaning FIVA. Cleaning FIVA with the power on creates the danger of electric shock. • Clean FIVA by wiping it with a soft, dry cloth. If FIVA is very dirty, wipe it with a cloth that has been moistened with a weak solution of water and a mild neutral detergent. Wring out all excess of moisture before wiping.
Maintenance Never remove FIVA’S outer cover or otherwise try to take it apart or modify it in any way. High voltage inside the case creates the danger of electric shock.
Contents Packing List ................................................................................................. 1 Safety Precautions ...................................................................... 2 Before Using FIVA ....................................................................................... 9 Maintenance and Care .............................................................................. 15 About This User’s Guide ..............................................................
Using the Keyboard .................................................................................. 61 Keyboard Types .................................................................................................. 61 Changing the Mobile Keyboard Size .................................................................. 62 Moving the Mobile Keyboard on the Screen ....................................................... 62 Inputting Text with the Mobile Keyboard .............................................
Connecting to the USB port ..................................................................... 104 Using External Monitor ..................................................................................... 107 Changing the screen's resolution and colors .................................................... 108 Using a PC Card ...................................................................................... 109 Using a PC Card .........................................................................
About This User’s Guide This User’s Guide is divided into the four sections shown below. Be sure you read the section titled “Before Using FIVA” starting from page 9 before you do anything else. Before Using FIVA This section provides important safety precautions and things you need to know to use FIVA correctly. Chapter 1 Getting Ready This chapter provides you with general description of functions and part names. It also explains required procedures for turning power on and off for the first time.
Chapter 1 Getting Ready This chapter provides you with general description of functions and part names. It also explains required procedures for turning power on and off for the first time. MPC701M50E#p21~22*Tobira 21 02.11.
MPC701M50E#p21~22*Tobira 22 02.11.
Features The MPC-701 Series is a lightweight and compact pen type computer. 1 8.4-inch SVGA (800 × 600) TFT LCD • High-density TFT color LCD has high resolution. MPC-701M30E: VE-transflective type MPC-701M50E: Transmissive type Backlight turns on automatically in response to the brightness sensor. (M30E only) Highly mobile B5 size • Compact 1,400g, B5 size goes along anywhere. • Comes with 128MB of memory as standard (384MB maximum) and a 20GB hard disk built in.
Part Names and Their Functions The part names introduced in this chapter are used throughout the rest of this User’s Guide. Front wIndicator qLCD lamps screen eBrightness sensor rSpeaker tPower switch yMicrophone uHeadphone iUSB oBacklight !4Battery pack compartment !0Key !3Keyboard switch lock switch !1Hook !2Stylus 24 MPC701M50E#p23~35 24 02.11.
qLCD screen SVGA (800 × 600) 8.4" type color TFT with touch panel MPC-701M30E: VE-transflective type MPC-701M50E: Transmissive type wIndicator lamps LED lamps indicate the following states from the left as you face FIVA: Power (PW-LED) Indicates the power state. (page 92) HDD (HDD-LED) Indicates the disk accessing state. (Lights green during accessing.) BATT1 (BAT-LED) Indicates the power state of battery pack 1. (page 35) BATT2 (BAT-LED) Indicates the power state of battery pack 2.
Back qBattery pack compartment wHook ePC card slot rUSB !1Ventilation port tModem port hole yLAN oInfrared port communications port !0RGB port iCF card slot uPower adapter port !2Memory replacement cover !3Reset !4Battery !5Battery switch pack release latch 26 MPC701M50E#p23~35 26 02.11.
qBattery pack compartment Contains the battery pack. wHook Used for attaching the neck strap. ePC card slot (PCMCIA CARD) Used for inserting the PC card. rUSB port ( ) Connects USB peripheral devices. (USB Ver.2.0 compliant) tModem port ( ) Connects the built-in modem to the telephone line by modular cable. yLAN port (LAN) Connects to an Ethernet network. uPower adapter port ( ) Connect the power cord from the AC adapter to this port. iCF card slot (CF CARD) Used for inserting the CF card.
Keyboard This section describes the basic functions of the keyboard. Actual keyboard functions may differ in accordance with the application you are using. • Keyboard keys are grouped according to function: control keys, 10-key pad, and arrow keys. Function Control Keys Key Key Name Escape Cancels an operation. DEL Delete Deletes the character to the right of the cursor. BS Backspace Deletes the character to the left of the cursor. Tab Tab Inputs a tab operation.
Key Combinations • Key combinations where you must hold down one key and press a second are indicated by a plus symbol. • The following shows the key combinations that are available with the Fn key. This is called the “hot keys” function. Key Fn + + + + + + + Fn + “0” Ctrl Alt Fn + “.” + “–” + Spc + Fn Fn Fn Fn Fn Fn Fn Fn Fn Description “1” Decreases LCD brightness. (page 57) “2” “3” Increases LCD brightness. (page 57) “4” Puts FIVA into Hibernation Mode.
Before Using FIVA for the First Time Affixing the Screen Protector on to the LCD screen Follow the steps to affix the film. 1. Peel off a thin sheet on each side of the film first. 2. Note the four corners on the Screen Protective Film. The surface with the corners pointing upward must face to your side and the other side must face to the LCD screen. Affix it as shown in the illustration. A corner is upward Connecting the Neck Strap When you use the neck strap, be sure to hook it as follows.
Pulling out the Stylus Use your finger to slide the stylus from its storage slot on the front of the FIVA unit. To replace the stylus, slide it carefully back into the slot so the raised part of the stylus enters the slit. 1 Important • Take care to avoid misplacing the stylus. • Take care to avoid damaging or breaking the tip of the stylus. • Keep the tip of the stylus and the FIVA screen clean and free of dirt. Performing stylus operations when the stylus or screen is dirty can damage the screen.
Power Supply This section describes how to set up, remove, and charge the battery packs. Though operation is possible using the AC adapter only, it is a good idea to attach the battery packs and charge them before using FIVA for the first time. Attaching and Removing the Battery Packs When you set the full-charged battery packs, you can use this unit without connecting the AC adapter. Make sure you correctly set the battery packs so they do not come off accidentally during unit opetation.
• Two battery packs can be attached at the same time, and they can be attached in any order. Of course operation with only one battery pack is also possible. To remove the battery pack Before removing the battery pack, be sure to turn off the power when the AC adapter is connected to FIVA and a power outlet you can remove the battery pack without turning off the power. Also, when two battery packs are attached, one can be removed without turning off the power.
Charging the Battery Pack The AC adapter is used not only to supply power from the AC power outlet but also to charge the battery pack. The battery pack is also charged while FIVA is in use (power is on) if the AC adapter (provided) is connected with the battery pack inserted in the FIVA unit. Unwanted power consumption can be prevented and safety ensured if the power outlet side of the AC adapter also is disconnected when the AC adapter is not connected to the FIVA unit.
When the two battery packs are used for MPC-701, one of them can be exchanged by the "hot swap" function at any time,even in the state of the use MPC-701. MPC-701 starts battery charge from a large remained capacity battery pack. Please check the lamp color of BATT1 / BATT2. When the battery pack under charge becomes full charge, charge of the other battery pack is started.
Turning on Power Either connect the FIVA unit to the power outlet by the AC adapter, or attach a charged battery pack. Turning on the power Press the power switch until the PW indicator lamp lights. Important Do not turn on and off in a short time. After turning power off, wait for at least 10 seconds before turning it back on again. The first time you turn on the power, you must perform a Windows 2000 operating system setup procedure.
Windows 2000 Operating System Setup Introduction When FIVA is first turned on, Windows 2000 operating system setup is required for setting license information and other information. Perform this operation when you turn a newly purchased FIVA on for the first after. When you next turn FIVA on, the Windows 2000 initial screen will be displayed according to the details you set up here. Windows 2000 operating system setup involves the following settings. You will need to do these settings in advance.
2. Confirm the terms of the Windows 2000 operating system licensing agreement. Be sure to read these terms. If you agree with the terms of this agreement, select “I accept this agreement.”, and click Next. If you do not agree to these terms, you cannot use Windows 2000 operating system provided on FIVA. • To read all, use the ▲ or ▼ button, or PgUp ( Fn + ↑ ) or PgDn ( Fn + ↓ ) button to scroll the screen. 3. Set the location where FIVA is to be used. 38 MPC701M50E#p36~54 38 02.11.
4. Next, the user information screen for setting details relating to the individual using the software is displayed. Register your name and the name of your organization. When you have entered your name, press the tab. The cursor moves to the textbox for entering the name of your organization. 1 • Personal settings in the software Enter your “Name” and your “Organization name” here. Entering characters is done by using both the CTRL key and the number keys.
Input example: If your name is fiva Name f i v a fiva While holding down the CTRL key, press “8” repeatedly, when “f” appears, release the CTRL key and the “8” key. “f” is displayed on the screen. While holding down the CTRL key, press “8” repeatedly, when “i” appears, release the CTRL key and the “8” key. “i” is displayed on the screen. While holding down the CTRL key, press “9” repeatedly, when “v” appears, release the CTRL key and the “9” key. “v” is displayed on the screen.
5. Enter the Windows product key. (The key is indicated on the label affixed to the bottom of the FIVA.) If you make a mistake when entering the product key, an error will be displayed, and you can enter the product key again. This key will be needed when you ask for customer support, or when you set up Windows 2000 again. Take care not to allow it to get dirty as it cannot be re-issued. 41 MPC701M50E#p36~54 41 02.11.
• Product key The product key combines the ALT key, the “8” key and the “9” key for English letters and numbers only. Product key numbers are input from the 10 key. For English letters, while pressing the ALT key, repeatedly press the “8” key or the “9” key until the appropriate letter appears. When the appropriate letter appears, release the ALT key to set the letter.
6. The screen for entering the name of the computer and the administrator (system manager) password is displayed. 1 7. Setting the date and time Set the correct date and time to FIVA. 43 MPC701M50E#p36~54 43 02.11.
8. Set the network settings. In this screen, you must enter information that is common not only to FIVA but that is also shared with other computers over a network. If you do not know this information, ask the system administrator of the network you are using or the system supervisor at the store of purchase. Continue with the settings for the "work group and the domain." 44 MPC701M50E#p36~54 44 02.11.
9. In the exit Windows 2000 operating system setup screen, select Exit. This reboots FIVA, and the Windows 2000 initial screen is displayed. 1 10. Enter the user name and password in this field to log on. After doing the input, setup closes and the Windows desktop screen returns. 45 MPC701M50E#p36~54 45 02.11.
Shutting Down the Power There are 3 ways to shut down the power. However, power consumption with the power off, and the time until Windows can be used again vary according to how FIVA is stopped and power is shut down.
To shut down Windows 2000 operating system from the Start menu Selecting [Shut Down...] from the Start menu ( ) [Shutdown], [Restart], [Stand by] and [Hibernate] can be selected in the Windows Shutdown dialog box. 1 The following describes how to shut down from the Start menu ( ). 47 MPC701M50E#p36~54 47 02.11.
Selecting [Shutdown] in the Windows Shutdown dialog box This shuts down Windows and turns the power off. Select this method when FIVA is not to be used for a long time (for example, when power is not to be turned on until the following day) or when adding on memory. 1. Select "Shutdown". 2. Check the screen, and click OK. This completely shuts down the system, and stops power supply.
Selecting [Restart] in the Windows Shutdown dialog box This exits the currently active session, completely shuts down the system, and then restart the system as in a normal bootup. Select this method when you are experiencing a problem in the application or when you want to change system settings. 1. Select "Restart". 1 2. Check the screen, and click OK. 49 MPC701M50E#p36~54 49 02.11.
Selecting [Stand by] in the Windows Shutdown dialog box Use this method when you have to leave your desk for only a short time or you want to resume operation immediately after the previous operation. In the Standby mode, screen displays, Windows states and the states of previously active applications are saved to memory so that they can be immediately used. In this mode, the Power indicator lamp flashes amber, and only a slight amount of power is constantly consumed.
Selecting [Hibernate] in the Windows Shutdown dialog box In the Hibernation mode, the state of Windows 2000 operating system and previously active applications are saved to hard disk. (In the Standby mode, they are saved to memory and a slight amount of power is constantly consumed.) Also, almost no power is supplied. To resume use of FIVA, lightly press the power switch to restart FIVA operation from the previous state. (page 129) 1. Select "Hibernation". 2. Check the screen, and click OK.
Important • Avoid entering the Hibernation Mode while a communication operation is in progress, or while a peripheral (disk, printer, etc.) is in use. Entering the Hibernation Mode while a communication operation is in progress will cause an error on the other computer. • The Standby Mode and Hibernation Mode are disabled in the MS-DOS. • You can reset FIVA and force power to turn off by holding down the power switch for 4 seconds.
How to Use Suspend The FIVA unit is provided with the suspend of the power saving function as standard. Suspend refers to both the Hibernate and Stand by modes described on the previous pages. Use of the battery packs can be prolonged by suspending FIVA when FIVA is not to be used temporarily. (The time that FIVA is held in the suspend state varies according to the battery pack charge state.
54 MPC701M50E#p36~54 54 02.11.
Chapter 2 Using FIVA This chapter explains how to turn on power and perform a number of basic computer operations. MPC701M50E#p55~56*Tobira 55 02.11.
MPC701M50E#p55~56*Tobira 56 02.11.
Adjusting the Screen Brightness When you use FIVA, the brightness of the screen must sometimes be adjusted. There are two ways of doing this, from the keyboard and from the Mobile Cockpit. q From the keyboard (page 29) Fn +"1" ( ) turns down (darkens) the brightness. Fn +"2" ( ) turns up (lightens) the brightness. w From the Mobile Cockpit (page 130) Click the brightness ( ) button in the Mobile Cockpit. You can change the screen brightness in eight stages in the dialog box that is displayed.
Using the Stylus Before actually using the stylus to perform screen operations, be sure to first clean the tip of the stylus and the screen. Performing stylus operations when the stylus or screen is dirty can damage the screen and interfere with stylus input. Use only the stylus that comes with FIVA to perform screen operations. Never use a pencil, a mechanical pencil, or any other pointed object. Such objects can damage the display.
Stylus Operations With FIVA, you can perform all the operations you need by lightly touching the screen. The following provides descriptions and examples of a number of basic functions. Important • Do not trace along the frame line on the LCD screen with the stylus, or apply an excessive pressure when inputting on the screen as it is easily damaged. Doing so may cause malfunction of the screen.
r Right Click Touch the icon on the lower right of the screen. The next time you touch the screen with the stylus performs a right-click operation. Some applications do not allow right clicking while a range of text is selected (highlighted). Key lock The key lock switch is located on the right side of the FIVA unit. This switch has two settings LOCK and FREE, and is for preventing wrongful entry on the keyboard.
Using the Keyboard Keyboard Types FIVA Hard Keyboard The keys to the right of the FIVA display are grouped according to function: control keys, 10-key pad, and arrow keys. Pressing the function key Fn and then another key performs a hot key function. See page 29 for a complete list of hot key combinations. Text Input Panel There are two types of text input panels: Mobile Keyboard and smARTwriter (a handwriting input panel).
Changing the Mobile Keyboard Size Touch and hold the lower right corner of the keyboard with the stylus so the pointer changes from to . Drag the stylus on the screen to change the size of the keyboard. Note that the size of the smARTwriter handwriting input panel cannot be changed. Moving the Mobile Keyboard on the Screen Hold and tap the area on the left side of the keyboard and drag it to the location you want. 62 MPC701M50E#p57~64 62 02.11.
Inputting Text with the Mobile Keyboard There are five different Mobile Keyboard configurations. You can select the one that suits you best. To change the configuration of the Mobile Keyboard, tap the icon in the upper left corner of the current keyboard, and then select the keyboard you want from the menu that appears. q Full Qwerty key 2 w Middle Qwerty key e Small Qwerty key r ABC key 63 MPC701M50E#p57~64 63 02.11.
t Ten key 64 MPC701M50E#p57~64 64 02.11.
Using handwriting input (smARTwriter) FIVA comes with smARTwriter handwriting recognition software. You can find detailed information about all of the features and functions in the online help that is available while smARTwriter is running. The following explains of smARTwriter Plus Ver.3.5.
Achieving Good Recognition Following the tips listed below helps to improve the handwriting recognition rate. • Write without stopping. There is no need to wait for smARTwriter to recognize text. • Write using printed (not connected or cursive) characters. • Do not use delayed strokes. Dot your “i” and cross “t” characters immediately. • Avoid touching the screen with your hand while writing. Doing so can leave unwanted ink on the screen. • Avoid writing small characters.
3. The Quick Trainer window appears, showing a passage of text. Note 4. Copy each character into the slot or box directly under it, one character in each slot. If you make a mistake, re-write the letter or character. You can re-write a letter or character as many times as you need. Make sure you write characters in all the slots provided. Letters that smARTwriter immediately recognizes will be highlighted. The rest will be learned by the recognition system when you tap the Accept button.
Using smARTwriter This section explains what you need to know in order to actually set up and use smARTwriter on your FIVA. Starting Up smARTwriter smARTwriter always starts up automatically every time you turn on FIVA. You can, however, quit smARTwriter manually (selecting Exit from the smARTwriter menu option), and then start it back up manually the next time you want to use it. To start up smARTwriter manually 1.
First Steps in Writing with smARTwriter 1. Switch to Pointing Mode( ) and then start up an application, such as Word. 2. Switch to Writing Mode ( ) and tap in the input area of the application so the insertion cursor appears. You are ready to start writing on the screen. 3. Using the stylus, write a few words in the Pocket Word document area. Write continuously. It is not necessary to pause after each letter. smARTwriter reads the “ink,” recognizes it, and converts it into printed text. 4.
Using Gestures A “gesture” is a symbol you draw to activate a special function or enter a special character, like a backspace, new line, etc. The following are the gestures available with smARTwriter. Note Training Correction Backspace Backspace Space New Line Edit Selected Edit Selected Tab • The heavy dot indicates the starting point of each gesture. For example, the following describes the steps you should perform when you want to use the Backspace gesture. 1. Switch to the Writing Mode ( ).
To activate the Correction Box with the menu 1. Write until a recognition error occurs. 2. Select (highlight) the misrecognized word. 3. Tap the smARTwriter icon and then select Correct... from the smARTwriter menu. • This activates the Correction Box with the misrecognized word inside it. To activate the Correction Box with an Edit Selected gesture 1. Write until a recognition error occurs. 2. Select (highlight) the misrecognized word. 3. Draw either of the Edit Selected gestures.
The smARTwriter Menu Tapping the smARTwriter icon opens the smARTwriter menu, which provides access to the main functions of smARTwriter. Tap here. Correct Activates the Correction Box. See “Using the Correction Box” on page 71. Train Opens the Trainer dialog box so you can “teach” smARTwriter your handwriting style. See “Training smARTwriter” on page 65. Library Opens the Library Manager. See “Library Models” on page 79. Properties Displays the smARTwriter Properties dialog box.
Train You can train smARTwriter to recognize your own handwriting style for characters, strings, macros, gestures, or application shortcuts. • Training improves the handwriting recognition rate because it teaches smARTwriter how to recognize your particular writing style. See “Using Quick Trainer” on page 66 for information about how to use another training tool named Quick Trainer.
2. In the upper part of the Trainer dialog box, select the segments or parts of the ink pattern that you want to use as a character. Note • Tap the ink pattern to select it, tap it again to deselect. If there is more than one stroke, make sure you select all the strokes that are part of the character. The strokes you select appear in the Trainer dialog box, which shows the ink pattern that will be used for recognition. 3.
Note • If you open the Trainer dialog box while text is selected in a document, the selected text is automatically replaced by the newly trained character when you close the Trainer dialog box. Macros & Gestures This option opens the Train Macro Wizard dialog box with the last ink pattern you wrote or selected. Use this dialog box to teach smARTwriter to interpret the pattern as a character string, macro, or gesture. To teach smARTwriter a character string, macro, or gesture 1.
3. Tap Finish to save the macro and close the Train Macro Wizard. Existing Macro 1. On the dialog box that appears, select the macro or gesture you want from the list. • The lower part of the dialog box shows the sequence currently assigned to the selected macro or gesture. 2. Tap the Finish button to save your changes and close the Train Macro Wizard. Application Shortcuts This option opens the Train Shortcut Wizard dialog box with the last ink pattern you wrote or selected.
3. In response to the prompt that appears, tap New Shortcut if you are creating a new shortcut, or Existing Shortcuts to associate the ink pattern with an existing shortcut. Next, tap Next to continue. Note • The prompt described in step 3 appears only when one or more application shortcut already exists. If there are no application shortcuts yet, the New Shortcut option is selected automatically.
Library The collection of characters and shapes recognized by smARTwriter is called the Library of Models. smARTwriter contains a pre-defined Library of Models with over 371 distinct characters. smARTwriter recognizes handwriting primarily by comparing the shape and direction of flow of individual characters you write to a set of character shapes (models) stored in the Library of Models. Every time you train smARTwriter, you add character models to the Library of Models.
Type of Models Use this box to specify the category of models you want to view. Tap the down arrow and select one of the categories listed below. To view: Select: All characters in the Library of Models All Lower case characters only Lower Upper case characters only Upper Numbers only Digits Symbols and punctuation marks only Punc. Gestures only Gestures Macros only Macros Shortcuts only Shortcuts You cannot use this box to view macros and shortcuts.
Using the Libraries Window Use the Libraries Window to create new libraries, open an existing library (change the active library), and to copy and delete libraries. The icons on the top of the Libraries Window represent New (create), Open (change), Copy, and Delete. Creating a New Library If more than one person uses the FIVA, it is a good idea if each user creates a personal Library of Models. To create a new library 1. Tap the New button ( ). 2.
Note To delete a library • Make sure that the library you are deleting is not the active library. If it is, change the active library. 1. On the Libraries Window, select the library you want to delete from the list of libraries. 2. Tap the Delete button ( ). Properties This menu option displays a dialog box for setting the properties of smARTwriter. The Properties dialog box contains the following tabs. General This tab contains settings for customizing smARTwriter behavior.
Ink The settings on this tab control the way the electronic ink is displayed on the FIVA screen. Ink Width Use this setting to change the width of the ink. Tap the up or down arrow to change the width within the range of 1 to 5 points. Ink Color This area shows a sample of the color currently selected for the ink, and provides a button for changing the color. To change the color of the ink 1. Tap the Change... button to display the Color dialog box, which is a standard Windows color palette. Note 2.
Note Orientation • This option affects smARTwriter only. The screen orientation of your other applications does not change. These settings let you adjust the position of the screen for use as a writing board. They define the writing orientation so smARTwriter can recognize the electronic ink pattern. Ink Filter Use these settings to correct ink patterns and help improve recognition. • Smooth out jagged ink Check this option to eliminate “dotting” and make electronic ink appear smooth.
Constraints Note This tab lets you turn recognition filters on and off. Turning on filters helps to improve recognition. As explained previously, smARTwriter searches through a large number of symbols in the Library of Models to find a match for each character you write. If you are inputting only characters from a certain group (lower case, numerals, etc.), you can constrain (limit) the search to those character groups and minimize recognition errors.
Using smARTscribble Basic Concepts About smARTscribble smARTscribble is a sketching application you can use to draw on the screen and capture the ink pattern. The resulting image is a set of stylus strokes you can edit later. smARTscribble also lets you add text to the image. The following are just some of the ways you can use smARTscribble. • Taking handwritten notes - instantly put your ideas in writing. • Drawing images, sketches, road maps, etc. with explanatory text.
Note 3. Lift the stylus from the screen. All the strokes contained within the selection boundary become highlighted. Strokes that are partially within the selection boundary are also highlighted. • Selecting as area or image automatically cancels any previous selection on the screen. To select all the images on the screen On the Edit menu, tap Select All. To delete an image Select the image and then tap the Delete button ( ). To cut an image Select the image and then tap the Cut button ( ).
To modify existing text 1. Tap the Text button ( ) to switch to the text mode. 2. Tap the text item you want to edit. 3. Make any changes you want. 4. After you are finished, tap anywhere outside the text box or tap the Text button again to finish entering text. Editing Text Use standard Windows editing procedures to edit text with smARTscribble. In other words, select the text and then edit it using Cut, Copy, Paste or Delete.
Ink Changing the Ink color To change the color of the ink 1. On the Edit menu, tap Pen Color to display the Color dialog box, which is a standard Windows color palette. Note 2. Select the color you want to use for the ink. • For more information about using this dialog box, refer to your Windows documentation. Changing the Ink width smARTscribble supports three ink widths: thin, medium and thick. The currently selected width is always shown on the toolbar in the Ink Width box. To change the ink width 1.
smARTscribble Documents Creating, Saving and Opening Documents Note smARTscribble documents can be saved as files. • smARTscribble document files have names that end with the extension INK. Any file with this extension is automatically associated with smARTscribble. • To create a new smARTscribble document, tap New on the File menu. • To save a smARTscribble document under its current name, tap Save on the File menu. • To save a smARTscribble document under a different name, tap Save As on the File menu.
Page Size Note Each new smARTscribble document page is sized to fit the FIVA screen. Use the Expand ( ) to expand the size of the document page. • To lengthen the size of a page, tap the Expand ( ) button. This causes the page to expand downwards. You can view the area of the page off the bottom of the screen by using the vertical scrollbar on the right of the page. • When you switch between pages, smARTscribble automatically adjusts the page size so all the data fits on the page.
Using the Battery Pack A charged battery pack lets you run FIVA without connecting the AC adapter. The following describes various power management functions that help to make battery pack operation more efficient. Note • See page 32 for information about attaching and removing the battery pack. See page 34 for information about charging the battery pack. Checking the Current Charge Level of the Battery Pack The battery pack discharges naturally even when you are not using it.
Checking the Power Indicator Lamp ColorBAT-LED PW-LED When there is little remaining battery power left when FIVA is running on the battery pack only, the Power Indicator lamp ( ) starts to flash red, and the system notifies the user by the low battery power warning. If you ignore this warning and continue using FIVA without the AC adapter connected, FIVA will automatically enter the Hibernation mode.
Checking with Mobile Cockpit Mobile Cockpit’s battery monitor function lets you graphically view the charge level of the battery at any time. See page 134. For more information on the battery pack, press the battery control button to display some on-screen information. Battery control button Click. 2 Battery information is displayed here. Using the Battery Pack Effectively The amount of operating time you get from the battery pack is greatly affected by operating conditions and how you use it.
When to Replace the Battery Pack The battery pack is a consumable item, and after long use the amount of operating time provided by a fully charged battery can become quite short. This indicates it is time to replace the battery pack with a new one. The Mobile Cockpit displays a message notifying you when to replace the battery pack. Look at battery life under battery control on the Mobile Cockpit. If the signal is red, it is time to replace the battery pack with a new one. Tap here.
When Two Battery Packs Are Mounted When two battery packs are mounted, the hot-swapping function allows either of the two battery packs to be replaced while the other is in use even if FIVA is turned on. About charging Charging is started from the battery pack having more remaining power. So, check the charging state by the color of the BATT1/BATT2 indicator lamps. When the battery pack being charged becomes fully charged, charging of the other battery pack is started.
MPC701M50E#p85~96 96 02.11.
Chapter 3 Supplementary Information This chapter contains information about how to connect peripherals and what to do when you experience problems. MPC701M50E#p097~98 Tobira 97 02.11.
MPC701M50E#p097~98 Tobira 98 02.11.
Note the following important points before connecting a peripheral. • Some peripherals require changes in FIVA settings. Some peripherals require certain settings to be made before they can be used. • Use only special cables for connections. Use only the specified cables to connect peripherals. Even if the shape of a connector on a cable appears the same as that for the specified cable, it may not work properly. Carefully check to make sure you are using the correct cables.
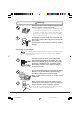
Connecting a Headphone or a Microphone By connecting commercially available headphone or microphone to this unit, the sound function built in this unit can be used. To connect the headphone Connect the headphone plug to the headphone port ( ) on the right of this unit. For details of the volume adjustment, see “u Adjusting the volume” on page 131. Use a headphone which has the stereo mini jack (ø3.5 mm). Connect the headphone plug to the headphone port ( ).
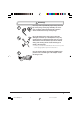
To connect microphone Connect the microphone plug to the microphone port ( ) on the right of this unit. Use a microphone which has the monaural mini jack (ø3.5 mm). Connect the microphone plug to the microphone port ( ). To disconnect the plug, pull it out from the port by holding the plug. Connecting to the LAN port By using the LAN port, you can connect to the standard Ethernet (10Base-T/100Base-TX). An Ethernet cable is necessary when connecting to the Ethernet.
Connecting to the modem port The built-in 56kbps modem provides a high-speed data communication and facsimile transmission/reception capabilities. (The actual communication speed depends on the local line conditions, etc.) You can use this function by connecting the modular cable to the modem port. The built-in modem can be connected to the general telephone line (analog). It cannot be connected directly to the digital line (the ISDN circuit, etc.).
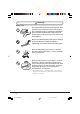
Performing Infrared Communications A communications function compliant with the IrDA infrared communications system is provided on the rear of FIVA. Infrared communications allows you to send and receive data to and from another computer. Infrared communications port Locate FIVA and the other device supporting the IrDA interface so that they directly face each other. Wireless link icon The wireless link ( ) icon is displayed on the desktop and in the indicator area. Double-click this icon.
Connecting to the USB port The USB (Universal Serial Bus) is a standard interface specification for the connections of the USB compatible peripherals such as a keyboard, mouse, printer, scanner, etc. to the computer. Connecting to or disconnecting from the USB port can be performed even when the power of this unit is turned on. (Right side: USB1.1, Left side: USB2.0) Insert the plug of the USB cable to the USB port securely with the plug’s mark ( ) facing upwards.
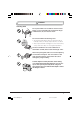
Using the floppy disk drive The optional USB compatible floppy disk drive (MPC-240FDD) is available for this unit. The two types of floppy disk can be used with this unit. One is 2DD floppy disk with the capacity of 720 KB and the other is 2HD floppy disk with the capacity of 1.44 MB. (For details, see the manual that comes with the floppy disk drive.) Connecting the floppy disk drive allows you to store data and to copy data to other computer. Connect the MPC-240FDD to the USB port of this unit.
Connecting a Printer A USB compatible printer can be connected to the USB port of this unit. Installing the printer driver is required for using the printer. The printer driver that comes with this unit or one (stored in a CD, floppy disk, etc.) that comes with the printer can be used. When a printer compatible with the plug and play function is connected for the first time, the Add Printer Wizard screen appears. Follow the procedure displayed on the screen to use the printer.
Using External Monitor Connect an external monitor to FIVA so that the operation can be performed while viewing the big-screen. To connect a Monitor 1. Turn off the power of FIVA after closing an application, etc. Making sure that the RGB cable from the external monitor is oriented correctly, connect the RGB cable to the RGB port of the FIVA. Connect the power cord of the monitor to other power outlet. (For details, see the manual that comes with the monitor.) 2. Turn on the power of the external monitor.
Changing the screen's resolution and colors You can specify the resolution and number of colors only when using an external monitor. Right click on the Windows Me desktop and select Properties on the menu. The Display Properties appears. Click the Setting tab and then make the Colors and Screen area settings you want. These settings can be changed. The following table shows the setting combinations that can be made for Colors and Screen area.
Using a PC Card Using a PC Card FIVA has one PC Card Standard PCMCIA TYPE II PC card slot (including card compatible with the Card BUS). You can use a PC card to connect various peripherals such as the CDROM drive or DVD-ROM, etc. Almost of all PC cards can be inserted or removed while the power of the unit is turned on. For the detail of using the PC card, see the manual that comes with the PC card.
Inserting a PC card Make sure that the PC card is oriented correctly when you insert it into the PC card slot. Inserting the PC card into the slot upside down forcibly may damage the cable or the slot. 1. Connect the cable to the PC card. And, push the eject button into the slot. 2. Making sure that the PC card is oriented correctly, insert the PC card into the PC card slot.
Removing a PC card Before removing a PC card from the slot, first click the Mobile Cockpit PC Card button ( ) and disable PC card operation and then remove the PC card. Also, make sure that an application or system is not running. The PC card can be inserted or removed even when the power of this unit is turned on or off, but not when the unit is in the Suspend Mode. 1. Stop using the PC card.
Using a CF Card Using a CF Card FIVA has one CF TYPE I/II CF (Compact Flash) card slot. You can use a CF card to load the expansion memory or hard disk. Almost all CF cards can be inserted or removed while the power of the unit is turned on. For the detail of using a CF card, see the manual that comes with the CF card. Important • Long term use of CF card that generates a lot of heat can cause unstable card operation and malfunction and also can create the danger of burns.
Inserting a CF card Make sure that CF card is oriented correctly when you insert it into the CF card slot. Inserting the CF card into the slot upside down forcibly may damage the connector or the slot. 1. Push the eject button into the slot. 2. Making sure that the CF card is oriented correctly, insert the CF card into the CF card slot. Though you may be aware of some resistance while inserting the CF card, push the card carefully and horizontally until it goes to the last.
Removing a CF card Before removing a CF card from the slot, first click the Mobile Cockpit ) and disable CF card operation and then remove PC Card button ( the CF card. And, be sure that an application or system is not running. The CF card can be inserted or removed even when the power of this unit is turned on or off, but not when the unit is in the Suspend Mode. 1. Stop using the CF card.
Loading an Expansion Memory You can expand the FIVA memory by installing an expansion memory board. Expanded memory can help applications and large-volume data to be operated at a high speed. Use the optional expansion memory board (MPC-252RAM/253RAM/754RAM) or one specified by CASIO. Before installing or removing expansion memory board Do not disassemble the unit except the part described below. As the high-voltage components are inside FIVA, improper usage causes damage to the unit.
3. Remove the screw from the memory replacement cover near the center of the top section of the turned over FIVA. 4. Lift up the cover to remove. 5. When the cover is removed, the expansion memory slot appears. Align the notched sections (q) of the expansion memory board with the protrusions (w) of the expansion memory slot, and insert the expansion memory board diagonally while paying attention to its orientation and insertion angle until its terminals come into contact with the inside of the slot (e) .
Removing the expansion memory board Perform steps 1 to 4 of the procedure of “Installing the expansion memory board.” 5. When the memory replacement cover is removed, the expansion memory slot appears. Pull up the inserted memory board while prizing apart (q) both sides of the expansion memory slot to the left and right, and remove the inserted memory board. (w) When removing the memory board, take care not to excessively press or bend it. q q w 6.
Using the “Mobile Cockpit #” The CASIO original application software “Mobile Cockpit3” is installed in this unit. The “Mobile Cockpit3” is always displayed as a tool bar on the desk top of the Windows and it allows you to perform the convenient settings easily. When the “Mobile Cockpit3” is not displayed on the screen, click in the indicator area to start up. * After this, “Mobile Cockpit3” is described as the mobile cockpit.
q Switching the tool bar The Mobile Cockpit has the Control bar and Launcher bar. You can switch the display between them depending on your usage. When you click or , the display is switched between the Control bar and the Launcher bar. • Control bar It allows you to specify each setting easily. When you click the appropriate button, the window appears. So, you can follow the procedure displayed in the window.
2. Confirm that the button of the application you registered is displayed in the Launcher bar. To register applications from the “My Computer”. 1. Drag and drop application you want to register from the My Computer in the Windows to the Launcher bar. 2. Confirm that the button of the application you registered is displayed in the Launcher bar. To start up the application you registered 1. Clicking the Switching the tool bar button in the Mobile Cockpit to switch to the Launcher bar from the Control bar.
To delete the application you registered 1. Clicking the Switching the tool bar button in the Mobile Cockpit to switch to the Launcher bar from the Control bar. 2. Right-click the button of the application you want to delete. Right-click the icon of the application. 3. Click the Delete in the menu. When you click the All Delete, all the applications you registered are deleted. 4. Confirm that the button of the application you deleted is not displayed in the “Launcher bar”.
w Panel Changing the display position of the tool bar By dragging the panel, the “Mobile Cockpit” can be displayed in the following 5 positions of the desk top screen. The upper part of the screen The lower part of the screen The right side of the screen The left side of the screen Floating Although the tool bar and the Windows taskbar are displayed together, the Windows taskbar has priority over the tool bar.
Important • When you use Windows or Mobile Cockpit III task bar at left or right side of the screen, do not set Auto hide active. • If you place the task bar at left or right side on the screen and set Auto hide active, the icons on the task bar may be hidden which makes you find the icons difficult. • This precaution should be ignored if you operate the screen with a mouse. Pop-up menu When you right-click this part, the pop-up menu is displayed.
Help When you need the information about the Mobile Cockpit, this lets you know how to operate. Version info This displays the version information of the Mobile Cockpit. Exit This closes the application of the “Mobile Cockpit3”. When you want to use the tool bar of the “Mobile Cockpit3” again after closing it, you need to start up from the “FIVA tool”. 124 MPC701M50E#p118~135 124 02.11.
e Settings You can specify 4 settings of the “One Touch Operation Buttons”, the Wake On Timer, Power Management and Settings. One Touch Operation Button Setting Three one touch operation buttons ( , P0, P1) are located on the keyboard. Pressing each of these buttons starts up the application preregistered to that button. You can register the desired application to each of the one touch operation buttons.
Power Management Setting This allows you to prolong the using time of the battery pack when you change the settings of the Suspend Mode, CPU, hard disk and the LCD monitor and the power supply according to the conditions. (This function is called “Power Management”.) To make the change of the using condition easier, the three modes of “FULL POWER”, “NORMAL” and “ECONOMY” are provided. And, for the power, the two modes of “USER AC” and “USER DC” are provided.
FULL POWER NORMAL 3 ECONOMY 127 MPC701M50E#p118~135 127 02.11.
USER AC This setting is when the power is supplied to this unit by the AC adapter. USER DC This setting is when the power is supplied to this unit by the battery packs. 128 MPC701M50E#p118~135 128 02.11.
Settings (Preferences) The initial setting can be set to use this unit. The two settings of “Built-in LAN on/off”, “Power Switch Action” can be specified. When the restart is necessary after the setting is changed, the display to restart this unit appears after you press the OK button. Built-in LAN When you do not use the built-in LAN, remove the check mark the check box . from When the built-in LAN settings have been changed, a message prompting you to reboot the computer is displayed.
r Power management When the button is depressed. Full power Normal Economy User When you press one of the “Full power”, the “Normal”, the “Economy” and the “User” button to select the setting of the “Power Management Setting” described before, the setting of the power management for this unit can be specified. The selected button is depressed. (The “Full power” button is selected in the illustration shown above.
y LAN connection switch Up to 16 LAN settings can be set to FIVA, each with individual names for each of the different locations. With these individual LAN settings, you set the name of your own computer, IP address, proxy setting, and the normally used printer. If LAN settings are already set when the LAN connection switch button is pressed, the following dialog box is displayed. To add new LAN settings, click New , and to correct existing LAN settings, click Edit .
i PC card properties The( ( ) button open Windows PC card (PCMCIA) properties. ) button To remove the PC card by operating from this screen. All currently connected storage devices including PC cards can be removed by the [Eject Hardware] button ( ) in the indicator area. (page 111) o Long-Run setting By setting the function range of CPU of this unit, you can decrease the power consumption and prolong the using time of the battery packs. The CPU functions within the upper value and the lower value.
!0 Battery Control This window displays the condition of the battery packs. You can check the connecting condition of the battery packs, the remaining power of the battery packs or the time to replace with a new battery pack, etc. The reading of the Rated capacity does not guarantee the actual capacity of the battery packs which are being used. Therefore the capacity of the full-charged battery pack and the Rated capacity do not coincide with each other.
!1 Battery indicator The battery indicator indicates the battery pack remaining power and installed state at all times. When running FIVA by the battery pack only • The display differs when only battery pack is installed and when two battery packs are used. For one battery pack For two battery packs When two battery packs are installed • The average value of the total battery power is displayed as the remaining power. However, the level indicator shows each of their battery powers.
!2 Standby Mode When you click the standby button ( ), this unit enters the Standby Mode. • You can also set to the Standby Mode by pressing “ Fn + “3” ( )”, selecting “Standby” after selecting the “Shut down”, or performing the operation of “e Settings” described before. If you click this button when the wake on timer setting is set to on, the unit is restored from the Standby Mode when the time you set comes.
The following explanation on pages 136 to 143 is about the Terminal Equipment embedded in CASSIOPEIA FIVA series and described by following the rules. The Terminal Equipment is operable and compliant with the regulations in the United States and Canada only. For users of CASSIOPEIA FIVA series resident in other countries, the description and the instruction of the equipment are not applicable.
The REN is used to determine the quantity of devices which may be connected to the telephone line. Excessive RENs on the telephone line may result in the devices not ringing in response to an incoming call. In most, but not all areas, the sum of RENs should not exceed five (5.0). To be certain of the number of devices that may be connected to a line, as determined by the total RENs, contact the local telephone company.
According to the FCC’s electrical safety advisory, we recommend that you may install an AC surge arrestor in the AC outlet to which this equipment is connected. Telephone companies report that electrical surges, typically lightning transients, are very destructive to customer terminal equipment connected to AC power source and that this is a major nationwide problem. This equipment is registered with the FCC under Part 68 as a component device for use with CASIO COMPUTER CO., LTD.
Notice Concerning FCC Radial Regulations Note that federal law prohibits you from using software that is not in compliance with FCC rules that regulate redialing on the computer or other device where this modem is installed. For users in Canada NOTICE: The Industry Canada label identifies certified equipment.
For users in Europe The modem integrated in this product has been approved in accordance with Council Decision 98/482/EC for Pan-European single terminal connection to the Public Switched Telephone Network (PSTN). However, due to differences between the individual PSTNs provided in different countries in Europe, the approval does not, of itself, give an unconditional assurance of successful operation on every PSTN network termination point.
Main functions of the modem Network control functions Automatic Send and Receive by built-in NCU Modem protocols Conforms to the following protocols and possible to communicate in full duplex V.21/V.22bis/V.32/V.32bis/V.34/ V34bis/V.90/K56flex/V.27ter/V.29/V.17 Data compression protocols Conforms to MNP 5, ITU-T V.42bis Error control protocols Conforms to MNP 4, ITU-V.42 Function Protocol ITU-T V.21 ITU-T V22bis ITU-T V32 Data communication (Send and Receive) ITU-T V32bis ITU-T V34 V.
FIVA with embedded 1456VQL19V (INT) Modem port Connecting to telephone line The modular cable that comes with the modem shall be used to connect the modem to the telephone line. In this case, if the telephone line is available through the modular jack, it is possible to connect the modem to the telephone line directly. Otherwise, an adapter is required or modification of the telephone line socket might be necessary. 142 MPC701M50E#p136~143 142 02.11.
Connecting to the FIVA Turn off the power of the FIVA first and then connect as depicted below. Modular cable Connector for communication (for connection to the dedicated Modular cable) Caution on operation of the product To use this product, operate as instructed below since this is designed to be embedded in the FIVA. 1. The product must be set in a case upon use. 2. Do not leave the product in the area such as hot and humid or exposed to direct sunlight since it is a precision product. 3.
Troubleshooting This section describes what you should do whenever you start to experience problems with operation of FIVA, its peripherals, or applications you are running. Basic Troubleshooting Note the following important points whenever you are experiencing problems. 1. Take your time. If the system seems to hang up, resist the urge to turn off power, click things on the display, or press keyboard keys. The operation you are performing may simply require a bit more time. 2.
System Outline Have the following information handy whenever you request user support. Memo about your system Model Unit ID Number (on the bottom panel) Memory Capacity(MB) FIVA Hard Disk Capacity (GB) Hard Disk Free Space (MB) Battery Pack (Used/No Used) External Monitor Printer Peripherals PC (CF) Card Other Peripherals Software Remarks Windows Version 3 All applications running when problem occurred Other information about FIVA can be found by visiting the CASSIOPEIA Website at: http://www.
FIVA Malfunction Recommended Action Symptom FIVA is emitting smoke and heat. Immediately turn off power, remove the Battery Packs, and unplug the AC adapter from the wall outlet. FIVA malfunction Contact your original dealer or authorized distributor. Have the following information on hand. • Product name and model number • Date of purchase • Current status and the names of applications being used You don’t know what to do. Contact your authorized distributor. Have the following information on hand.
Power Supply Symptom Recommended Action Power does not turn on. • Power indicator lamp is flashing red. • Power turns on but immediately turns off. • Nothing happens when the power switch is pressed. Use the AC adapter to power FIVA. • Use a fully charged battery pack. If the battery pack has small charge when power is turned on, a warning message appears momentarily and power turns off. Power turns on, but the system does not start up.
Display Problems Recommended Action Symptom Nothing on the display, Power indicator lamp is not lit. Press the power switch to turn on power. Display has gone blank. Touch anywhere on the display. FIVA’s power saving function causes the display to go blank if no operation is performed for some time. See page 126. Display contents are difficult to see. Reorient FIVA so you can view the display at a different angle. Display is dim. Use Fn + “1” or Fn + “2” to adjust display brightness.
Software Problems Symptom Recommended Action Cannot perform infrared data communication. Make sure that the wireless link on the control panel is enabled. • Make sure there are no obstructions in the infrared path between the two devices. Cannot send data correctly using infrared data communication. Make sure the data transfer speed set for FIVA is the same as that set on the other device. • Change the distance between FIVA and the other device.
General Operation Problems Recommended Action Symptom Power indicator lamp flashes red immediately after charging. Purchase a new battery pack and replace the current one. Battery packs tend to lose their ability to charge after long use. FIVA suddenly hangs up. • If you suspect that the problem is due to low battery power, connect the AC adapter and charge the battery. • If you suspect that the problem is being caused by the application you are using, press the RESET switch and restart Windows.
General Operation Problems (continued) Symptom Recommended Action Hot keys do not work. Tap the Taskbar’s Start button and start up Mobile Cockpit from the Programs menu. Mobile Cockpit is not displayed. • If Mobile Cockpit is not running, tap the Taskbar’s Start button and start up Mobile Cockpit from the Programs menu. • If the Mobile Cockpit toolbar is hidden, tap the Mobile Cockpit icon on the Taskbar and then uncheck the Hide option on the menu that appears. Windows is hung up.
The CE marking indicates compliance to applicable European Directives and Norms declared by; CASIO Europe GmbH Bornbarch 10, D-22848 Norderstedt, Germany DECLARATION OF CONFIRMITY We CASIO Europe GmbH Bornbarch 10, D-22848 Norderstedt, Germany declare under our sole responsibility that the product Mobile Personal Computer, Models: MPC-701M50E, MPC-701M30E to which this declaration relates is conformity with the following standards and Council Directives; Standards; EMC: EN55022:1994+A1:1995+A2:1997 Lim
GUIDELINES LAID DOWN BY FCC RULES FOR USE OF THIS UNIT IN THE U.S.A. (not applicable to other areas.) NOTICE This equipment has been tested and found to comply with the limits for a Class B digital device, pursuant to Part 15 of the FCC Rules. These limits are designed to provide reasonable protection against harmful interference in a residential installation.
Specifications Product Name Type Clock speed MPC-701M30E MPC-701M50E Transmeta CrusoeTM TM5800 CPU 800 MHz Cache 128 KB (primary), 512 KB (secondary) Standard (On Board) 128 MB Memory Max. (expansion slot ×1) 384 MB Built-in hard disk Ultra DMA66 20 GB Display unit 8.4" VE-transflective TFT LCD 8.
Options List The useful options shown below are available for use with the FIVA MPC-701 Series. Expansion memory board (part No.: MPC-252RAM) 64 MB (part No.: MPC-253RAM) 128 MB (part No.: MPC-754RAM) 256 MB Floppy disk drive (part No.: MPC-240FDD) AC adapter (part No.: AD-S60160A-E) Battery holder (part No.: MPC-720CS) Stand (part No.: MPC-710ST) Screen protector (part No.: MPC-730PS5) 3 ×5 Car adapter (part No.: MPC-780CAR-E) CD-ROM DRIVE Interface Card CD-ROM drive (part No.
MPC701M50E#p152~156 156 02.11.
FIVA User’s Guide (Product No:MPC-701 series) 1st. ed. 2002-11 CASIO COMPUTER CO., LTD. 6-2, Hon-machi 1-chome Shibuya-ku, Tokyo 151-8543, Japan Notes • This guide cannot be reproduced or duplicated in any form, in part or in whole, without written permission from CASIO COMPUTER CO., LTD. • The content of this guide is subject to change without notice. • CASIO has, to the best of its ability, endeavored to make this guide as accurate as possible.
™ CASIO COMPUTER CO., LTD. 6-2, Hon-machi 1-chome Shibuya-ku, Tokyo 151-8543, Japan FIVAMPC701M50E#Hyo_1~4 4 02.11.