User ’s Guide MPC-205E/206E FIVA User’s Guide (Product No.: MPC-205E/206E) P1 P2 P3 MODE MODE LA CASIO COMPUTER CO., LTD. 6-2, Hon-machi 1-chome Shibuya-ku, Tokyo 151-8543, Japan Printed on recycled paper. Printed in Taiwan B A N Thank you for purchasing the CASIO MPC-205E/206E. This guide describes the basic operations of the MPC-205E/206E. Read this guide in its entirely before handling or operating this products, and keep it close at hand so it can easily referenced.
International ENERGY STAR® Program As a member of the International ENERGY STAR® Program, CASIO products have been judged to meet International ENERGY STAR® standards. ENERGY STAR® is a U.S. registered mark. The information regarding International ENERGY STAR® Program attached to this product and found in its manual, advertising pamphlets, and so on, is applicable under our Power Management software in Windows Me. When booting from B mode, it is not applicable.
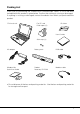
Packing List Thank you for purchasing the CASSIOPEIA FIVA205E/206E series. A list of the items included with this product is given below. Confirm that nothing is missing or damaged. If anything is missing or damaged, contact the dealer from which you purchased this product.
Safety Precautions • To use this product safely and correctly, read this User’s Guide thoroughly and operate as instructed. After reading this guide, keep it close at hand for easy reference. • Always observe the warnings and cautions indicated on the product. • If this guide is misplaced or damaged so as to be unreadable, a new one can be ordered. To obtain a new User’s Guide, contact the dealer from which this product was purchased.
Warning! Handling FIVA Should FIVA malfunction, start to emit smoke or a strange odor, or otherwise behave abnormally, immediately shut down the power, remove batteries, and unplug the AC adaptor from the power outlet. Continued use creates the danger of fire and electric shock. • Contact your original retailer or authorized distributor. Do not place containers of liquids near FIVA and do not allow any foreign matter to get into it.
Warning! Power Plug and AC Adaptor Note AC cord plug and wall outlet illustrated in this User’s Guide shows the two-pin plug type. It may not be the same shape of AC cord plug used in your area. AC100~240V Use only a proper AC electric outlet (100V~240V) when powering FIVA with the AC adaptor. Use of an outlet with a different voltage from the rating creates the danger of malfunction, fire, and electric shock. Overloading an electric outlet creates the danger of overheating and fire.
Warning! Do not cover the AC adaptor with a blanket, etc., or do not place FIVA on the heating rug, near a heater, etc. Doing so may cause malfunction or deformation of FIVA, which creates the danger of fire. Battery Pack Supplied battery pack Use only the battery pack that comes with FIVA. When the battery pack reaches the end of its life, replace it with a new battery pack as specified by CASIO.
Caution! Handling FIVA Do not place FIVA on an unstable or uneven surface. Doing so can cause FIVA to fall, creating the danger of malfunction, fire, and electric shock. Do not leave FIVA in the following areas. • Areas where FIVA will be subject to large amounts of humidity or dust, or directly exposed to hot or cold air. • Areas exposed to direct sunlight, in a close motor vehicle, or any other area subject to very high temperatures.
Caution! Power Cord and Peripherals Do not overly bend the power cord, do not allow it to be caught between desks or other furniture, and never place heavy objects on top of the power cord. Doing so can cause shorting or breaking of the power cord, creating the danger of fire and electric shock. Be sure to grasp the plug when unplugging the power cord from the wall outlet. Pulling on the cord can damage it, break the wiring, or cause short, creating the danger of fire and electric shock.
Before Using FIVA • This product has been designed and manufactured under stringent quality control. Should you suspect FIVA is defective or malfunctioning, contact your original dealer or authorized distributor. Repair and maintenance are subject to the terms and conditions of the Warranty. The mis-operation of electronic product may create a risk of injury caused by a fire or electric shock, etc. To avoid the accident, be sure to follow the instructions below.
System Recovery • This product comes with Windows Me and a collection of utility software pre-installed on its hard disk. Should the problem occur to the system or applications due to an unexpected malfunction, you can use the “Product Recovery CD-ROM” that comes with FIVA to restore the factory default system. This returns FIVA the same settings and state it was in when you originally purchased it. Computer Viruses Avoiding Computer Viruses A computer virus is a program.
Precaution Label • The label shown above is affixed to the bottom of FIVA. Be sure to carefully observe these precautions at all times. Never remove this label. Should this label ever start to come off or should its contents become unreadable, contact your original dealer or authorized distributor. Power Requirements • Plug the AC adaptor into a power outlet rated for 100V to 240V AC, 50/60Hz only. • Do not connect FIVA to the same outlet of another device that generates electrical noise.
Options • Be sure to carefully follow the procedures provided in the applicable User’s Guides whenever connecting or disconnecting peripherals. Failure to do so can damage FIVA or the peripheral. AC adaptor: WARNING • Use the AC adaptor MPC-277ADPE. Main battery: WARNING • Replace this main battery with the MPC-273BAT or MPC-274LBAT. Use of other battery may present a risk of fire or explosion. • This battery pack is suitable for use only with the MPC-205E or MPC206E.
Consumables Standard Battery Pack • Long use of the battery pack causes it to deteriorate and lose its ability to recharge. If you feel your battery pack is not providing enough operating time, it may be time to contact your dealer or authorized distributor about purchasing a new one. • Use this product for only specified CASIO product. • Never take this product apart or modify it or apply an impact on it. Danger • Never allow the positive and negative poles to become shorted by metal.
Maintenance and Care Normal Care Shut down the power and unplug the power cord from the power outlet before cleaning FIVA. Cleaning FIVA with the power on creates the danger of electric shock. • Clean FIVA by wiping it with a soft, dry cloth. If FIVA is very dirty, wipe it with a cloth that has been moistened with a weak solution of water and a mild neutral detergent. Wring out all excess moisture before wiping. • Clean the LCD by wiping it with a soft, dry cloth.
The CE marking below applies to the EU region. Declarator of conformity is as follows: CASIO ELECTRONICS CO. LTD. Unit 6, 1000 North Circular Road, London NW2 7JD GUIDELINES LAID DOWN BY FCC RULES FOR USE OF THIS UNIT IN THE U.S.A. (not applicable to other areas). NOTICE This equipment has been tested and found to comply with the limits for a Class B digital device, pursuant to Part 15 of the FCC Rules.
Contents Packing List ................................................................................................. 1 Safety Precautions ...................................................................... 2 Before Using FIVA ....................................................................................... 8 Maintenance and Care .............................................................................. 13 1 Normal Care ......................................................................
Chapter 3 Supplementary Information ................................. 59 Connecting Peripherals ............................................................................ 61 Connecting a pair of Headphones or a Microphone ........................................... 61 Connecting to the LAN port ................................................................................ 62 Connecting to the modem port ...........................................................................
Appendix ....................................................................................97 System Restoration .................................................................................. 99 Starting up from the “Product Recovery CD-ROM” .......................................... 100 Setting the Partition of Hard Disk/Initializing the Hard Disk .............................. 101 Making Windows Me Settings ...........................................................................
About This User’s Guide This User’s Guide is divided into the five sections shown below. Be sure you read the section titled “Before Using FIVA” starting from page 8 before you do anything else. Before Using FIVA This section provides important safety precautions and things you need to know about use of FIVA correctly. Chapter 1 Getting Ready This chapter provides you with general description of functions and part names, and other information you need to know before trying to use FIVA.
Getting Ready Chapter 1 This chapter provides you with general description of functions and part names, and other information you need to know before trying to use FIVA.
Part Names and Their Functions The part names introduced in this chapter are used throughout the rest of this User’s Guide. CASSIOPEIA FIVA has the port and the slot for PC card in order to connect to peripherals such as a network, the USB equipment, etc. As the part names are described in this User’s Guide many times, remember these names introduced in this chapter. At first, open the display panel. Opening FIVA Slide the monitor release lever in the direction of the arrow and open the display panel.
Front w Monitor release lever and latch q Monitor !9 Stick !8 Keyboard e E-mail button P1 r Internet button !7 Speaker P2 t Memo button P3 y Software switch B MODE A MODE u AC adaptor IN L AN i USB port o LAN port !0 Indicator lamps !4 Power switch !5 Microphone port !6 Headphone port 22 !1 Control button (right) !2 Control button (left) !3 Center button
q Monitor 8.6-inch color TFT LCD (SVGA) ) and latch w Monitor release lever ( Slide this lever to the right to open the monitor. You can close the monitor securely using the latch. e E-mail button ( ) Press this button to start up the E-mail software. 1 r Internet button ( ) Press this button to start up the Internet Browser. t Memo button ( ) Press this button to start up the Note pad software. y Software switch ( MODE A B ) Slide this switch to select the start-up mode.
Back q Modem port w CF CARD slot e RGB port r IEEE1394 port t PC card (PCMCIA CARD) slot PCMCI A CA RD i Battery pack y Reset switch u Battery pack release latch 24
q Modem port Plug the modular cable into this port to connect the telephone line via the built-in modem. w CF CARD slot (CF CARD) Insert a CF card into this slot. e RGB port (RGB) Connect an external monitor using the supplied RGB cable. r IEEE1394 port (1394) Connect a digital equipment, e.g., digital video camera to this port. 1 t PC card slot (PCMCIA CARD) Insert a PC card into this slot. y Reset switch Press this switch with a thin, pointed object to forcibly turn off the unit.
Keyboard This section describes the basic functions of the keyboard. Actual keyboard functions may differ in accordance with the application you are using. q w e r t y !8 !7 u i i !6 !5 !4 !3 !2 !1 The above keyboard layout shows the US version.
No. Key Key Name Description q Esc Escape Cancels an operation. w F1 ~ F12 Function Execute specific functions. e Ins Insert Toggles character insertion on and off. r Del Delete Deletes the character to the right of the cursor. t Pause Pause Pauses a process. y Back Space Backspace Deletes the character to the left of the cursor. u Enter Enter (Return) Enters data or inserts a carriage return. i Shift Shift Shifts the keyboard between upper case and lower case.
Key Combinations • Key combinations where you must hold down one key and press a second key are indicated by a plus symbol. This key operation shift locks the keyboard for uppercase character input. Perform this operation again to unshift the keyboard. Caps Shift + Lock Ctrl + Alt + Del Places a displayed image of the entire screen onto the clipboard. Fn + Prt sc Alt Restarts the system without turning off power. + Fn + Del Places a displayed image of the active window onto the clipboard.
• The following shows the key combinations that are available with the Fn key. This is called the “hot keys” function. Fn + F1 Increases or decreases LCD brightness. F2 Fn + F3 Puts FIVA into Standby Mode. (Pages 47, 96) Fn + F4 Puts FIVA into Hibernation Mode. (Pages 48, 96) Fn + F5 Increases or decreases speaker sound volume. 1 F6 Fn + F7 Stops speaker sound. Fn + F10 Cycles through monitor function in the following sequence: LCD(FIVA) → CRT* → CRT* and LCD(FIVA) → LCD(FIVA).
Control Buttons and Stick FIVA has a stick, two control buttons and a center button to control the pointer ( ). • Stick This can be used to control the pointer on the screen. Put a finger on the stick and move it in every direction to control the pointer on the screen. The pointer speed can be changed according to the force you press the stick. When you press the stick strongly, the pointer speed becomes fast. Pressing the stick straight is the same operation as pressing the left control button.
The following operations can be performed with the control buttons. Function Click Double-click Drag and drop Click with the right control button Control Button Operation Move the pointer to the desired position and press the left control button once. This button is used to select OK, Next, etc. Move the pointer to the desired position and press the left control button twice in succession. You can start up an application. While holding down the left control button, move the pointer with the stick.
Changing a stick cap The stick cap is an expendable item. It can be replaced with a supplied new one when it is worn. Stick cap (supplied) Important 32 Put the cap on the stick firmly. Otherwise, the cap may damage the LCD monitor when you close the display panel.
Before Using FIVA for the First Time Though operation is possible using the AC adaptor only, it is a good idea to attach the battery pack and charge it before using FIVA for the first time. Setting and Removing the Battery Pack When you set the full-charged battery pack, you can use this unit without connecting the AC adaptor. Make sure you correctly set the battery pack so it does not come off accidentally during unit operation.
To remove the battery pack Before removing the battery pack, be sure to turn off the power. (When the AC adaptor is connected to FIVA and a power outlet, you can remove the battery pack without turning off the power.) 1. Close FIVA and turn it over. 2. While sliding the battery release latch in the direction indicated in the illustration below, pull the battery pack from FIVA. Make sure you have a firm grasp of the battery pack when you pull it from FIVA.
2. Connect the plug of the AC adaptor to the AC adaptor IN port (DC IN 16V) on the side panel of FIVA (e). q 1 e w The BAT ( ) indicator lights orange while the battery is being charged, and the indicator lights green when the battery is fully charged. If the BAT ( ) indicator lamp goes out during charging, it means FIVA’s internal protection circuitry has activated to cancel the charge operation. If this happens, try disconnecting the AC adaptor and battery from FIVA, and then resetting them.
Note Important 36 • If the battery pack is attached to FIVA, do not unplug the AC adaptor until the BAT ( ) indicator lamp turns green (full charge). This helps to extend battery pack life. • The battery pack requires period replacement. The end of a battery pack’s service life is indicated when the battery pack powers FIVA for a relatively short period after a full charge. When this happens, replace the battery pack with a new one.
Using FIVA Chapter 2 This chapter covers such operations as turning on power, setting up Windows Me, and other operational procedures.
Turning on Power the First Time The first time you turn on the power, you must perform a Windows Me setup procedure. You need to perform this procedure only once. After that, Windows Me will boot up automatically when you turn on the power. The Windows Me setup routine lets you make the settings listed below. The “Product Key” is sealed on the bottom of this unit. Have it on hand when performing the setup procedure for the first time.
4. The CASIO logo appears for a few moments. And, the “Windows Me” screen appears. After the CASIO logo appears, the screen goes blank and then Windows Me starts up. After that, “Welcome to Microsoft Windows” screen appears. To use the Windows Me, follow the procedure below. First, click Next.
5. “Select your time zone” appears. Select your local area and click Next. 2 6. Read and agree to the Software License Agreement. • Be sure you read the terms and conditions of the Microsoft Software End-user’s License Agreement. • To read all, use the or button, or PgUp ( Fn + ) or PgDn ( Fn + ) button to scroll the screen. Click here. • Click the option button next to “Yes, I accept this agreement.”, and then click Next.
7. Input the Product Key number. • Input the Product Key number that is printed on the Certificate of Authenticity affixed to the back of this unit, and then click Next. All the letters and numbers you type in this screen are automatically input in upper case, even if you do not press the Shift key. Important Make sure you input the Product Key number correctly. Take care that you distinguish between the letter O and the number 0 (zero).
8. Register with the Microsoft. You can register with the online system. If you do not want to register immediately, you can register afterward. 2 9. When Setting is complete appears, click the Finish button.
• The above screen appears after Windows Me setup is complete. Now Windows Me will start up whenever you turn on FIVA. For full details on using Windows Me, see the “Windows Me Quick Start Guide” manual that comes with FIVA. Note 44 This unit comes with a number of pre-installed applications. See page 80 of this User’s Guide for information about how to use these applications.
Shutting Down the Power This section describes various ways to turn off the power. Select “Shut down”, “Restart”, “Stand by” or “Hibernate” from the Start menu. The following ways are also available. • Slide the power switch so that the unit enters the “Stand by”, “Hibernate” or “Shut down” mode. However, if you keep sliding the power switch for more than 4 seconds, the system is quit forcibly and the power is turned off (see “Preferences “ on page 90).
To shut down Windows Me from the Start menu In this mode, Windows Me is completely shut down and FIVA is consuming almost no battery power. This mode extends battery life but requires that Windows Me be restarted from the very beginning to restore power. This means that the status of Windows Me or any application that is running is not maintained in memory when the Power Off mode is entered. Enter the Power Off mode if you do not plan to use FIVA for a long time and before installing expansion memory. 1.
To enter the Standby Mode from the Start menu The status of LCD, Windows Me and any applications that are running is retained in memory, so they can be restored in a shortest time after leaving the Standby Mode. In Standby Mode, FIVA always consumes slight power. Sliding the power switch restores FIVA to the mode before you turn off the power.
To enter the Hibernation Mode from the Start menu The Hibernation Mode is recommended when you do not plan to use your computer for a long time, but you want to restore the status of Windows Me and your applications when you return. The state of Windows Me and other applications that were active when the power save mode is entered are written to FIVA’s hard disk. This process takes some to complete, after which FIVA automatically powers down so that almost no power is supplied.
Important • Avoid entering the Hibernation Mode while a communication operation is in progress, or while a peripheral (disk, printer, etc.) is in use. Entering the Hibernation Mode while a communication operation is in progress will cause a communication error on the other computer. • You can reset FIVA and force power to turn off by holding down the power switch for 4 seconds. Note that FIVA does not beep if sound output is muted.
Using the Sleep function FIVE has the Sleep function to save power as a standard function. This means the Hibernation Mode or Standby Mode described before. When this unit is not used temporarily, set the unit to the Sleep Mode so that the available time of battery pack can be prolonged. (The time to maintain the Sleep Mode differs according to the battery charge capacity of battery pack.
Turning On Power Slide and hold the power switch ( ), and then release it when the PW-LED lights up. Turning on FIVA power after you set up Windows Me starts up Windows Me. First, perform the log-on operation to make the unit recognize the user. If you use the unit alone and also not connected to a network, you can set the unit so that the screen above does not appear. Important Do not turn on and off in a short time.
Using the Battery Pack FIVA comes with a standard battery pack when you purchase it. Once you charge the battery pack, you can use FIVA without being connected to a power outlet via the AC adaptor. FIVA also has a number of power management functions that make battery operations more efficient. Note See page 33 for details about how to set the battery pack to FIVA, and page 34 for information about charging the battery pack.
Checking the Power Indicator Lamp Color The indicator lamp will start flashing red and a warning screen will appear if the battery charge level drops while FIVA is operating under battery power only. When this happens, connect the AC adaptor and charge the battery. If you continue to use FIVA under the low power condition, FIVA will automatically enter the Hibernation Mode when the battery charge level drops more. When a warning screen appears, perform one of the following procedures.
Checking with Mobile Cockpit Mobile Cockpit’s battery monitor function lets you graphically view the charge level of the battery at any time. See page 86. You can obtain even more detailed information about the battery pack by displaying the Battery control. Battery Control button Click here. Displays battery information. Using the Battery Pack Efficiently The amount of operating time you get from the battery pack is greatly affected by operating conditions and how you use it.
Important Be sure you use the correct battery pack. On the “Options List” (page 141) comes with FIVA, find the battery pack whose model number matches the number marked on the battery pack. You can also get an idea of the battery pack’s current condition by checking the Mobile Cockpit’s Battery Control. Click here. 2 See “BATTERY LIFE” in the Battery Control of the Mobile Cockpit. If the signal is red, you have to replace with a new battery pack.
Using the One Touch Operation Buttons There are 3 types of Keys; “E-mail button”, “Internet button” and “Memo button”. P1 P2 P3 One touch operation buttons B MODE A MODE E-mail button (P1) When the E-mail button ( ) is pressed, the E-mail software starts up. The “Microsoft Outlook Express” is installed as the E-mail software when you purchase. • For using the E-mail button, the setting to connect to an internet or the contract with an internet provider is also necessary beforehand.
Memo button (P3) When the Memo button ( ) is pressed, the “Microsoft Notepad” software starts up. The “Notepad” is installed as the memo software when you purchase. Changing the function of each button The function of each button can be changed in the “Settings” → “One Touch Operating Button Setting” of the Mobile Cockpit. (See page 86.) Important The “Mobile Cockpit II” activates the application function of the one touch operation buttons (P1: E-mail, P2: Internet, P3: Memo).
Supplementary Information Chapter 3 This chapter contains information about how to connect peripherals and about convenient functions.
Connecting Peripherals Peripherals mean a a CD-ROM drive, an external floppy disk drive, etc. that can be connected to this unit. This section describes how to connect peripherals and how to install PC cards or expansion memory. For the peripherals that are not described in this User’s Guide, see the manual that comes with the peripheral you are installing. Important Be sure to turn off the power of FIVA and unplug the power cord before connecting peripherals.
To connect microphone Connect the microphone plug to the microphone port ( ) on the front of this unit. Use a microphone which has the monaural mini jack (ø3.5 mm). Connect the microphone plug to the microphone port ( ). To disconnect the plug, pull it out from the port by holding the plug. Connecting to the LAN port By using the LAN port, you can connect to the standard Ethernet (10Base-T/100Base-TX). An Ethernet cable is necessary when connecting to the Ethernet.
Connecting to the modem port The built-in 56kbps modem provides a high-speed data communication and facsimile transmission/reception capabilities. (The actual communication speed depends on the local line conditions, etc.) You can use this function by connecting the modular cable to the modem port. The built-in modem can be connected to the general telephone line (analog). It cannot be connected directly to the digital line (the ISDN circuit, etc.).
Connecting to the USB port The USB (Universal Serial Bus) is a standard interface specification for the connections of the USB compatible peripherals such as a keyboard, mouse, printer, scanner, etc. to the computer. Connecting to or disconnecting from the USB port can be performed even when the power of this unit is turned on. Insert the plug of the USB cable to the USB port securely with the plug’s mark ( ) facing upwards.
Using the floppy disk drive The optional USB compatible floppy disk drive (MPC-240FDD) is available for this unit. The two types of floppy disk can be used with this unit. One is 2DD floppy disk with the amount of 720 KB and the other is 2HD floppy disk with the amount of 1.44 MB. (For details, see the manual that comes with the floppy disk drive.) Connecting the floppy disk drive allows you to store data and to copy data to other computer. Connect the MPC-240FDD to the USB port of this unit.
Connecting a Printer A USB compatible printer can be connected to the USB port of this unit. Installing the printer driver is required for using the printer. The printer driver that comes with this unit or one (stored in a CD, floppy disk, etc.) that comes with the printer can be used. When a printer compatible with the plug and play function is connected for the first time, the Add Printer Wizard screen appears. Follow the procedure displayed on the screen to use the printer.
Using External Monitor Connect an external monitor to FIVA so that the operation can be performed while viewing the big-screen. (Use the supplied RGB cable for the connection.) Opening the display panel is required for using the external monitor as the unit enters the Sleep Mode automatically when the display panel is closed. To connect a Monitor 1. Turn on the power of FIVA after closing an application, etc.
Note You can specify the resolution and number of colors only when using an external monitor. Right click on the Windows Me desktop and select Properties on the menu. The Display Properties appears. Click the Setting tab and then make the Colors and Screen area settings you want. These settings can be changed. The following table shows the setting combinations that can be made for Colors and Screen area.
Connecting to the IEEE1394 port Various devices such as digital video camera, etc. can be connected to the IEEE1394 port. The procedure to connect a device to the IEEE1394 port is described in this section. Connect the plug of the cable to the IEEE1394 port securely. Pull out the lid on the left side of the unit so that the IEEE1394 port appears. When a device compatible with the plug and play function is connected, the icon appears in the My Computer screen. Click the icon to perform the operation.
Using a PC Card Using a PC Card FIVA has one PC Card Standard PCMCIA TYPE II PC card slot (including card compatible with the Card BUS). You can use a PC card to connect various peripherals such as the CDROM drive or scanner, etc. Almost of all PC cards can be inserted or removed while the power of the unit is turned on. For the detail of using the PC card, see the manual that comes with the PC card.
1. Stop using the PC card. Click the Mobile Cockpit PC Card button ( ) or double-click the PC Card button ( ) on the indicator area to open PC Card (PCMCIA) Properties. Select the card name from the list, and then click Stop to cut off the power to the PC card. Select the card here. Click the Stop button. ➔ When “You may safely remove this device.” appears, click OK. 2. Press the PC card eject button. When the PC card is ejected, pull it out the rest of the way by hand.
Inserting a PC card Make sure that the PC card is oriented correctly when you insert it into the PC card slot. Inserting the PC card into the slot upside down forcibly may damage the cable or the slot. 1. Connect the cable to the PC card. And, push the eject button into the slot. 2. Making sure that the PC card is oriented correctly, insert the PC card into the PC card slot.
Using a CF Card Using a CF Card FIVA has one CF TYPE I/II CF (Compact Flash) card slot. You can use a CF card to load the expansion memory or hard disk. Almost all CF cards can be inserted or removed while the power of the unit is turned on. For the detail of using a CF card, see the manual that comes with the CF card. Important • Long term use of CF card that generates a lot of heat can cause unstable card operation and malfunction and also can create the danger of burns.
Inserting a CF card Make sure that PC card is oriented correctly when you insert it into the CF card slot. Inserting the CF card into the slot upside down forcibly may damage the connector or the slot. 1. Remove the CF card slot lid. (Keep the lid in order not to lose it.) 2. Making sure that the CF card is oriented correctly, insert the CF card into the CF card slot. Though you may be aware of some resistance while inserting the CF card, push the card carefully and horizontally until it goes to the last.
Removing a CF card Before removing a CF card from the slot, first click the Mobile Cockpit PC Card button ( ) and disable CF card operation and then remove the CF card. And, be sure that an application or system is not running. The CF card can be inserted or removed even when the power of this unit is turned on or off, but not when the unit is in the Sleep Mode. 1. Stop using the CF card.
Loading an Expansion Memory You can expand the FIVA memory by installing an expansion memory board. Expanded memory can help applications and large-volume data to be operated at a high speed. Use the optional expansion memory board (MPC-252RAM/253RAM) or one specified by CASIO. To increase the memory to maximum 192 MB, it is necessary to remove the expansion memory board from the expansion slot and install the optional expansion memory board (MPC-253RAM: 128 MB).
3. Turn FIVA again so that it is facing up. Push the attachments towards the unit and lift them slightly (q) and then remove the hooks. And lift the attachments to remove them (w). w q w q hooks 4. Open the display panel. Remove the two screws (+) on both sides of the keyboard and turn the keyboard toward you slowly. (Keep the screws in order not to loose them). When turning the keyboard toward you, do not hold the keys. The keys may be removed. Remove the screws.
5. When the keyboard is removed, the expansion memory slot appears. Pushing the both sides of the expansion memory slot outwards (q), pull the installed expansion memory board out (w). Do not press down or bend the board when removing it. q q w 6. Steps 6 to 7 are the reverse procedure of steps 3 to 4. Replace the keyboard and secure it in place with the two screws (+). 7. Replace the two attachments.
Installing the expansion memory board Perform steps 1 to 4 of the procedure of “Removing the expansion memory board.” 5. When the keyboard is removed, the expansion memory slot appears. Aligning the depression of the expansion memory board (q) with the protrusion of the expansion memory slot (w), insert the board on the slant until it goes to the end (e) after making sure that the board is oriented correctly, and then press it down (r) until it is locked into place.
Using the “Mobile Cockpit II” The CASIO original application software “Mobile Cockpit II” is installed in this unit. The “Mobile Cockpit II” is always displayed as a tool bar on the desk top of the Windows Me and it allows you to perform the convenient settings easily. When the “Mobile Cockpit II” is not displayed on the screen, click in the indicator area to start up. * After this, “Mobile Cockpit II” is described as the mobile cockpit.
q Switching the tool bar The Mobile Cockpit has the Control bar and Launcher bar. You can switch the display between them depending on your usage. When you click or , the display is switched between the Control bar and the Launcher bar. • Control bar It allows you to specify each setting easily. When you click the appropriate button, the window appears. So, you can follow the procedure displayed in the window.
2. Confirm that the button of the application you registered is displayed in the Launcher bar. To register applications from the “My Computer”. 1. Drag and drop application you want to register from the My Computer in the Windows Me to the Launcher bar. Drag and drop the application you want to register in the tool bar. 2. Confirm that the button of the application you registered is displayed in the Launcher bar. To start up the application you registered 1.
To delete the application you registered 1. Clicking the Switching the tool bar button in the Mobile Cockpit to switch to the Launcher bar from the Control bar. 2. Right-click the button of the application you want to delete. Right-click the icon of the application. 3. Click the Delete in the menu. When you click the All Delete, all the applications you registered are deleted. 4. Confirm that the button of the application you deleted is not displayed in the “Launcher bar”.
w Panel Changing the display position of the tool bar By dragging the panel, the “Mobile Cockpit II” can be displayed in the following 5 positions of the desk top screen.
Pop-up menu When you right-click this part, the pop-up menu is displayed. Auto hide When the check mark is put in the Auto hide, the tool bar is hidden. In this setting, when you move the pointer to each corner of the screen, the tool bar appears and when you move the pointer aside from the corner of the screen, the tool bar is hidden. When the check mark is not put, the tool bar is always displayed. Always on top The tool bar in the Mobile Cockpit is always displayed in front.
Version info This displays the version information of the Mobile Cockpit. Exit This closes the application of the “Mobile Cockpit II”. When you want to use the tool bar of the “Mobile Cockpit II” again after closing it, you need to start up from the “FIVA tool”. e Settings You can specify 4 settings of the “One Touch Operation Buttons”, the Wake On Timer, Power Management and Settings.
You can display the Windows standard files by pressing the referring button and select desired application and then register it in each of one touch operation buttons. If you do not register the application in the button, leave the textbox vacant. In this case, the application does not start up even when you press the button.
Important You can also specify the power management setting of this unit by selecting “Control panel” → “Power Management” → “The property of Power Management”. Note that the setting in the “Power Management” has priority over the setting of the “Power Management Setting” in the Mobile Cockpit.
ECONOMY USER AC This setting is when the power is supplied to this unit by the AC adaptor. 3 USER DC This setting is when the power is supplied to this unit by the battery pack.
Settings (Preferences) The initial setting can be set to use this unit. The 5 settings of “Built-in LAN on/off”, “Priority of starting up devices (Boot sequence)”, “Power Switch Action”, “LCD Panel Action” and “Switch the PC Card/PC Card Pro button” can be specified. When the restart is necessary after the setting is changed, the display to restart this unit appears after you press the OK button. Built-in LAN on/off When you do not use the built-in LAN, remove the check mark the check box .
Power Switch Action You can set to each of the “Stand by”, the “Hibernate” or the “Shut down” when you slide the power switch to turn off the power while the unit is used. LCD Panel Action You can set to each of the “None”, the “Stand by”, the “Hibernate” or the “Power Off” when you close the display panel while the unit is used. Switch the PC Card/PC Card Pro button You can change the setting of the “PC card” button of the tool bar in the Mobile Cockpit according to this setting.
t Brightness control You can adjust the brightness of LCD monitor. Adjust the brightness of LCD monitor by dragging the control bar. After adjusting it, click the “Save the user mode” to save the items of the “LCD monitor setting” in the “Setting of power management” described before. If you do not save the setting, the LCD monitor is displayed in the brightness previously set in the “LCD monitor setting” of the “Setting of power management” when you restart the unit.
i PC card properties This button has the two functions and the display can be switched in the “Settings” described before. The ( ) button opens the PC card properties (PCMCIA) of the Windows. The ( ) buttons connects or disconnects two PC cards each other. An example of “Settings” ( ) button Selects Control panel → PC card (PCMCIA) and opens the PC card (PCMCIA) properties window. When you remove the PC card, perform the operation in this window.
( ) button Connects or disconnects the PC card (PCMCIA). When this button is clicked, this unit confirms the connecting condition of the PC card, and connects the PC card when the PC card is disconnected, or disconnects it when it is connected. • Connecting operation After inserting the PC card into the slot of this unit, click the ( ) button. The connecting operation is automatically performed with the plug and play function.
!0 Battery Control This window displays the condition of the battery pack. You can check the connecting condition of the battery pack, the remaining power of the battery pack or the time to replace with the new battery pack, etc. The reading of the Rated capacity does not guarantee the actual capacity of the battery pack which is being used. Therefore the capacity of the full-charged battery pack and the Rated capacity do not coincide with each other.
!1 Battery indicator This indicator always displays the remaining power or estimated remaining time of the battery pack, etc. • When using only the battery pack The estimated remaining time of the battery pack is displayed. • When using the AC adaptor and the battery pack The estimated time to reach a full charge is displayed. • When using only the AC adaptor “NO BATTERY” appears. • CALCULATE “CALCULATE” appears right after the battery pack is installed.
Appendix This appendix tells you how to solve the problem and how to restore FIVA to the default settings.
System Restoration Using the supplied “Product Recovery CD-ROM”, you can restore the system and applications back to the factory defaults. When Windows Me does not function correctly or when Windows Me does not start up even if you turn on the power, restore the system with the supplied “Product Recovery CD-ROM” (after this, the way to resume the system is described as “System restoration”). • The optionally available CD-ROM drive is required to use the “Product Recovery CD-ROM”.
Starting up from the “Product Recovery CD-ROM” Though FIVA is preset to start up from its hard disk, you can start up FIVA from “Product Recovery CD-ROM” in a CD-ROM drive to restore the system and applications. The following procedure is performed with the CD-ROM. 1. 2. 3. 4. 5. Turn off FIVA and disconnect all peripherals. Connect the CD-ROM drive. Insert the “Product Recovery CD-ROM” into the CD-ROM drive. Turn on FIVA. The CASIO logo appears. 6. Press F2 a few times.
Setting the Partition of Hard Disk/Initializing the Hard Disk Starting up from the “Product Recovery CD-ROM” automatically starts the system restoration routine. Follow the instructions that appear on the screen. 1. Specify hard disk space which should be allocated for Hibernation Mode data. Start up from the “Product Recovery CD-ROM,” and the screen shown below appears after an initial process is performed. Type Shift + Y (upper case Y ) to delete all data on the hard disk and start installation.
2. Creating the Linux preferences. ================================================================= Initialize the Linux environment ================================================================= Please wait a little. For details of Linux, see the supplied booklet. After that, the hard disk will be initialized. 3. After restarting, change CD-ROM.
4. Start installation of Windows Me. When the screen shown below appears, press Enter . Me Me • • • 5. Run Scan Disk. When the screen shown below appears, press Enter to starts Scan Disk. Scan Disk checks the hard disk for errors. Note Scan Disk is a program that checks hard disk for errors, and corrects any errors it finds.
6. Exit Scan Disk. After Scan Disk finishes its check, type Exit to exit it. Exiting Scan Disk changes starts Windows Me installation. The screen changes, and FIVA prepares for Windows Me installation and the Windows Me installation wizard starts. Click Next.
7. Select the directory where you want Windows Me installed. Make sure that C:\WINDOWS is selected as the installation directory, and then click Next>. If you want to install Windows Me in a different directory, select “Other directory”, and then type in path to the directory. Of course, you can leave the default C:\WINDOWS as it is. 8. Select the kind of setup you want. Make sure that Typical is selected and then click Next>.
9. Select the Windows Me files you want installed. Make sure that “Install the most common components recommended.” is selected, and then click Next>. Important You can select “Display the list of components so I can choose the ones I want to install.” you like, but be sure to select “Install the most common components recommended.” if you want to restore the system to its initial factory defaults. 10. Specify your geographic area.
11. Specify your time zone. 12. Skip the screens for making a startup disk. Click Next> on the screen shown below. A startup disk is a floppy disk that can be used when Windows Me does not start up correctly. You can find the cause Windows Me does not function correctly by starting up the system with the startup disk and performing troubleshooting steps.
Click the Cancel button when the screen below appears. In response to the confirmation message that appears, click Cancel. The screens for making a startup disk is skipped. A startup disk will be made after the installation of Windows Me is complete. Note 108 • See page 121 for details on making a startup disk. • The CD-ROM drive is treated as Drive A: during the system restoration operation. Because of this, you will be unable to make a startup disk with the connected floppy disk drive.
13. Start the file copy operation. When the screen shown below appears, click Finish to start the file copy operation. It takes about 15 minutes to copy all files. After that, you do not need to operate. Windows Me is installed automatically. FIVA will automatically restart with Windows Me when the installation of Windows Me is complete. 14. After FIVA restarts, the following screen appears. Click OK.
15. Specify the computer name and work group name respectively. Input a computer name and work group name and then click Close. For example, Input “FIVA” as a computer name and “CASIO” as a work group name. Note When using this unit in a network, ask the network manager about specifying a computer name and work group name. After that, “Setting up hardware and finalizing settings” described below will be processed.
Making Windows Me Settings Use the following procedure to make Windows Me settings required for installation after formatting the hard disk in the procedure above. 1. Input your user information. • You must input your name, but input of the company name is optional. Pressing the Tab key after inputting your name causes the cursor to jump to the company name text box. • After inputting your name and company name, click the Next button. 2. Read and agree to the Software License Agreement.
3. Input the Product Key number. • Input the Product Key number that is printed on the Certificate of Authenticity affixed to the back of this unit, and then click Next. All the letters and numbers you type in this screen are automatically input in upper case, even if you do not press the Shift key. Important Make sure you input the Product Key number correctly. Take care that you distinguish between the letter O and the number 0 (zero).
• The Setup Wizard copies files from the CD-ROM and installs Windows Me. 4. The screen changes to the “Windows is now setting up the following items.” screen from the Setup wizard.
5. The setup is performed automatically and after that, the Windows Me restarts automatically. 6. Type in your user name and password. Type in your user name and password. If you do not input in the name and password, this screen will not appear when you start up Windows Me. Type the user name and then press Tab to move the cursor to the password text box. As you type your password, an asterisk appears in the textbox for every character you type. After you input the password, click the OK button.
When the Windows Me starts up, the Welcome to Windows Me screen appears. 7. The Windows Me desk top screen appears. 2. Turn on the power of this unit. 3. While the CASIO logo is displayed, press F2 a few times until the BIOS setup screen appears. 4. Press F9 (SetUp Defaults) and confirm that Yes is selected, then press Enter . 5. Select Main by pressing . Select Keyboard by pressing , and then change Japanese to English by pressing the space key. 6.
Installing applications from the “Product Recovery CD-ROM” Installing the CASIO Applications Some applications are installed in this unit at the factory. The procedure you performed with the “Product Recovery CD-ROM” restores the hard disk to virtually the same state it was in when the FIVA shipped from the factory. Note, however, that the recovery procedure does not restore the following software and settings. The applications are not automatically installed from the “Product Recovery CD-ROM”.
4. Double-click the SETUP icon or AR405ENG.exe in the folder you opened. This launches the installer for the application. Follow the instructions that appear on the screen. FIVA TOOLS which includes Mobile Cockpit and other important system support utilities is strongly recommended to install. Note Mobile Cockpit makes it easy to adjust speaker volume, change serial port functions, etc.
Making Screen Settings Restoring the system causes the Windows Me display fonts and wallpaper to be set to initial default settings. Use the following procedure to change these settings. 1. Right-click on the Windows Me desktop. 2. From the menu that appears, select Properties to display Display Properties. 3. Select the wallpaper. Click the Background tab, and select the desired picture from the Wallpaper list. 4. Click OK to close Display Properties.
Installing Microsoft Me Components The components available after you install Microsoft Windows Me are different from those installed on FIVA when you purchase it. Use the following procedure to install the components that are available when you purchase FIVA. 1. Insert the “Microsoft Windows Me Operating System CD-ROM” into the CD-ROM drive. 2. On the Windows Me Taskbar, click Start, point to Settings, and then click Control Panel. Next, double-click the Add/Remove Programs icon.
3. Click the Windows Setup tab. The names of components that are already installed have a checkmark next to them. Select from this list. Click here to specify which parts you want installed. 4. Select the components you want to install. Select a component from the list, and then click the Details button. For FIVA, you should check all components in the list except for the following. • Multilanguage Support • Commmunications cable connection, dial-up server, and virtual private network 5.
Making a Startup Disk A startup disk is a floppy diskette that contains the system files required to start up the system. It starts up the system without using the hard disk, so it comes in handy when you need to perform troubleshooting steps. Important The optional floppy disk drive is required to make a startup disk. 1. On the Windows Taskbar, click Start, point to Settings, and the click Control Panel. 2. Double-click the Add/Remove Programs icon. 3.
The following explanation on pages 122 to 128 is about the Terminal Equipment embedded in CASSIOPEIA FIVA series and described by following the rules. The Terminal Equipment is operable and compliant with the regulations in the United States and Canada only. For users of CASSIOPEIA FIVA series resident in other countries, the description and the instruction of the equipment are not applicable.
The telephone company may make changes in it’s facilities, equipment, operations or procedures that could affect the operation of the equipment. If this happens the telephone company will provide advance notice in order for you to make necessary modifications to maintain uninterrupted service. If trouble is experienced with this equipment FB1456VQL12, for repair or warranty information, please contact CASIO INC. (973.361.5400).
This equipment is registered with the FCC under Part 68 as a component device for use with CASIO COMPUTER CO., LTD. models CASSIOPEIA FIVA Series. In order for the FCC registration of this product to be retained, all other products used in conjunction with this product must also be FCC Part 68 registered for use with this host. If any of these components are not registered, then you are required to obtain FCC Part 68 registration of the assembles equipment prior to connection to the telephone network.
For users in Canada NOTICE: The Industry Canada label identifies certified equipment. This certification means that the equipment meets telecommunications network protective, operational and safety requirements as prescribed in the appropriate Terminal Equipment Technical Requirements document(s). The Department dose not guarantee the equipment will operate to the user’s satisfaction.
Main functions of the modem Network control functions Automatic Send and Receive by built-in NCU Modem protocols Conforms to the following protocols and possible to communicate in full duplex V.21/V.22bis/V.32/V.32bis/V.34/ V34bis/V.90/K56flex/V.27ter/V.29/V.17 Data compression protocols Conforms to MNP 5, ITU-T V.42bis Error control protocols Conforms to MNP 4, ITU-V.42 Function Protocol ITU-T V.21 ITU-T V22bis ITU-T V32 Data communication (Send and Receive) ITU-T V32bis ITU-T V34 V.
FIVA with embedded FB1456VQL12 Modem port PCMCI A CA RD Connecting to telephone line 127 Appendix The modular cable that comes with the modem shall be used to connect the modem to the telephone line. In this case, if the telephone line is available through the modular jack, it is possible to connect the modem to the telephone line directly. Otherwise, an adapter is required or modification of the telephone line socket might be necessary.
Connecting to the FIVA Turn off the power of the FIVA first and then connect as depicted below. Dedicated Modular cable Connector for communication (for connection to the dedicated Modular cable) Caution on operation of the product To use this product, operate as instructed below since this is designed to be embedded in the FIVA. 1. The product must be set in a case upon use. 2. Do not leave the product in the area such as hot and humid or exposed to direct sunlight since it is a precision product. 3.
Troubleshooting This section describes what you should do whenever you start to experience problems with operation of FIVA, its peripherals, or applications you are running. Basic Troubleshooting Note the following important points whenever you are experiencing problems. 1. Take your time. If the system seems to hang up, resist the urge to turn off power, click things on the display, or press keyboard keys. The operation you are performing may simply require a bit more time. 2.
System Outline Have the following information handy whenever you request user support.
Power Supply Symptom Recommended Action Power does not turn on. • Nothing happens when the power switch is turned on. • Power indicator lamp is flashing red. • Power turns on but immediately turns off. Use the AC adaptor to power FIVA. • Confirm that FIVA is connected to the AC adaptor, the AC adaptor is connected to the power cord and the power cord is connected to the power outlet securely. • Confirm that the battery pack is installed correctly. • Use a fully charged battery pack.
Display Problems Symptom Recommended Action Nothing on the display, Power indicator lamp is not lit. Slide the power switch to turn on power. Display has gone blank. Press the control button. FIVA’s power saving function causes the display to go blank if no operation is performed for some time. See page 91. The operator cannot remember the Windows Me password. Input a new user name in the Windows Log On screen, or restore the system to its factory defaults.
Software Problems Symptom Recommended Action Is a pair of headphones plugged into FIVA? If so, unplug it. • Change the volume control setting. • Remove the check when the setting of “Volume control” is set to the “mute”. Nothing comes out of the speaker, even when a pair of headphones is not plugged in. Click the Mobile Cockpit Sound Volume icon and then use the slider to adjust speaker volume. Sound output is too slow. Turn off sound playback and then turn it back on again. Sound output is broken.
Peripheral Operation Problems Symptom Recommended Action Cannot use a PC/CF card. Check to make sure the PC/CF card is inserted correctly into the PC/CF card slot. The unit is locked when using the PC card or USB device. If you set the unit to the Sleep Mode or Hibernation Mode while the device connected to the PC card is in use, the unit may lock up when recovering.
Text Input Problems Symptom Recommended Action The keyboard is shift locked. Press Shift + Caps Lock to shift lock the keyboard between upper case and lower case characters. Nothing happens when keyboard keys are pressed. Turn FIVA power off and then back on again. Nothing happens when the Power switch is turned on. Press Ctrl + Alt + Del . Nothing happens when Ctrl + Alt + Del are pressed. Press the RESET switch. See page 24. Typing letter keys inputs numbers.
General Operation Problems Symptom Recommended Action Power indicator lamp flashes red immediately after charging the battery pack. Purchase a new battery pack and replace the current one. Battery packs tend to lose their ability to charge after long use. FIVA suddenly hangs up. • If you suspect that the problem is due to low battery power, connect the AC adaptor and charge the battery.
General Operation Problems (continued) Symptom Recommended Action Hot keys do not work. Click the Taskbar’s Start button and start up Mobile Cockpit from the Programs menu. Mobile Cockpit is not displayed. • If Mobile Cockpit is not running, click the Taskbar’s Start button and start up Mobile Cockpit from the Programs menu. • If the Mobile Cockpit toolbar is hidden, click the Mobile Cockpit icon on the Taskbar and then uncheck the Hide option on the menu that appears. The pointer does not move.
Problems Following Restoration of the System Symptom Recommended Action Standard bundled applications do not work. Some of the bundled applications are not reinstalled when you restore the system. Use the “Product Recovery CD-ROM” to reinstall all the applications. Screen fonts are too small. Use Display Properties to change display font size settings. Wallpaper is different. Use Display Properties to change the wallpaper setting.
Specifications Model CPU Built-in Cache Memory BIOS ROM Standard/Max. Memory Slot VRAM Monitor Device*1 Monitor Functions Resolution Input Device Keyboard Operation buttons Pointing device Hard Disk Sound Functions LAN IEEE1394 Interfaces USB*2 RGB PC Card Slot*2 MPC-206E Transmeta Crusoe TM5600 500MHz Transmeta Crusoe TM5600 600MHz 128KB (1), 512KB (2) 512KB 96MB/192MB 128MB/192MB 1 expansion slot 2MB (SMI LynxEM+) 8.4-inch TFT color LCD SVGA (800 × 600 dots), 16,770,000 colors max.
Power Require- Input ments Battery Capacity*3 Battery Charge Time*3 Dimensions with standard battery pack Approximate weight with standard battery pack Standard battery pack dimensions Standard battery pack approx. weight Operating Environment DC16V from AC adaptor (Input: 100V~240V AC, 50/60Hz) Lithium-ion battery, equipped as standard Standard Battery Pack: Approximately 4.5 hours Large-capacity Battery Pack*2: Approximately 9 hours Power On: Approximately 2.
Options List The useful options shown below are available for use with the FIVA MPC-205E/206E. Memory Expansion DIMM Board (Product No. MPC-252RAM) 64MB MPC-253RAM) 128MB AC Adaptor (Product No. MPC-277ADPE) CD-ROM Drive (Product No. MPC-142CDD) Large-capacity Battery Pack (Product No. MPC-274LBAT) Battery Pack (Product No. MPC-273BAT) CD-ROM DRIVE Interface Card Floppy Disk Drive (Product No.
International ENERGY STAR® Program As a member of the International ENERGY STAR® Program, CASIO products have been judged to meet International ENERGY STAR® standards. ENERGY STAR® is a U.S. registered mark. The information regarding International ENERGY STAR® Program attached to this product and found in its manual, advertising pamphlets, and so on, is applicable under our Power Management software in Windows Me. When booting from B mode, it is not applicable.
User ’s Guide MPC-205E/206E FIVA User’s Guide (Product No.: MPC-205E/206E) P1 P2 P3 MODE MODE LA CASIO COMPUTER CO., LTD. 6-2, Hon-machi 1-chome Shibuya-ku, Tokyo 151-8543, Japan Printed on recycled paper. Printed in Taiwan B A N Thank you for purchasing the CASIO MPC-205E/206E. This guide describes the basic operations of the MPC-205E/206E. Read this guide in its entirely before handling or operating this products, and keep it close at hand so it can easily referenced.