Mobile E-mailer (Version 1.0) User's Guide Trademarks Microsoft, Windows, and Windows NT are either registered trademarks or trademarks of Microsoft Corporation in the United States and/or other countries. All other product and company names mentioned herein may be the trademarks of their respective owners. l The contents of this document are subject to change without notice. l In no event shall CASIO COMPUTER CO., LTD.
Contents Getting Acquainted.........................................................................4 Starting Mobile E-mailer.......................................................................................4 Message List Screen............................................................................................5 Configuring Your Mail Service.......................................................6 Configuring a New Mail Service....................................................................
Working with Attached Files...............................................................................45 Attaching a File to an Outgoing Message.............................................................45 Working with Incoming Attachments....................................................................48 Using Folders.......................................................................................................50 Moving and Deleting Messages................................................
Getting Acquainted Mobile E-mailer is an application that makes it possible for you to send and receive email with your Pocket PC. The following are some of the useful features and functions available with Mobile E-mailer. l Search by addressee, subject, body text, etc. l Set up of up to 10 filters for grouping incoming e-mail according to subject, content, etc.
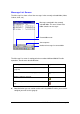
Message List Screen The Message List shows a list of the messages in the currently selected folder (Inbox, Outbox, Sent, etc.) Messages contained in the currently selected folder. This area is blank if the folder contains no messages. Current folder name Sort sequence Number of messages in current folder The Message List screen is starting point for a number of different Mobile E-mailer operations, like the ones described below.
Configuring Your Mail Service Before you can send or receive mail using Mobile E-mailer, you must first make certain Internet settings and configure your mail service. Mobile E-mailer’s Setup Wizard helps to take some of the work out of the setup procedure by providing you with step-bystep guidance. Configuring a New Mail Service In the following procedure, steps 4 through 10 are for configuring the modem connection, while steps 11 through 15 configure the mail service. 1.
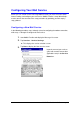
4. Tap Next. l This causes a screen like the one shown below to appear. Type in a connection name here (required for Modem Connection only). To use a previously specified modem connection, tap the button next to this box and tap the modem connection name in the list that appears. Specify the connection type. Select Modem Connection if you will be connecting through an Internet service provider (ISP) or Network Connection if you will be connecting to a network.
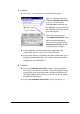
6. On the screen that appears when you tap Next - Yes in step 5, type in your user name and password. l You should normally leave the Domain box empty, unless your ISP or network administrator provides you such information. l Check the Save password option if you want Mobile E-mailer to remember your password. When this option is checked, you do not need to input your password each time you log in to your server. 7. Tap Next.
8. Tap Next to advance to the modem settings screen l Select Modem Tap the button and then select the modem type you are using. l Connection Properties If necessary, tap this button and set the dial properties. See "Configuring Your Modem" on page 14 for more information. 9. Tap Next to advance to the TCP/IP settings screen. l Normally, you should leave the initial default settings on this screen as they are. Do not change the default settings unless specifically instructed to do so by your ISP. 10.
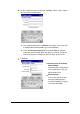
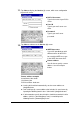
11. Tap Next to display the Service (1) screen, which starts configuration of your mail service. l POP 3 Host name Type in the name of your POP3 server. l User ID Type in your mail server user name. l Password Type in your mail server password. 12. Tap Next to advance to the Service (2) screen. l SMTP host name If your ISP provided you with different names for the POP3 host and the SMTP host, type in the SMTP host name here. l Return address Use this box to specify a return address. See the example below.
13. Tap Next to advance to the Service (3) screen. l Make the settings you want. 14. Tap Next to advance to the Service (4) screen. l Make the settings you want. l Check this box when you want to receive only messages that correspond to certain conditions defined by you. To define conditions, tap the Receive Mail Settings button. See “Configuring Incoming Mail Conditions” on page 15 for more information. 15. Tap Next to advance to the Configuration Check screen.
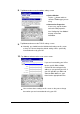
16. When all the settings are the way you want, tap Configure to configure the mail service and return to the service selection screen in step 2. • A mark is located next to the name of the service you just configured. This mark indicates that the service is currently selected. l If you want to configure another account, repeat steps 3 through 16. 17. To exit the service configuration procedure, tap OK. l This returns to the Message List screen.
Configuring Dial Properties When using a modem connection to dial into a mail server, you must configure your dial properties in accordance with the type of telephone circuit you are dialing through. To configure dial properties 1. Tap – Settings. Tap the Connections tab and then tap the Modem icon. 2. Tap the Dialing tab. 3. Use the Location box to select the location you want. l Home Select this option when connecting the CASSIOPEIA to a standard household phone line or to a portable phone.
NOTE You can also set dial properties while configuring a new service or changing an existing service. On the Phone Number screen that appears in step 7 of the procedure under “Configuring a New Mail Service,” tap the Dial Properties button to display the same screen as that in the above procedure. Make the settings you want and then tap OK top continue with the new service configuration procedure.
4. After everything is the way you want, tap OK to apply your settings. NOTE Except for the Baud Rate setting, it is usually best to leave the settings on the Connection Properties screen set to their initial defaults. Configuring Incoming Mail Conditions You can configure specific conditions that must be met by incoming messages before Mobile E-mailer receives them. For example, you could specify that only messages containing the word “urgent” in the Subject field should be received.
1. On the Service (4) screen, tap the check box next to Pick up only messages that satisfy conditions. so it is checked. l This enables the Receive Mail Settings button. 2. Tap the Receive Mail Settings button. l This displays the Receive Mail Settings screen. l Any conditions that you already have configured are listed on the screen. 3. Tap New to display a screen for configuring a new condition. 4. Type in a name for the condition, and then tap OK.
l Configure the condition you want, and then tap OK to return to the Receive Mail Settings screen. 5. Repeat steps 3 through 5 to configure other conditions, if you want. l You can configure up to 10 conditions for each mail service. l The conditions you configure are automatically assigned priorities, with the newest condition receiving the highest priority. 6. 7. Change the priorities of the conditions, if you want. l Tap and hold the name of the condition whose priority you want to change.
and hold the name of any condition name and then tap Restore on the shortcut menu that appears. This returns the conditions to the configuration they had when you originally displayed the Receive Mail Settings screen in step 2. l Restore works only one way, restoring previously saved configurations. You cannot use Restore to undo a previous Restore operation.
Editing Existing Incoming Mail Conditions You can edit the content of, rename, and delete existing incoming mail conditions. To edit the content of an existing condition On the Incoming Mail Conditions screen, tap the name of the condition whose content you want to change. This displays the condition definition screen. Make the changes you want and then tap OK to save them. To rename an existing condition On the Incoming Mail Conditions screen, tap and hold the name of the condition you want to rename.
New Mail Service” on page 6 to edit the configuration of the mail service. 4. After making the changes you want, tap Next until you get to the Configuration Check screen. 5. When all the settings are the way you want, tap Configure to apply them to the configuration. l This returns to the service selection screen in step 1. l Repeat steps 2 through 6 to edit other configurations, if you want. 6. To exit the service configuration procedure, tap OK. l This returns to the Message List screen.
2. Tap Services - Service Settings to display the service selection screen. Currently selected service Name of connection assigned to the currently selected service. 3. Tap the Currently selected connection box and select the connection to which you want to change from the list that appears. Tap the name of the connection to which you want to change. l Tap OK to save your setting and return to the Message List screen. To delete a mail service 1.
3. In response to the confirmation message that appears, tap Yes to delete the mail service, or No to cancel without deleting. l Note that a delete operation cannot be undone. 4. Tap OK to return to the Message List screen. Creating and Deleting Modem Connections The following procedures describe how to create a new modem connection, and how to duplicate and delete existing modem connections.
4. Perform steps 6 through 10 under “Configuring a New Mail Service” on page 6. 5. Tapping Next on the name server screen in step 10 displays the Configuration Check screen. l If you want to change a setting, tap Back to back step through the setting screens and make the changes you want. 6. When all the settings are the way you want, tap Configure to configure the connection and return to the service selection screen.
The default name of the connection is the same name as the original connection with the words “Copy of” in front of it. 4. Use the Next and Back buttons to navigate between setting screens and make the changes you want. 5. When you reach the Configuration Check screen, check the settings. l If you want to change a setting, tap Back to back step through the setting screens and make the changes you want. 6.
Sending and Receiving Mail This section covers operations related to sending and receiving e-mail, including how to create a new mail message, how to respond to mail, how to forward mail to another addressee, and more. Connecting to a Mail Server and Sending and Receiving Mail When you connect to your mail server, Mobile E-mailer normally sends all the mail messages currently queued in the Outbox and picks up any mail messages waiting on the server.
l 3. The screen shown nearby appears next if Modem Connection is specified as the connection type for the service you selected in step 1. If there is no connection password already in the Password box, type in the proper connection password. If there is no connection password already in the Password box, type in the proper connection password. Tap Connect to start the connection procedure.
4. If you have the “Display subject list first and then pick up only selected messages.” option turned on (page 68), a Subject List screen like the one shown below appears to show you the subjects of messages waiting on the mail server. Use the Subject List screen to select which mail messages you want to pick up. Tapping a check box toggles a message between pick up (checked) and do not pick up (unchecked).
Creating a New Message Use the following procedure to create a new mail message or to edit an existing message. To create a new message 1. On the Message List screen, tap New to display the Message Editor screen. This box shows the name of the service that was selected when you tapped New. If you want to use a different service, tap this box and then select the service you want from the list that appears. 2. Tap the Subj (Subject) field to display the header input screen as shown below.
3. Input the body text of the message. button next to the Service field switches to an l Tapping the abbreviated header and expands the body text input area. Tap here to expand the header to its full size. Body text input starts from here. Tap here if you want to attach a file to the message. See “Attaching a File to an Outgoing Message” on page 45 for more information. 4. If you want to append a signature to the end of the message, tap Edit – Signature.
5. After the message is the way you want, tap to queue it. l The message is queued in the Outbox of the service you specified in step 1 of this procedure. All the mail messages queued in a mail service’s Outbox are sent the next time you connect to the service. l If you are connected to the applicable service when you tap , the message is sent immediately without being queued in the Outbox of the service.
Deleting the Message Being Edited While editing an unsent message on the editor screen, tap Edit - Delete to move the message to the Deleted folder. NOTE Messages in the Deleted folder are actually deleted from memory by any one of the following events. l Tapping Tools - Empty Deleted Items on the Message List screen You can recover a file that is still in the Deleted folder by moving it to another folder. See “Moving a Message to Another Folder” on page 52 for more information.
Recalling an Address from the Contacts Database or Personal Address Book You can input an address into an outgoing e-mail message header by recalling it from the Contacts database or the Mobile E-mailer Personal Address Book. NOTE l The “Contacts database” is the name of the file where data stored using the Contacts mode or Mobile Address Book is stored. For information about using the Contacts mode, see the “Pocket PC User's Guide” and CASSIOPEIA online help.
3. Tap . l This displays a list of all names and mail addresses in the Contacts database that match your highlighted input. 4. Select the name and address of the person to whom you want to send the message, and then tap OK. l This returns to the header input screen, with the address you selected in the input area. NOTE If there are no Contacts database matches for the characters you input, the screen returns directly to the header input screen when you tap in step 3.
To recall a Contacts database address using manual search 1. Tap To, Cc, or Bcc at the top of the header input screen. l See step 2 of the procedure under “To create a new message on page 28 for more information about the header input screen. l With manual search, you will have a chance to specify the addressee type (To, Cc, Bcc) later, so you can select any one of the three options at this time. 2. Tap to display a list of Contacts database names and e-mail addresses. 3.
Recalling an Address from the Personal Address Book The Personal Address Book is a Mobile E-mailer function that lets you assign nicknames to your often-used mail addresses for quick and easy recall whenever you need them. Note that you must input addresses into the Personal Address Book and assign nicknames to them before you can recall addresses for your e-mail messages. See “Adding Mail Addresses to the Personal Address Book” on page 62 for more information.
N OTE If there are no Personal Address Book matches for the characters you input, the screen returns directly to the header input screen when you tap in step 3. To recall a Personal Address Book address using manual search 1. Tap To, Cc, or Bcc at the top of the header input screen. l See step 2 of the procedure under “To create a new message on page 28 for more information about the header input screen.
l The checkboxes at the left side of each line indicates whether or not the nickname assigned to the address is displayed in the header input screen nickname menu. See “Adding Mail Addresses to the Personal Address Book” on page 62 for more information. 4. After all the addressees are configured the way you want them, tap OK to return to the header input screen. l The header input screen now shows all of the To, Cc, and Bcc addressees you selected using the above steps.
l See “Adding Mail Addresses to the Personal Address Book” on page 62 for information about controlling the contents of the nickname menu. Using Signatures A “signature” is a block of preset text (your name and e-mail address, for example) that is inserted at the end of an e-mail message. Mobile E-mailer lets you keep up to five signatures on file and select the one you want at any time. To create a signature 1.
NOTE l You can also use the above procedure to edit an existing signature. l See “To create a new message” on page 28 for information about inserting a signature into a message. Viewing Received Mail Messages This section describes a number of different techniques you can use when viewing received mail messages. Opening a Received Message The contents of the Inbox folder should appear automatically on the Message List screen after you connect to your mail server and receive the mail that is waiting.
2. If you want to view full details of a particular header field, tap the field (Subj, From, To, Cc). Tap the name of the field you want to view. Tapping a header field displays the details of that field. Tapping the Body field returns to the Message Viewer screen. Tapping this button returns to the Message Viewer screen. 3. To return to the Message List screen, tap OK on the Message Viewer screen.
Using the Message Viewer Screen The following describes the operations you can perform while the Message Viewer Screen is on the display. l The icon in the upper right corner of the Message Viewer screen indicates that the message has file attached to it. Tapping the icon opens the attached file. See “To open an attached file” on page 48 for more information.
Unread and Read Messages Unread messages appear on the Message List screen in boldface. Read messages are indicated by normal text. Boldface indicates unread messages. l Opening a message and displaying it on the Message Viewer screen changes its status to “read.” l You can use the following procedure to toggle the status of a particular message between “read” and “unread.” To change the read/unread status of a message 1.
Replying to a Message Use the following procedure to send a reply to an e-mail message you receive. To reply to an e-mail message 1. Display the Message Viewer screen of the message to which you want to reply and then tap to display the Reply screen shown below. l You could also tap and hold the message to you want to reply on the Inbox folder Message List screen, and then tap Reply on the shortcut menu that appears.
Forwarding a Message to Another Address Use the following procedure when you want to forward a message you receive to another address. To forward a message to another address 1. Display the Message Viewer screen of the message to which you want to reply and then tap to display the Forward screen shown below. l You could also tap and hold the message to you want to reply on the Inbox folder Message List screen, and then tap Forward on the shortcut menu that appears.
Working with Attached Files This section explains how to attach files to an outgoing mail message and how to open a file attached to an incoming mail message. Attaching a File to an Outgoing Message Use the following procedure to attach a file to an original message, a reply, or a forwarded message. To attach a file to an outgoing message 1. Display the Message Editor screen for the message to which you want to attach a file.
3. Tap to display a menu of attachment file types (see below). To attach this type of file: Select this file type: Image (jpg, jpeg, or gif) Still Image CASIO original movie format (cmf) Movie Pocket Word Document (psw) Pocket Word Pocket Excel Workbook (pxl) Pocket Excel Note (pwi) Note Sound (wav) Voice Any other Others l To attach a text (txt) file or some other file whose type is not shown in the menu, tap Others. 4. Tap the type that corresponds to the file you want to attach.
6. Repeat steps 3 through 4 to attach other files, if you want. 7. When everything is the way you want, tap OK on the File Attachment screen to return to the Message Editor screen. 8. Now you can finish writing your message and send it. To remove a file attached to an outgoing message 1. Display the File Attachment screen for the message whose attached file you want to remove. 2. Tap and hold the name of the file you want to remove. 3.
Working with Incoming Attachments This section describes the things you can do with a file that you receive at an attachment to an e-mail message. To open an attached file 1. Display the Message Viewer screen for the message whose attached file you want to open. l See “Opening a Received Message” on page 39 for information about the Message Viewer screen. 2. Tap to display the Attachment List screen. Attachments list 3. Tap the name of the attached file you want to open.
when you tap Yes if your CASSIOPEIA does not support execution of the file. To save an attached file 1. On the Message Viewer screen of the message with the attached file, tap to display the Attachment List screen. 2. Tap and hold the name of the file you want to save and then tap Save Attachment on the shortcut menu that appears to display the Save Attachment screen. l Instead of the above operation, you could select the name of the attached file you wan to save and then tap .
Using Folders Mobile E-mailer initially creates the four folders described below for each of the services you configure. Folder Name Description Inbox Stores messages you receive Outbox Queues messages you send Sent Deleted Stores messages you have sent Stores messages you have deleted Each time you perform a send, receive, or delete operation for a particular service, Mobile E-mailer automatically puts the message into the required folder.
l Tap OK to display the contents of the folder on the Message List screen. NOTE You can switch between the Inbox, Outbox, and Sent folders of your currently selected service by tapping the Message List screen Tools menu. Next, select the name of the folder whose contents you want to view. To create a new folder NOTE You can create a new folder directly below the service name (at the same level as Inbox and Outbox), or inside of another folder. 1. On the Message List screen, tap 2.
To delete a folder 1. On the Message List screen, tap 2. On the Show screen, tap the folder you want to delete. 3. Tap Edit – Delete. 4. In response to the confirmation message that appears, tap Yes to delete the folder or No to cancel without deleting anything. to display the Show screen. l Deleting a folder also deletes all of its contents. NOTE You cannot delete the Inbox, Outbox, Sent, or Deleted folders.
2. On the command bar, tap Tool - Move To to display the Move To screen. l Instead of tapping Tool – Move To, you can tap and hold any message on the Message List screen and then tap Move To on the shortcut menu that appears. 3. Tap the folder to which you want to move the message or messages you selected in step 2, and then tap OK. l This moves the message or messages you selected, and returns to the Message List screen. To move a message using the Message Viewer screen 1.
Deleting Messages You can perform a message delete operation starting from either the Message List screen or the Message Viewer screen. With the Message List screen, you can select multiple messages and delete them with a single operation. With the Message Viewer screen, you can delete the currently displayed message. To delete messages using the Message List screen 1. On the Message List screen, select the message or messages you want to delete.
Advanced Functions The Mobile E-mailer functions described in this section help to make management of your e-mail messages easier and more efficient. Searching for Text The search capabilities of Mobile E-mailer make it possible to quickly locate a message that contains text you specify. Note that a search operation searches the messages in the currently selected service only. To search for text 1. On the Message List screen, tap to display the Find screen.
This list screen looks like the standard Message List screen, except that is shown in place of . Except for folder selection and search, you can perform the same operations on this list of found messages as you can perform on the standard Message List screen. 4. To clear the list of found messages and return to the normal Message List screen, tap . NOTE The found message list is also cleared whenever any one of the following operations is performed.
Using Filters for Incoming Messages You can configure filters that automatically route incoming mail messages to specific folders in accordance with criteria defined by you. You can have up to 10 filters configured for each service. To configure a filter NOTE You must have a service configured before you can perform the following procedure to configure a filter. See “Configuring a New Mail Service” on page 6 for more information. 1.
3. Type in the name you want to give to the filter and then tap OK to advance to the filter editor screen. Use this box to specify whether a message has to meet both sets of the filter criteria, or either of the sets of criteria. You can configure up to two sets of criteria for each filter. Tap here and select the destination folder of a message that satisfies the filter's criteria. 4. Define the criteria for the filter, as described below. Field to be checked Check this box to enable these criteria.
5. Specify the name of the folder to which messages that satisfy the criteria of the filter should be routed. l Tapping the Move to folder box displays a folder selection screen like the one shown below. Select the destination folder and then tap OK. 6. After everything is the way you want, tap OK to return to the Filter Settings screen. 7. Repeat steps 2 through 6 to configure other filters, if you want. l You can have up to 10 filters configured for each service.
Assigning a Priority to a Filter When you have multiple filters configured, you can assign a priority that determines the sequence that the filters are applied. The filter with priority 1 is checked first. If the message satisfies the criteria of the first filter, it goes to the applicable folder without further filtering. If it does not satisfy the criteria, the filter with priority 2 is checked. This process is repeated until all the filters (1, 2, 3, and so on) are checked.
l This returns to the Message List screen. To enable and disable a filter 1. On the Filter Settings screen, tap the check box next to a filter to toggle it between being enabled (checked) and disabled (unchecked). The status of this check box determines whether a filter is enabled (checked) or disabled (unchecked). l This procedure makes it possible to temporarily disable a filter without deleting it. 2. After everything is the way you want, tap OK to return to the Message List screen.
Adding Mail Addresses to the Personal Address Book Storing e-mail addresses in your Personal Address Book makes input of addresses into mail messages quick and easy. To add a mail address to the Personal Address Book 1. Display the Message List screen for the Inbox folder. 2. Tap a message that contains the address you want to add to the Personal Address Book. This opens the message in the Message Viewer screen. 3. Tap the header field (From, To, Cc) that contains the mail address you want to add.
5. Tap to display the Personal Address Book Record Input screen shown below. Selected mail address 6. Type a nickname for the address into the Name box. l You can also make any changes you want to the mail address in the Email box. 7. Tap OK to display the Personal Address Book screen. The Personal Address Book screen shows the current contents of the Personal Address Book, including addresses and nicknames.
NOTE l You can also display the Personal Address Book screen from the Message Editor Screen and input a new address. Use the procedure under “To recall a Personal Address Book address using manual search” (page 36) to display the Personal Address Book screen, and then tap New. l The check boxes to the left of each mail address nickname controls whether the nickname assigned to the address is displayed in the header input screen nickname menu.
To edit a Personal Address Book mail address 1. Display the Personal Address Book screen. 2. Display the Personal Address Book Record Input screen for the mail address you want to edit. 3. Make the changes you want and then tap OK to return to the Personal Address Book screen. 4. Repeat steps 2 and for other addresses, if you want. 5. After everything is the way you want, tap OK on the Personal Address Book screen to return to the message header screen.
Adding Mail Addresses to the Contacts Database You can add addresses contained in message headers directly to the Contacts database from Mobile E-mailer. NOTE Note that you can use the following procedure to add mail addresses and names only to the Contacts database. You must use Contacts or Mobile Address Book to input data for other fields. To add a mail address to the Contacts database 1. Display the Message List screen for the Inbox folder. 2.
4. Tap to display a screen like the one shown below. If the mail address you selected in step 3 uses the format "user name", the user name part appears here. Mail address you selected in step 3. l Tapping the box to the left of the mail address displays a list of Contacts database e-mail address field names (Email, Email2, Email3). Tap the one where you want to store the displayed address.
Configuring Option Settings Mobile E-mailer’s option settings let you configure mail send and receive operations to suit your particular needs. To configure option settings 1. On the Message List screen, tap Tools – Options to display the Connect tab of the Options screen.
Store all received messages in the Inbox Filter messages automatically as they are received and route them to applicable folders (page 57) Uncheck the box next to Filter received messages automatically Check the box next to Filter received messages automatically l Sent To do this when sending mail: Do this: Move messages to the Deleted folder after they are sent Move messages to the S e n t folder after they are sent 2. Tap the Message tab.
Command Bar Items (Menus and Buttons) Message List Screen NEW (button) Displays an editor screen for creating a new mail message. Tools Menu Command Description Select All Selects all the messages listed on the Message List screen. Open Inbox Displays the contents of the currently selected service’s Inbox folder on the Message List screen. Open Outbox Displays the contents of the currently selected service’s Outbox folder on the Message List screen.
Message Viewer Screen NEW (button) Displays an editor screen for creating a new mail message. Tools Menu Command Description Copy Copies the currently selected text string to the clipboard. Select All Selects all the text in the Body field. Signature Settings Displays a Signature Settings screen for editing signatures. Save As Save an e-mail message as a text file. Open HTML This option is available only for messages that contain HTML formatting.
Message Editor screen NEW (button) Closes the currently open message editor screen and opens an editor screen for creating a new message. Edit Menu Command Description Cut Cuts the currently selected text string to the clipboard. Copy Copies the currently selected text string to the clipboard. Paste Pastes the clipboard’s contents at the current cursor position. Clear Deletes the currently selected text string. Select All Selects all the text in the Body field.