ES USER’S GUIDE GUÍA DEL USUARIO LK100ES1A
GUIDELINES LAID DOWN BY FCC RULES FOR USE OF THE UNIT IN THE U.S.A. (not applicable to other areas). NOTICE This equipment has been tested and found to comply with the limits for a Class B digital device, pursuant to Part 15 of the FCC Rules. These limits are designed to provide reasonable protection against harmful interference in a residential installation.
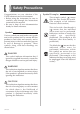
Safety Precautions Congratulations on your selection of the CASIO electronic musical instrument. • Before using the instrument, be sure to carefully read through the instructions contained in this manual. • Be sure to keep all user documentation handy for future reference. Symbols Various symbols are used in this user’s guide and on the product itself to ensure that the product is used safely and correctly, and to prevent injury to the user and other persons as well as damage to property.
DANGER Alkaline Batteries Perform the following steps immediately if fluid leaking from alkaline batteries ever gets into your eyes. 1. Do not rub your eyes! Rinse them with water. 2. Contact your physician immediately. Leaving alkaline battery fluid in your eyes can lead to loss of sight. WARNING Smoke, Strange Odor, Overheating Continued use of the product while it is emitting smoke, a strange odor, or heat creates the risk of fire and electric shock. Take the following steps immediately. 1.
Do not incinerate the product. Never throw the product into fire. Doing so can cause it to explode, creating the risk of fire and personal injury. Water and Foreign Matter Water, other liquids, and foreign matter (such as pieces of metal) getting into the product create the risk of fire and electric shock. Take the following steps immediately. 1. Turn off power. 2. If you are using the AC adaptor for power, unplug it from the wall outlet. 3.
CAUTION AC Adaptor ● Misuse of the AC adaptor creates the risk of fire and electric shock. Always make sure you observe the following precautions. • Do not locate the electric cord near a stove or other sources of heat. • Never pull on the cord when unplugging from the electrical outlet. Always grasp the AC adaptor when unplugging. ● Misuse of the AC adaptor creates the risk of fire and electric shock. Always make sure you observe the following precautions.
Display Screen • Never push on the display screen’s LCD panel or subject it to strong impact. Doing so can cause the LCD panel’s glass to crack, creating the risk of personal injury. • Should the LCD panel ever crack or break, never touch the liquid inside of the panel. LCD panel liquid can cause skin irritation. • Should LCD panel liquid ever get inside your mouth, immediately wash out your mouth with water and contact your physician.
Main Features ❐ On-screen fingering and timing indicators • Easy-to-understand on-screen indicators help to simplify keyboard play, even for novices. ❐ 100 amazingly realistic tones ❐ Enhanced auto-accompaniment function for greater versatility • 50 built in auto-accompaniment patterns. ❐ 100 Built-in Song Bank tunes • A total of 100 built-in Song Bank tunes comes built in for playback enjoyment or play-along practice.
Contents Safety Precautions ................ E-1 3-Step Lesson System ........ E-21 Using 3-Step Lesson System .................. E-21 Main Features ........................ E-6 General Guide ........................ E-8 Attachment of Score Stand ........................ E-9 Voice Fingering Guide .............................E-23 Timing Indicator ....................................... E-23 Step 1: Master the timing ......................... E-24 Step 2: Master the melody .......................
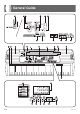
General Guide 1 23 4 7 C D E F 5 8 9 G * 6 0 H ** I A B E J K L M E-8 N O P Q R 662A-E-010A
1 MIC VOLUME slider F 100 SONG BANK list 2 POWER/MODE selector G Display 3 Power indicator H 50 RHYTHMS list See “Rhythm List” on page A-2 for details. 4 MAIN VOLUME slider I 100 TONES list See “GM Tone Map List” on page A-1 for details.
Quick Reference This section provides a quick overview of keyboard operation using steps one and two of the 3-step lesson feature. See page E-21 for detailed explanations of these steps. 1 3 2 1 Set the POWER/MODE selector to NORMAL. 4 5 5 5 Play the melody part on the keyboard. Play the notes with the ONE KEY PLAY buttons. • The accompaniment tempo automatically adjusts to play along with your melody. 2 Press the SONG BANK button.
Power Supply This keyboard can be powered by current from a standard household wall outlet (using the specified AC adaptor) or by batteries. Always make sure you turn the keyboard off whenever you are not using it. Using batteries Always make sure you turn off the keyboard before loading or replacing batteries. To load batteries 1. 2. Remove the battery compartment cover. Load 6 AA-size batteries into the battery compartment. • Make sure that the positive (+) and negative (–) ends are facing correctly.
Care of Your Keyboard IMPORTANT! • Make sure that the keyboard is turned off before connecting or disconnecting the AC adaptor. • Using the AC adaptor for a long time can cause it to become warm to the touch. This is normal and does not indicate malfunction. Auto Power Off When you are using battery power, keyboard power turns off automatically whenever you leave it on without performing any operation for about 6 minutes.
Connections Phones/Output Jack Sustain Jack Before connecting headphones or other external equipment, be sure to first turn down the volume settings of the keyboard and the connected equipment. You can then adjust volume to the desired level after connections are complete. You can connect an optional sustain pedal (SP-3 or SP-20) to the SUSTAIN jack to enable the capabilities described below.
IMPORTANT! • Be sure to use the microphone’s on/off switch to turn off the microphone and to disconnect the microphone from the keyboard whenever you are not using it. Recommended Microphone Type • Dynamic microphone (standard plug) IMPORTANT! • Be sure to disconnect the microphone from the keyboard whenever you are not using it. Howling (Feedback Noise) Any of the following conditions can cause howling (feedback noise).
Basic Operations MAIN VOLUME POWER/MODE SYNCHRO/FILL-IN START/STOP SONG BANK TEMPO This part of the manual provides you with the basic information you need to use your keyboard. To switch power on and off 1. Set the POWER/MODE selector to NORMAL. 2. Press the keyboard keys. 3. 4. Use the MAIN VOLUME slider to set the volume to a relatively low level. To switch power off, set the POWER/MODE selector to OFF position. To change tones 1.
BASS DRUM COWBELL SIDE STICK CRASH CYMBAL 2 ACOUSTIC SNARE CLAVES To change the key of the keyboard HAND CLAP RIDE CYMBAL 2 ELECTRIC SNARE HIGH BONGO LOW FLOOR TOM LOW BONGO CLOSED HI-HAT MUTE HIGH CONGA The transpose feature of this keyboard lets you raise or lower its key in semitone increments. This means you can easily match to suit someone’s voice, and you can eliminate sharps and flats from music making it easier to play.
❚ NOTE ❚ NOTE • If you leave the transpose screen on the display for about five seconds without doing anything, the screen is automatically cleared. • You cannot change the transpose setting while the keyboard is in the Song Bank Mode. • In step 2 of the above operation, you could also use the number buttons 0 to 5 to specify C through F. • Pressing both of the TEMPO buttons ( / ) at the same time returns the transpose setting to C(0).
6. ❚ NOTE • Only the following buttons are enabled while a Song Bank tune is being played. • MAIN VOLUME slider • Number buttons • START/STOP button • POWER/MODE selector (OFF) • DEMO button • KEY LIGHT button • SPEAK button • You cannot change the tone being used for the melody of a Song Bank tune. • Each time you press one of the TEMPO buttons while the tempo value is displayed, the tempo setting changes one step, within the range of 040 to 255.
5. Using the CASIO CHORD system The CASIO CHORD system lets you easily play the four main types of chords. Play of chords is simplified as shown in the chart below. Keys 6.
IMPORTANT! • If you play one or two notes only in the left hand, or three notes that do not make up a recognizable chord formation, no sound will be produced. The FINGERED mode requires a conventional three or four-note chord formation to produce an auto-accompaniment. Also, note that autochords only work in conjunction with rhythm patterns, and not independently of them. ❚ NOTE • The above examples show only one of the possible fingerings for each chord.
3-Step Lesson System KEY LIGHT SONG BANK TONE STEP 1 STEP 2 START/STOP Using 3-Step Lesson System Even individuals who cannot play the keyboard at all can follow along with the 100 built-in Song Bank tunes with the ONE KEY PLAY buttons. You can also use the 3-Step Lesson System to learn at your own pace. Play slowly at first until you are able to play along at normal speed.
5. 6. To stop Song Bank tune play, press the START/ STOP button again. To exit the Song Bank Mode, press the SONG BANK button again. Crossed Finger Indications The display also shows when you have to cross fingers to play notes, and in which direction your fingers should cross. Example: Display for playing the notes below with the right hand • When you do, the SONG BANK indicator goes out. ❚ NOTE • Always enter two digits for the Song Bank number.
Key Lighting System Operation and Display Contents During 3-step Lesson Play Whenever you select an Auto Accompaniment tune (00 to 83) for 3-step lesson play, the key lighting system shows you which keys to press, while the display shows you the fingerings. Note Pitch The keyboard key that should be pressed lights. The fingers you should use to play the notes are also shown on the display.
Turning Off Key Lighting Step 1: Master the timing 1. 1. Press the KEY LIGHT button. • The KEY LIGHT indicator disappears when the key light system is turned off. • Press the KEY LIGHT button again to turn key lighting back on. Press the STEP 1 button. • When you do, the STEP 1 indicator appears. • After a count sounds, the keyboard stands by and waits for you to play the first note of the tune. If the tune includes intro measures, the keyboard enters standby after the intro measures are complete.
Step 2: Master the melody Step 3: Play at normal speed 1. 1. Press the STEP 2 button. • When you do, the STEP 2 indicator appears. • After a count sounds, the keyboard stands by and waits for you to play the first note of the tune. If the tune includes intro measures, the keyboard enters standby after the intro measures are complete. Press the STEP 3 button. • When you do, the STEP 3 indicator appears. • Play starts after a count sounds. Tw i n k l e Tw i n k l e Fingering Fingering 2. 2.
To practice the left hand part Once you master right hand part play, you can use the twohand tunes (numbers 84 through 99) to practice left hand part. 1. Press the SONG BANK button until the SONG BANK indicator appears. • This causes the number and name of the currently selected Song Bank tune to appear on the display. 2. 3. Input the two digit number for the tune you want to play. Press the PART SELECT button to switch the left hand play. Lit 4. Press the STEP 1, STEP 2, or STEP 3 button.
MIDI NOTE ON/OFF What is MIDI? The letters MIDI stand for Musical Instrument Digital Interface, which is the name of a worldwide standard for digital signals and connectors that makes it possible to exchange musical data between musical instruments and computers (machines) produced by different manufacturers. MIDI Connections MIDI IN MIDI OUT MIDI IN MIDI OUT This message sends data when a key is pressed (NOTE ON) or released (NOTE OFF).
TEMPO LOCAL CONTROL (Default: on) /GM mapping (Default: off) This setting determines whether or not the keyboard and sound source of this keyboard are connected internally. When recording to a computer or other external device connected to this keyboard’s MIDI IN/OUT terminal, it helps if you turn LOCAL CONTROL off. RHYTHM SONG BANK To turn on LOCAL CONTROL/To turn off GM mapping 1.
Technical Reference Troubleshooting Be sure to check the following table whenever you experience problems with keyboard operation. Symptom • No sound when keyboard keys are pressed. Cause 1. Power supply problem. 2. Volume setting is too low. 3. Headphones are plugged into the keyboard. 4. The POWER/MODE selector is in the CASIO CHORD or FINGERED position. 5. Tone “99 PERCUSSION” is selected and you are pressing keys that are not assigned tones. 6. LOCAL CONTROL is off.
Symptom Cause Action • RHYTHM button does not work. • Keyboard is in the Song Bank Mode. • Press the SONG BANK button to return to the normal mode. Page E-21 • Cannot change TRANSPOSE/ TUNE/LOCAL CONTROL settings. • Keyboard is in the Song Bank Mode. • Demo tune play is in progress. • Press the SONG BANK button to return to the normal mode. • Stop demo tune play. Page E-21 • No sound is produced when playing MIDI data from a computer. • MIDI cables are not connected properly.
Specifications Model: LK-100 Keyboard: 61 standard-size keys; 5 octaves Key Light System: Can be turned on and off (up to 4 keys can be lit at the same time) Tones: 100 presets Polyphony: 12 notes maximum 3-Step Lesson System: Number of simultaneosly lit keys; 4 3-Steps 1 tune repeat playback On/Off Playback: Voice Fingering Guide: Auto-accompaniment Rhythm patterns: Tempo: Chords: Other: 50 presets Adjustable, (216 steps, = 40 to 255), initial value; 120 Two systems; CASIO CHORD, FINGERED Fill
Appendix/Apéndice GM Tone Map List Lista de asignaciones de sonido GM Tone No.
Rhythm List Lista de ritmos POPS DANCE/FUNK 00 CLUB POP 26 TECHNO 01 FUNKY POP 27 TRANCE 02 SOUL BALLAD 28 DISCO 03 POP BALLAD 29 FUNK 04 LITE POP 30 RAP 05 16 BEAT FUNK EUROPEAN 06 8 BEAT POP 07 POP ROCK 08 DANCE POP 09 POP FUSION 10 FOLKIE POP ROCK POLKA 32 MARCH 33 WALTZ 34 SLOW WALTZ 35 TANGO LATIN/VARIOUS I 11 ROCK WALTZ 12 SLOW ROCK 13 SOFT ROCK 14 50’S ROCK 15 60’S SOUL 16 4 BEAT ROCK 17 ROCK 18 TWIST 19 NEW ORLNS R&R 20 R&B JAZZ/FUSIO
Fingered Chord Charts Cuadros de acordes digitados This table shows the left-hand fingerings (including inverted forms) for a number of often-used chords. Esta tabla muestra las digitaciones (incluyendo las formas invertidas) para varios de los acordes más a menudo usados.
* Cannot be specified in FINGERED setting because of accompaniment keyboard limitations, but augmented and diminished (seventh) chords made up of the same component notes (with different base note) can be used instead. Chords with same component notes as B aug ........... D aug, F aug Chords with same component notes as B aug ............ E aug, G aug Chords with same component notes as A dim7 ......... C dim7, E dim7, F dim7 Chords with same component notes as B dim7 ........
662A-E-070A Key’s Ch’s After Touch Control Change Pitch Bender Note ON Note OFF Velocity 1 6, 38 7 10 11 64 True voice O O X O X X O X X X X X O X X O 9nH V = 1-127 X 9nH V = 0,8nH V = *2 0-127 36-96 *1 X X X X 9nH V = 100 X 9nH V = 0 36-96 ❊❊❊❊❊❊❊❊❊❊❊❊❊❊ Mode 3 X ❊❊❊❊❊❊❊❊❊❊❊❊❊❊ Mode 3 X ❊❊❊❊❊❊❊❊❊❊❊❊❊❊ Default Messages Altered Mode Note Number 1-4, 10 1-4, 10 1 1 Recognized Transmitted MIDI Implementation Chart Default Changed Function ...
662A-E-071A : Local ON/OFF : All notes OFF : Active Sense : Reset Aux Mode 1 : OMNI ON, POLY Mode 3 : OMNI OFF, POLY Remarks Messages : Clock : Commands System Real Time X X X X X X X X X X X X X O 0-127, 0-99 *3 ❊❊❊❊❊❊❊❊❊❊❊❊❊❊ Mode 2 : OMNI ON, MONO Mode 4 : OMNI OFF, MONO X X X X X X X X X : Song Pos : Song Sel : Tune System Common O 0-99 ❊❊❊❊❊❊❊❊❊❊❊❊❊❊ X :True # X X X System Exclusive Program Change 100, 101 120 121 O : Yes X : No *3: Depends on GM Map setting *3: Depende en el
This recycle mark indicates that the packaging conforms to the environmental protection legislation in Germany. Esta marca de reciclaje indica que el empaquetado conforma a la legislación de protección ambiental en Alemania. CASIO COMPUTER CO.,LTD.