
User Manual

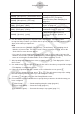
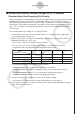
Table Of Contents
- Contenu
- Familiarisation — A lire en premier!
- Chapitre 1 Opérations de base
- Chapitre 2 Calculs manuels
- 1. Calculs de base
- 2. Fonctions spéciales
- 3. Spécification de l’unité d’angle et du format d’affichage
- 4. Calculs de fonctions
- 5. Calculs numériques
- 6. Calculs avec nombres complexes
- 7. Calculs binaire, octal, décimal et hexadécimal avec entiers
- 8. Calculs matriciels
- 9. Calculs vectoriels
- 10. Calculs de conversion métrique
- Chapitre 3 Listes
- Chapitre 4 Calcul d’équations
- Chapitre 5 Représentation graphique de fonctions
- 1. Exemples de graphes
- 2. Contrôle des paramètres apparaissant sur un écran graphique
- 3. Tracé d’un graphe
- 4. Stockage d’un graphe dans la mémoire d’images
- 5. Tracé de deux graphes sur le même écran
- 6. Représentation graphique manuelle
- 7. Utilisation de tables
- 8. Représentation graphique dynamique
- 9. Représentation graphique d’une formule de récurrence
- 10. Tracé du graphe d’une section conique
- 11. Changement de l’aspect d’un graphe
- 12. Analyse de fonctions
- Chapitre 6 Graphes et calculs statistiques
- 1. Avant d’effectuer des calculs statistiques
- 2. Calcul et représentation graphique de données statistiques à variable unique
- 3. Calcul et représentation graphique de données statistiques à variable double
- 4. Exécution de calculs statistiques
- 5. Tests
- 6. Intervalle de confiance
- 7. Lois de probabilité
- 8. Termes des tests d’entrée et sortie, intervalle de confiance et loi de probabilité
- 9. Formule statistique
- Chapitre 7 Calculs financiers
- 1. Avant d’effectuer des calculs financiers
- 2. Intérêt simple
- 3. Intérêt composé
- 4. Cash-flow (Évaluation d’investissement)
- 5. Amortissement
- 6. Conversion de taux d’intérêt
- 7. Coût, prix de vente, marge
- 8. Calculs de jours/date
- 9. Dépréciation
- 10. Calculs d’obligations
- 11. Calculs financiers en utilisant des fonctions
- Chapitre 8 Programmation
- 1. Étapes élémentaires de la programmation
- 2. Touches de fonction du mode PROGR (ou PRGM)
- 3. Édition du contenu d’un programme
- 4. Gestion de fichiers
- 5. Guide des commandes
- 6. Utilisation des fonctions de la calculatrice dans un programme
- 7. Liste des commandes du mode PROGR (ou PRGM)
- 8. Tableau de conversion des commandes spéciales de la calculatrice scientifique CASIO <=> Texte
- 9. Bibliothèque de programmes
- Chapitre 9 Feuille de Calcul
- Chapitre 10 L’eActivity
- Chapitre 11 Gestionnaire de la mémoire
- Chapitre 12 Menu de réglages du système
- Chapitre 13 Communication de données
- Chapitre 14 PYTHON
- 1. Aperçu du mode PYTHON
- 2. Menu de fonctions de PYTHON
- 3. Saisie de texte et de commandes
- 4. Utilisation du SHELL
- 5. Utilisation des fonctions de tracé (module casioplot)
- 6. Modification d’un fichier py
- 7. Gestion de dossiers (recherche et suppression de fichiers)
- 8. Compatibilité de fichier
- 9. Exemples de scripts
- Chapitre 15 Probabilités
- Appendice
- Mode Examen
- E-CON3 Application (English) (GRAPH35+ E II)
- 1 E-CON3 Overview
- 2 Using the Setup Wizard
- 3 Using Advanced Setup
- 4 Using a Custom Probe
- 5 Using the MULTIMETER Mode
- 6 Using Setup Memory
- 7 Using Program Converter
- 8 Starting a Sampling Operation
- 9 Using Sample Data Memory
- 10 Using the Graph Analysis Tools to Graph Data
- 11 Graph Analysis Tool Graph Screen Operations
- 12 Calling E-CON3 Functions from an eActivity

2-7
Using the Setup Wizard
6. In line “Y1”, input the function of the waveform for the sound you want to input.
• Note that the angle unit is always radians.
• Input a function where the value of “Y” is within the range of –1.5 to +1.5.
7. Press 6(DRAW) to graph the function.
• This graphs the function and displays a vertical cursor line as shown below. Use the
graph to specify the range that you want to output to the speaker.
8. Use the d and e cursor keys to move the cursor to the start point of the output, and
then press w to register it.
9. Use the d and e cursor keys to move the cursor to the end point of the output, and
then press w to register it.
• After you specify the start point and end point, an output frequency dialog box shown
below appears on the display.
/
10. Input a percent value for the output frequency value you want.
• To output the original sound as-is, specify 100%. To raise the original sound by one
octave, input a value of 200%. To lower the original sound by one octave, input a value
of 50%.
11. After inputting an output frequency value, press w.
• This outputs the waveform between the start point and end point from the EA-200
speaker.
• If the sound you configured cannot be output for some reason, the message “Range
Error” will appear. If this happens, press J to scroll back through the previous setting
screens and change the setup as required.
12. To terminate sound output, press the EA-200 [START/STOP] key.