
User Manual


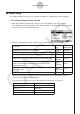


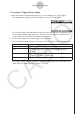
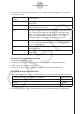
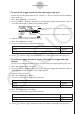
Table Of Contents
- Contenu
- Familiarisation — A lire en premier!
- Chapitre 1 Opérations de base
- Chapitre 2 Calculs manuels
- 1. Calculs de base
- 2. Fonctions spéciales
- 3. Spécification de l’unité d’angle et du format d’affichage
- 4. Calculs de fonctions
- 5. Calculs numériques
- 6. Calculs avec nombres complexes
- 7. Calculs binaire, octal, décimal et hexadécimal avec entiers
- 8. Calculs matriciels
- 9. Calculs vectoriels
- 10. Calculs de conversion métrique
- Chapitre 3 Listes
- Chapitre 4 Calcul d’équations
- Chapitre 5 Représentation graphique de fonctions
- 1. Exemples de graphes
- 2. Contrôle des paramètres apparaissant sur un écran graphique
- 3. Tracé d’un graphe
- 4. Stockage d’un graphe dans la mémoire d’images
- 5. Tracé de deux graphes sur le même écran
- 6. Représentation graphique manuelle
- 7. Utilisation de tables
- 8. Représentation graphique dynamique
- 9. Représentation graphique d’une formule de récurrence
- 10. Tracé du graphe d’une section conique
- 11. Changement de l’aspect d’un graphe
- 12. Analyse de fonctions
- Chapitre 6 Graphes et calculs statistiques
- 1. Avant d’effectuer des calculs statistiques
- 2. Calcul et représentation graphique de données statistiques à variable unique
- 3. Calcul et représentation graphique de données statistiques à variable double
- 4. Exécution de calculs statistiques
- 5. Tests
- 6. Intervalle de confiance
- 7. Lois de probabilité
- 8. Termes des tests d’entrée et sortie, intervalle de confiance et loi de probabilité
- 9. Formule statistique
- Chapitre 7 Calculs financiers (TVM)
- 1. Avant d’effectuer des calculs financiers
- 2. Intérêt simple
- 3. Intérêt composé
- 4. Cash-flow (Évaluation d’investissement)
- 5. Amortissement
- 6. Conversion de taux d’intérêt
- 7. Coût, prix de vente, marge
- 8. Calculs de jours/date
- 9. Dépréciation
- 10. Calculs d’obligations
- 11. Calculs financiers en utilisant des fonctions
- Chapitre 8 Programmation
- 1. Étapes élémentaires de la programmation
- 2. Touches de fonction du mode PRGM
- 3. Édition du contenu d’un programme
- 4. Gestion de fichiers
- 5. Guide des commandes
- 6. Utilisation des fonctions de la calculatrice dans un programme
- 7. Liste des commandes du mode PRGM
- 8. Tableau de conversion des commandes spéciales de la calculatrice scientifique CASIO <=> Texte
- 9. Bibliothèque de programmes
- Chapitre 9 Feuille de Calcul
- Chapitre 10 L’eActivity
- Chapitre 11 Gestionnaire de la mémoire
- Chapitre 12 Menu de réglages du système
- Chapitre 13 Communication de données
- Chapitre 14 PYTHON
- 1. Aperçu du mode PYTHON
- 2. Menu de fonctions de PYTHON
- 3. Saisie de texte et de commandes
- 4. Utilisation du SHELL
- 5. Utilisation des fonctions de tracé (module casioplot)
- 6. Modification d’un fichier py
- 7. Gestion de dossiers (recherche et suppression de fichiers)
- 8. Compatibilité de fichier
- 9. Exemples de scripts
- Chapitre 15 Distribution
- Appendice
- Mode Examen
- E-CON3 Application (English) (GRAPH35+ E II)
- 1 E-CON3 Overview
- 2 Using the Setup Wizard
- 3 Using Advanced Setup
- 4 Using a Custom Probe
- 5 Using the MULTIMETER Mode
- 6 Using Setup Memory
- 7 Using Program Converter
- 8 Starting a Sampling Operation
- 9 Using Sample Data Memory
- 10 Using the Graph Analysis Tools to Graph Data
- 11 Graph Analysis Tool Graph Screen Operations
- 12 Calling E-CON3 Functions from an eActivity

3. To change the sampling interval setting, move the highlighting to “Interval”. Next, press
1 to display a dialog box for specifying the sampling interval.
• The range of values you can select depends on the current sampling mode setting.
If this sampling mode is selected: This is the allowable setting range:
Realtime 0.2 to 299 sec
Fast
20 to 500
μ
sec
Extended 5 to 240 min
Period “=Trigger” only (no value input required)
Sound
20 to 27
μ
sec
Clock “=Trigger” only (no value input required)
Normal 0.0005 to 299 sec
4. To change the number of samples setting, move the highlighting to “Number”. Next, press
1 to display a dialog box for specifying the number of samples.
• The total sampling time shown at the bottom of the dialog box is calculated by
multiplying the “Sampling Interval” value you specified in step 3 by the number of
samples you specify here.
Important!
• When all of the following conditions exist, a “Distance” setting appears in place of the
“Number” setting. See “To configure the Distance setting” (page 3-7) for information
about configuring the “Distance” setting.
• Channel Setup (page 3-3): 2(VRNR) - [Photogate] - [Pulley],
3(CMA) - [Photogate] - [Pulley]
• Sampling Mode (page 3-5): Clock
5. To change the warm-up time setting, move the highlighting to “Warm-up”. Next, perform
one of the function key operations described below.
Note
• The “Warm-up” setting will not be displayed on the Sample Setup screen if “Fast”,
“Sound” or “Extended” is currently selected as the sampling mode.
To do this: Press this key:
Have the warm-up time for each sensor set automatically
1(Auto)
Input a warm-up time, in seconds, manually
2(Man)
Disable the warm-up time
3(None)
Important!
• When the following condition exists, an “FFT Graph” setting appears in place of the
“Warm-up” setting. See “To configure the FFT Graph setting” (page 3-7) for information
about configuring the “FFT Graph” setting.
• Sampling Mode (page 3-5): Fast
3-6
Using Advanced Setup