
User manual
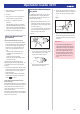

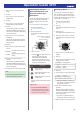

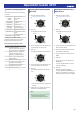
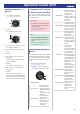
Table Of Contents
- Before Getting Started...
- Time Adjustment
- Using Mobile Link with a Mobile Phone
- Getting Ready
- Auto Time Adjustment
- Viewing Training Records
- Viewing Life Log Related Data
- Setting Target Values
- Creating a Training Plan
- Specifying Checkpoints Along a Running Course (Altitude Navigation)
- Specifying the Alert Interval (Target Alert)
- Specifying the Distance for Auto Lap Timing
- Setting Up Programmable Timers
- Configuring World Time Settings
- Setting the Alarm
- Phone Finder
- Configuring Watch Settings
- Connection
- Measuring Your Heart Rate
- Using the Training Function
- Run Timing
- Changing Display Information During Run Timing
- Changing the GPS Receive Interval
- Checking the Altitude Differential Between Your Current Location and a Checkpoint
- Setting Up Alerts
- Displaying Your Actual Running Distance
- Specifying the Distance Unit
- Enabling Auto Run Timing (Auto Run Detection)
- Enabling Auto Lap Timing
- Enabling Auto Pause
- Specifying the Screen to be Displayed During Running (RUN FACE)
- Settings Configured with the Application
- Run Timing Precautions
- Viewing Training Log Records
- Viewing Your Training Performance Condition
- Receiving Phone Notifications
- Digital Compass
- Altitude Measurement
- Barometric Pressure and Temperature Measurement
- Checking the Current Barometric Pressure and Temperature
- Barometric Pressure Change Indications
- Calibrating Barometric Pressure Readings
- Calibrating Temperature Readings
- Changing Displayed Information
- Specifying the Barometric Pressure Unit
- Specifying the Temperature Unit
- Barometric Pressure and Temperature Reading Precautions
- Timer
- Stopwatch
- World Time
- Alarms
- Pedometer
- Other Settings
- Other Information
- Troubleshooting

5. Use (A) and (D) to move the pointer to
[NOTIFICATION].
6. Press (C).
7. Use (A) and (D) to move the pointer to
[ON] (enabled) or [OFF] (disabled).
8. Press (C) to complete the setting
operation.
After the setting operation is complete,
[SETTING COMPLETED] will appear for
a few seconds, and then the HR (Heart
Rate) mode setting screen will re-appear.
9. Press (E) to exit the setting screen.
Heart Rate Measurement
Precautions
Heart Rate Measurement Functions
●
The back cover of the watch has a built-in
sensor that detects your pulse. This is used
to calculate and display an approximate
heart rate value. The factors below can
cause error in the displayed heart rate
value.
ー
How the watch is affixed to the wrist
ー
Individual wrist characteristics and
condition
ー
Training type and/or intensity
ー
Sweat, dirt, and/or other foreign matter
around the sensor
All of this means that heart rate values
displayed by the watch are approximate, and
no guarantees are made concerning their
accuracy.
●
The heart rate measurement function of this
watch is intended for recreational purposes,
and should not be used in any way for
medical purposes.
●
Heart rate measurement is automatically
disabled when the battery level indicator
shows
or lower.
Wrist Heart Rate Measurement Sleep
(Power Saving)
Regardless of whether or not you are wearing
the watch, the heart rate measurement sensor
will automatically stop measurement and
enter a sleep state if you do not move for a
certain amount of time.
If heart rate measurement does not start when
you strap the watch onto your wrist, it will start
when you move your wrist.
Precautions When Putting on
the Watch
Correctly wearing the watch on your wrist is
essential obtain more accurate heart rate
measurements. Position the watch on your
wrist as described below.
1. With the watch fastened loosely on your
wrist, place at least one finger to the right
of the pressure sensor on the right side of
the watch* (Figure
A
).
* If you wear the watch on your right wrist,
place your finger(s) to the left of the (C)
button (left side of the watch).
Figure A
●
If the watch covers the protruding bone
of your wrist (your ulna, which is circled
in the nearby figure), keep adding
fingers until it doesn’t anymore.
●
The location and shape of this bone
differ from person to person.
2. Position the watch so there is at least one
finger width between it and your wrist joint
when you bend your hand back (Figure
B
).
Figure B
3. After you determine the best wrist position
for the watch, tighten the band securely
enough to keep the watch from sliding on
your wrist.
Important!
●
A band that is snugly tightened for
heart rate measurement can make it
difficult for air to pass under the band
and cause you to sweat, which can
lead to skin irritation. After you are
finished measuring your heart rate,
loosen the band enough so you can
insert a finger between it and your
wrist.
Operation Guide 3475
23