E fx-ES Emulator User’s Guide http://world.casio.
Note Display examples shown in this User’s Guide are intended for illustrative purposes only. The actual text and values that appear on display may differ from the examples shown in this User’s Guide.
Introduction • fx-ES Emulator is software that emulates operation of a scientific calculator. It displays an image of one of the following CASIO scientific calculators on your computer screen. fx-82ES fx-83ES fx-300ES fx-82AU • You also can display the LCD of the calculator in a separate window, which can be zoomed as required. • An image of the LCD can be captured (copied to the Windows clipboard). k Using This Manual • This manual covers the operation of the software on your computer.
Contents 1 Installing and Uninstalling fx-ES Emulator........................................... E-3 2 Using fx-ES Emulator.............................................................................. E-8 Emulator Operations...................................................................................................... E-10 Emulator Shortcut Menus...............................................................................................
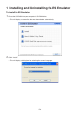
1 Installing and Uninstalling fx-ES Emulator To install fx-ES Emulator 1. Place the CD-ROM into your computer’s CD-ROM drive. • This will display a screen like the one shown below automatically. 2. Click “Install”. • This will display a dialog box for selecting the screen language.
3. Select the language you want and then click [OK]. 4. Click the [Next] button. • This will display the end user license agreement (EULA). 5. Carefully read the EULA.
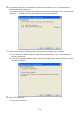
6. If you agree to the terms and conditions of the license agreement, click “I accept the terms…”, and then click the [Next] button. • If you do not agree to the terms and conditions of the license agreement, click “I do not accept the terms…” and then click [Cancel] button to exit the install procedure. 7. Perform either of the two following steps to specify the installation drive and folder. 7-a If you want to use default settings, simply click the [Next] button.
9. The dialog box shown below will appear when installation is complete. 10. Click the [Finish] button. • The fx-ES Emulator Menu screen will appear after installation is complete. 11. Click [EXIT]. Note • You could start up the emulator after step 10, if you like. • If the fx-ES Emulator Menu screen does not appear in step 10, clicking “Click here if a jump is not performed automatically after installation is complete.” will display it.
To uninstall fx-ES Emulator 1. Display the Windows Control Panel. 2. Click [Add or Remove Programs]. 3. On the list of applications that appears, select “CASIO fx-ES Emulator”. 4. Click the [Remove] button. 5. Click the [Yes] button. • This completes the uninstall operation.
2 Using fx-ES Emulator Important! fx-ES Emulator will not start up unless its CD-ROM is in the CD-ROM drive of your computer. To start up the emulator 1. Place the bundled CD-ROM into your computer’s CD-ROM drive. • This will cause fx-ES Emulator to start up automatically and display its Menu screen.
If fx-ES Emulator does not start up automatically... If fx-ES Emulator does not start up automatically when you set the CD-ROM into your computer’s CD-ROM drive or if you start up your computer with the CD-ROM already in the drive, navigate to the Window’s “My Computer” window and double-click “CD-ROM Drive”. This will start up fx-ES Emulator. If fx-ES Emulator still does not start up, navigate to the CD-ROM and double-click “fxES_Emu. exe”. 2.
k Emulator Operations • To operate the virtual calculator on your computer screen, “press” its buttons by clicking them. • You also can perform the following key operations on your computer keyboard. fx-82ES fx-83ES fx-300ES fx-82AU Computer Keyboard Calculator Key TAB, SPACE A F1 ! F2 a F3 , F4 p Home , Enter = Delete D BackSpace D ↓↑→← cfed ^ 6 ( ( ) ) +−`/ +-*/ 0 − 9 a−j . (Period) .
k Emulator Shortcut Menus • Right-clicking your mouse while the mouse pointer is located on the emulator will display a shortcut menu. Menu Item Submenu Item Description Zoom(`2) Makes the emulator image double the size of the actual calculator.*1 (initial default) Zoom(`3) Makes the emulator image triple the size of the actual calculator. Pop-up Display Pop-up Display When selected (indicated by a check mark), displays the calculator LCD as a separate window.
Menu Item Submenu Item Description fx-**** Manual Displays a calculator User’s Guide. Emulator Manual Displays the fx-ES Emulator User’s Guide. License Displays the end user license agreement (EULA). About fx-**** Displays version information. Exit Exits the emulator. *1 Each dot of the actual calculator LCD corresponds to one pixel on the computer screen. In the case of double size, one dot corresponds to 2 × 2 pixels.
To display the LCD as a separate window 1. Display the shortcut menu. 2. Select “Pop-up Display” to display a sub-menu. 3. Select “Pop-up Display” to display the LCD as a separate window. • A check mark will be next to “Pop-up Display” on the sub-menu while the LCD is displayed as a separate window. • To close the separate window, select “Pop-up Display” again. To change the LCD window size 1. Display the shortcut menu. 2. Select “Pop-up Display” to display a sub-menu. 3.
To capture the calculator LCD image to the Windows clipboard 1. Display the shortcut menu. 2. Select “Capture Screen” to capture an image of the LCD. • You can also use Ctrl+C in place of the above two steps to capture the LCD image. To specify a frame around the LCD image 1. Display the shortcut menu. 2. Select “Capture Setting” to display a sub-menu. 3. Select “Outer Frame”. • To remove the boundary from the LCD image, select “Outer Frame” again.
To exit the emulator 1. Display the shortcut menu. 2. On the shortcut menu, select [Exit]. 3. On the Menu screen that appears, click [EXIT]. Note • The settings listed below are saved whenever you exit the emulator. If you are using the emulator while logged on as a GUEST user, however, these settings will return to their initial defaults.
CASIO COMPUTER CO., LTD.