
Versão 3.00 do Software Guia do Usuário


ε-7
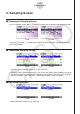
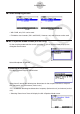
Sampling Screen
8. Use the d and e keys to move the vertical cursor of the output range end point and
then press w to register the end point.
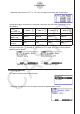
Setting both the start point and end point will cause the Output Frequency dialog box
shown below to appear.
R
9. Specify the output frequency percent (%) value.
To output the original sound unchanged, specify 100 (%). To output a sound one octave
higher than the original sound, input 200 (%). To output a sound one octave lower than
the original sound, input 50 (%).
10. Input a percent (%) value and then press w.
This outputs the sound of the waveform within the selected range.
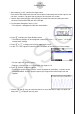
If the specified result cannot be output as a sound, the message “Range Error” will
appear. If this happens, press J to display the screen shown below and change the
settings.
11. To stop sound output on the EA-200, press t
he [START/STOP] key.
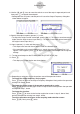
12. Press w.
This displays a screen like the one shown below.
13. Depending on what you want to do, perform one of the operations below.
To change the output frequency and try again:
Press 1(Yes) to return to the Output Frequency dialog box. Next, perform the operation
starting from step 9, above.
To change the output range of the waveform graph and try again:
Press 6(No) to return to the graph screen in step 6, above. Next, perform the operation
starting from step 7, above.
To change the function:
Press 6(No)J to return to the function registration screen in step 5, above. Next,
perform the operation starting from step 5, above.
To exit the procedure and return to the sampling mode selection screen:
Press 6(No). Next, press J twice.
•
•
•
•
•