
User Manual


ε-28
Starting a Sampling Operation
9. Starting a Sampling Operation
This section describes how to use a setup configured using the E-CON4 mode to start a
Data Logger sampling operation.
k Before getting started...
Be sure to perform the following steps before starting sampling with a Data Logger.
1. Connect the calculator to a Data Logger.
2. Turn on Data Logger power.
3. In accordance with the setup you plan to use, connect the proper sensor to the
appropriate Data Logger channel.
4. Prepare the item whose data is to be sampled.
k Starting a Sampling Operation
A sampling operation can be started from the sampling screen or the setup memory list.
Here we will show the operation that starts from the sampling screen. See “To recall a setup
and use it for sampling” on page
ε-26 for information about starting sampling from the setup
memory list.
You need to perform a special operation in the case of Manual Sampling. For more
information, refer to “Manual Sampling” (page
ε-31).
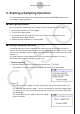
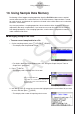
• To start sampling
1. Enter the sampling mode you want to use and then press 6(START).
• This displays a sampling start confirmation screen like the one shown below.
2. Press w.
• This sets up the Data Logger using the setup data in the current setup memory area.
• The message “Setting Data Logger...” remains on the display while Data Logger setup
is in progress. You can cancel the setup operation any time this message is displayed
by pressing A.
• The screen shown nearby appears after Data Logger
setup is complete.