
User manual - fx-CG10_20_Soft

2010080120100801
ε-12
Using Advanced Setup
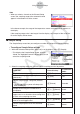
• Note that the mode you select also determines the channel(s) you can use.
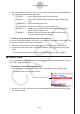
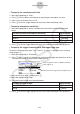
Sampling Mode Selectable Channel(s)
Real-time, Extended, Normal CH1, CH2, CH3, SONIC
Fast CH1, Mic
Sound Mic
Clock, Period CH1
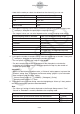
3. To change the sampling interval setting, move the highlighting to “Interval”. Next, press
1 to display a dialog box for specifying the sampling interval.
• The range of values you can select depends on the current sampling mode setting.
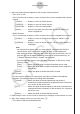
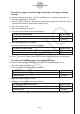
If this sampling mode is selected: This is the allowable setting range:
Real-time 0.2 to 299 sec
Fast 20 to 500 μsec
Extended 5 to 240 min
Period “=Trigger” only (no value input required)
Sound 20 to 27 μsec
Clock “=Trigger” only (no value input required)
Normal 0.0005 to 299 sec
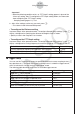
4. To change the number of samples setting, move the highlighting to “Number”. Next, press
1 to display a dialog box for specifying the number of samples.
• You can specify a value in the range of 10 to 30,000.
• The total sampling time shown at the bottom of the dialog box is calculated by
multiplying the “Sampling Interval” value you specified in step 3 by the number of
samples you specify here.
Important!
• When all of the following conditions exist, a “Distance” setting appears in place of the
“Number” setting. See “To configure the Distance setting” (page
ε-13) for information
about configuring the “Distance” setting.
- Channel setup (page ε-9): 2(VERNIR) - [Photogate] - [Pulley]
- Sampling mode (page ε-11): Clock
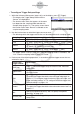
5. To change the warm-up time setting, move the highlighting to “Warm-up”. Next, perform
one of the function key operations described below.
Note
• The “Warm-up” setting will not be displayed on the Sample Setup screen if “Fast”,
“Sound” or “Extended” is currently selected as the sampling mode.
To do this: Press this key:
Have the warm-up time for each sensor set automatically
1(Auto)
Input a warm-up time, in seconds, manually
2(Manual)
Disable the warm-up time
3(None)