
User Manual


11
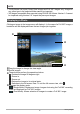
Viewing Images
Use the procedure below to select two images and create a Full 360° image. You can
also use images shot with the Dome View recording mode to create a Full 360°
image.
1. On the main screen, click (Dual Mode).
This displays an image menu that shows all images as Dome View images.
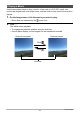
2. On the image menu, click the left-side image you want.
3. On the image menu, click the right-side image you want.
This will display the selected images as a Full 360° image.
• At this point, you can click to enter the Single Mode, which discards the
created Full 360° image. If you want to save a Full 360° image you created,
perform the above procedure and then export the result as a 360 degree
compatible file (page 15).
NOTE
• You cannot select the same image for the left side and right.
• You cannot create a Full 360° image by combining a movie image with a snapshot.
• You cannot create a Full 360° image by combining a CS image with a snapshot.
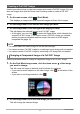
Use the procedure below to change a component image of a Full 360° image.
1. On the Dual Mode image menu, click the down arrow of the image
you want to change.
This will cause the image to become pink to indicate it is selected.
• If you want to switch selection to the other image, click at the bottom of the
screen.
• If you want to exit image selection, click .
2. On the image menu, click the new image you want to use.
This will change the selected image.
Creating a Full 360° Image
Changing a Component Image of a Full 360° Image