
User manual - EXZS20_Z690_M29_FC


Table Of Contents
- Accessories
- Read this first!
- Contents
- General Guide
- Monitor Screen Contents
- Quick Start Basics
- What you can do with your CASIO camera
- First, charge the battery prior to use.
- Configuring Basic Settings the First Time You Turn On the Camera
- Preparing a Memory Card
- Turning the Camera On and Off
- Holding the Camera Correctly
- To shoot a snapshot
- Viewing Snapshots
- Deleting Snapshots and Movies
- Snapshot Shooting Precautions
- Snapshot Tutorial
- Recording Movie Images and Audio
- Using BEST SHOT
- Advanced Settings
- Using On-screen Menus
- REC Mode Settings (REC)
- Selecting a Focus Mode (Focus)
- Changing the Focus Frame Shape (Focus Frame)
- Using Continuous Shutter (CS)
- Reducing the Effects of Camera and Subject Movement (Anti Shake)
- Specifying the Auto Focus Area (AF Area)
- Assigning Functions to the [<] and [>] Keys (L/R Key)
- Displaying the On-screen Grid (Grid)
- Using Icon Help (Icon Help)
- Configuring Power On Default Settings (Memory)
- Image Quality Settings (Quality)
- Viewing Snapshots and Movies
- Other Playback Functions (PLAY)
- Printing
- Using the Camera with a Computer
- Other Settings (Set Up)
- Turning off Eye-Fi Card Communication (Eye-Fi)
- Configuring Camera Sound Settings (Sounds)
- Configuring a Startup Image (Startup)
- Specifying the File Name Serial Number Generation Rule (File No.)
- Configuring World Time Settings (World Time)
- Time Stamping Snapshots (Timestamp)
- Setting the Camera’s Clock (Adjust)
- Specifying the Date Style (Date Style)
- Specifying the Display Language (Language)
- Configuring Sleep State Settings (Sleep)
- Configuring Auto Power Settings (Auto Power Off)
- Configuring [_] and [>] Settings (REC/PLAY)
- Disabling File Deletion (_ Disabled)
- Configuring USB Protocol Settings (USB)
- Selecting the Screen Aspect Ratio and Video Output System (Video Out)
- Formatting Built-in Memory or a Memory Card (Format)
- Resetting the Camera to Factory Defaults (Reset)
- Appendix
61
Advanced Settings
NOTE
• ISO sensitivity, aperture, and shutter speed do not appear on the monitor screen
when you half-press the shutter button while “Auto” is selected. These values will
appear briefly, however, in the preview image that is displayed immediately after
you shoot a snapshot.
• If the flash fires, the Anti Shake icon S will remain on the display, even though
Anti Shake does not function during flash photography.
• The ISO sensitivity setting (page 66) must be “Auto” for Anti Shake to work.
• Shooting with Anti Shake can cause an image to appear somewhat coarser than
normal and can cause slight deterioration of image resolution.
• Anti Shake may not be able to eliminate the effects of camera or subject movement
when movement is severe.
• Anti Shake is disabled during movie recording.
Procedure
[r] (REC) * [SET] * MENU * REC Tab * AF Area
IMPORTANT!
• Auto Focus is disabled when W (Manual Focus) is selected for the focus mode
(page 57), even if you select an AF area.
• Selecting “O
Tracking” can cause vibration and noise to occur due to lens
operation while tracking a subject. This does not indicate malfunction.
• While Face Detection (page 41) is turned on, regardless of the current AF Area
setting, “U Spot” (center) focusing will be used automatically whenever a face
cannot be detected for some reason.
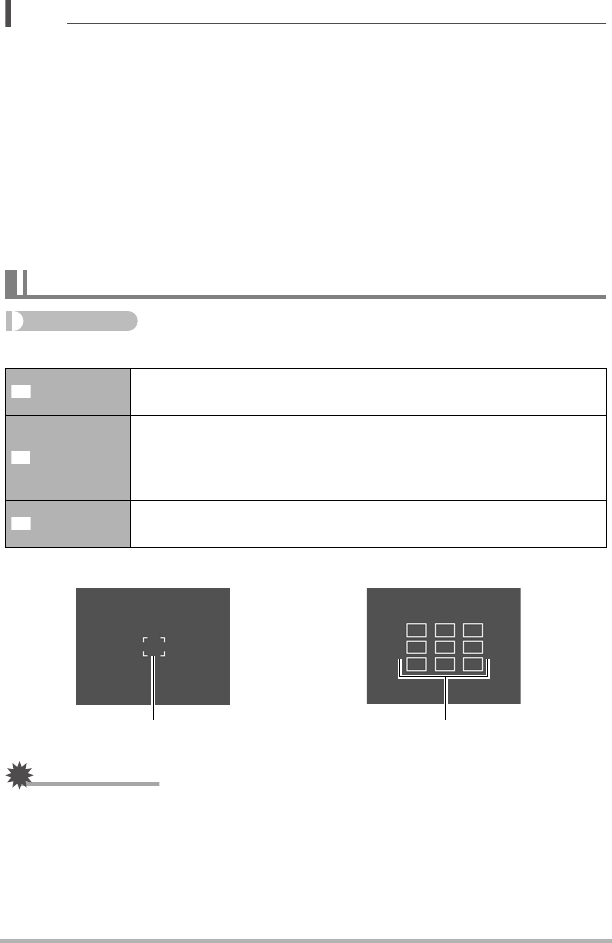
Specifying the Auto Focus Area (AF Area)
Spot
This mode takes readings of a small area in the center of the
image. This setting works well with focus lock (page 58).
Multi
When you half-press the shutter button while this setting selected,
the camera will select the optimum Auto Focus area from among
nine possible areas. The focus frame of the area where the
camera focuses will be displayed in green.
Tracking
Half-pressing the shutter button focuses on the subject and
causes the focus frame to track the movement of the subject.
U
I
O
“U Spot” or “O
Tracking”
Focus frame
Focus frame
“I
Multi”
C