
User manual - EXZS20_Z690_M29_FC


Table Of Contents
- Accessories
- Read this first!
- Contents
- General Guide
- Monitor Screen Contents
- Quick Start Basics
- What you can do with your CASIO camera
- First, charge the battery prior to use.
- Configuring Basic Settings the First Time You Turn On the Camera
- Preparing a Memory Card
- Turning the Camera On and Off
- Holding the Camera Correctly
- To shoot a snapshot
- Viewing Snapshots
- Deleting Snapshots and Movies
- Snapshot Shooting Precautions
- Snapshot Tutorial
- Recording Movie Images and Audio
- Using BEST SHOT
- Advanced Settings
- Using On-screen Menus
- REC Mode Settings (REC)
- Selecting a Focus Mode (Focus)
- Changing the Focus Frame Shape (Focus Frame)
- Using Continuous Shutter (CS)
- Reducing the Effects of Camera and Subject Movement (Anti Shake)
- Specifying the Auto Focus Area (AF Area)
- Assigning Functions to the [<] and [>] Keys (L/R Key)
- Displaying the On-screen Grid (Grid)
- Using Icon Help (Icon Help)
- Configuring Power On Default Settings (Memory)
- Image Quality Settings (Quality)
- Viewing Snapshots and Movies
- Other Playback Functions (PLAY)
- Printing
- Using the Camera with a Computer
- Other Settings (Set Up)
- Turning off Eye-Fi Card Communication (Eye-Fi)
- Configuring Camera Sound Settings (Sounds)
- Configuring a Startup Image (Startup)
- Specifying the File Name Serial Number Generation Rule (File No.)
- Configuring World Time Settings (World Time)
- Time Stamping Snapshots (Timestamp)
- Setting the Camera’s Clock (Adjust)
- Specifying the Date Style (Date Style)
- Specifying the Display Language (Language)
- Configuring Sleep State Settings (Sleep)
- Configuring Auto Power Settings (Auto Power Off)
- Configuring [_] and [>] Settings (REC/PLAY)
- Disabling File Deletion (_ Disabled)
- Configuring USB Protocol Settings (USB)
- Selecting the Screen Aspect Ratio and Video Output System (Video Out)
- Formatting Built-in Memory or a Memory Card (Format)
- Resetting the Camera to Factory Defaults (Reset)
- Appendix
26
Quick Start Basics
You can select one of two auto recording modes (Auto or Premium Auto) according to
your digital imaging needs.
1. Press [ON/OFF] (Power) to turn on the camera.
The camera will enter the REC mode.
• If the camera is in the PLAY mode, press [r] (REC).
• You also can configure the camera to turn on when you press [r] (REC) or
[p] (PLAY) (page 109).
2. Press [SET].
3. Use [8] and [2] to select the bottom Control Panel option (BS) and
then press [SET].
This will display a menu of BEST SHOT scenes.
4. Use [8], [2], [4], and [6] to select “Auto” or “Premium Auto”, and
then press [SET].
This enters the selected auto recording mode.
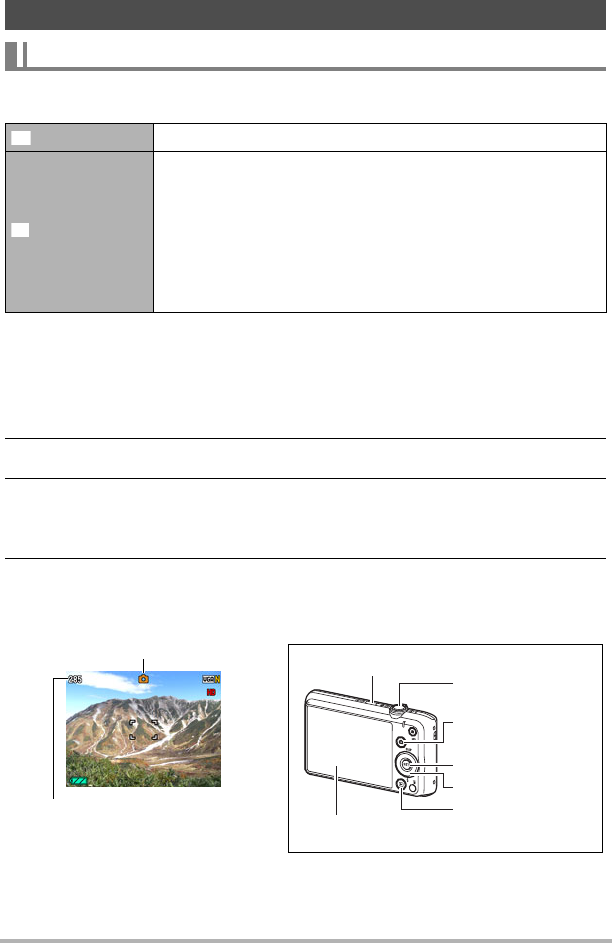
To shoot a snapshot
Selecting an Auto Recording Mode
Auto This is the standard Auto recording mode.
Premium Auto
With Premium Auto recording, the camera automatically
determines whether you are shooting a subject or scenery,
and other conditions. Premium Auto recording delivers higher
image quality than standard Auto recording.
• Premium Auto recording takes longer to process image data
after it is shot than Auto recording.
• It also requires more power (and runs down the battery
quicker) than Auto.
R
Ÿ
Auto recording mode icon
Remaining Snapshot Memory
Capacity (page 132)
Monitor screen
Shutter button
[r] (REC)
[SET]
[8] [2] [4] [6]
[ON/OFF] (Power)
[p] (PLAY)
B