
User`s guide


Table Of Contents
- INTRODUCTION
- QUICK START GUIDE
- GETTING READY
- BASIC IMAGE RECORDING
- OTHER RECORDING FUNCTIONS
- Selecting the Focus Mode
- Exposure Compensation (EV Shift)
- Adjusting White Balance
- Using Continuous Shutter
- Using the BEST SHOT Mode
- Reducing the Effects of Hand or Subject Movement
- Shooting with High Sensitivity
- Recording Images of Business Cards and Documents (Business Shot)
- Restoring an Old Photograph
- Recording a Movie
- Recording Audio
- Using the Histogram
- REC Mode Camera Settings
- Assigning Functions to the [<] and [>] Keys
- Turning the On-screen Grid On and Off
- Turning Image Review On and Off
- Using Icon Help
- Specifying Power On Default Settings
- Specifying ISO Sensitivity
- Selecting the Metering Mode
- Using the Filter Function
- Specifying Outline Sharpness
- Specifying Color Saturation
- Specifying Contrast
- Date Stamping Snapshots
- Resetting the Camera
- PLAYBACK
- Basic Playback Operation
- Zooming the Display Image
- Resizing an Image
- Cropping an Image
- Keystone Correction
- Using Color Restoration to Correct the Color of an Old Photograph
- Playing and Editing a Movie
- Displaying the 9-image View
- Displaying the Calendar Screen
- Playing a Slideshow
- Rotating the Display Image
- Adding Audio to a Snapshot
- Playing Back a Voice Recording File
- Displaying Camera Images on a TV Screen
- DELETING FILES
- FILE MANAGEMENT
- OTHER SETTINGS
- Configuring Sound Settings
- Specifying an Image for the Startup Screen
- Specifying the File Name Serial Number Generation Method
- Setting the Clock
- Using World Time
- Editing the Date and Time of an Image
- Changing the Display Language
- Changing the USB Port Protocol
- Configuring [_] (REC) and [>] (PLAY) Power On/Off Functions
- Formatting Built-in Memory
- USING A MEMORY CARD
- PRINTING IMAGES
- VIEWING IMAGES ON A COMPUTER
- USING THE CAMERA WITH A COMPUTER
- APPENDIX
BASIC IMAGE RECORDING
61
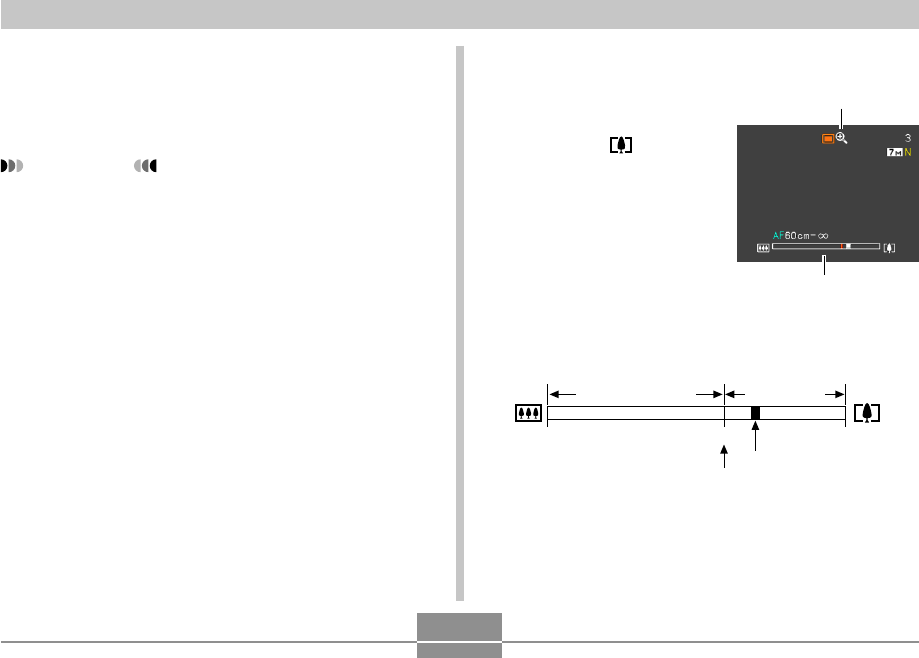
■ To record an image using digital zoom
1.
In the REC mode,
hold down the
telephoto ( ) side of
the zoom button.
• This causes the zoom
indicator to appear on
the display.
2.
When the zoom pointer reaches the optical/
digital zoom switch over point, it will stop.
• The above shows what the zoom indicator looks like
when digital zoom is turned on (page 62). The digital
zoom range is not displayed when digital zoom is
turned off.
1X 3X 12X
Optical Zoom range
Digital
Zoom range
Zoom pointer
Optical/digital zoom switch over point
Digital zoom indicator
Zoom indicator
Digital Zoom
Digital zoom digitally enlarges the part of the image at the
center of the image screen. The range of digital zoom is 3X
to 12X (in combination with optical zoom).
IMPORTANT!
• When you perform a digital zoom operation, the
camera manipulates the image data to enlarge the
center of the image. Unlike optical zoom, an image
enlarged with digital zoom appears coarser than the
original.
• Digital zoom is not supported while date stamping
(“Date” or “Date&Time”) is turned on (page 122).