
User`s guide


Table Of Contents
- INTRODUCTION
- QUICK START GUIDE
- GETTING READY
- BASIC IMAGE RECORDING
- OTHER RECORDING FUNCTIONS
- Selecting the Focus Mode
- Exposure Compensation (EV Shift)
- Adjusting White Balance
- Using Continuous Shutter
- Using the BEST SHOT Mode
- Reducing the Effects of Hand or Subject Movement
- Shooting with High Sensitivity
- Recording Images of Business Cards and Documents (Business Shot)
- Restoring an Old Photograph
- Recording a Movie
- Recording Audio
- Using the Histogram
- REC Mode Camera Settings
- Assigning Functions to the [<] and [>] Keys
- Turning the On-screen Grid On and Off
- Turning Image Review On and Off
- Using Icon Help
- Specifying Power On Default Settings
- Specifying ISO Sensitivity
- Selecting the Metering Mode
- Using the Filter Function
- Specifying Outline Sharpness
- Specifying Color Saturation
- Specifying Contrast
- Date Stamping Snapshots
- Resetting the Camera
- PLAYBACK
- Basic Playback Operation
- Zooming the Display Image
- Resizing an Image
- Cropping an Image
- Keystone Correction
- Using Color Restoration to Correct the Color of an Old Photograph
- Playing and Editing a Movie
- Displaying the 9-image View
- Displaying the Calendar Screen
- Playing a Slideshow
- Rotating the Display Image
- Adding Audio to a Snapshot
- Playing Back a Voice Recording File
- Displaying Camera Images on a TV Screen
- DELETING FILES
- FILE MANAGEMENT
- OTHER SETTINGS
- Configuring Sound Settings
- Specifying an Image for the Startup Screen
- Specifying the File Name Serial Number Generation Method
- Setting the Clock
- Using World Time
- Editing the Date and Time of an Image
- Changing the Display Language
- Changing the USB Port Protocol
- Configuring [_] (REC) and [>] (PLAY) Power On/Off Functions
- Formatting Built-in Memory
- USING A MEMORY CARD
- PRINTING IMAGES
- VIEWING IMAGES ON A COMPUTER
- USING THE CAMERA WITH A COMPUTER
- APPENDIX
GETTING READY
25
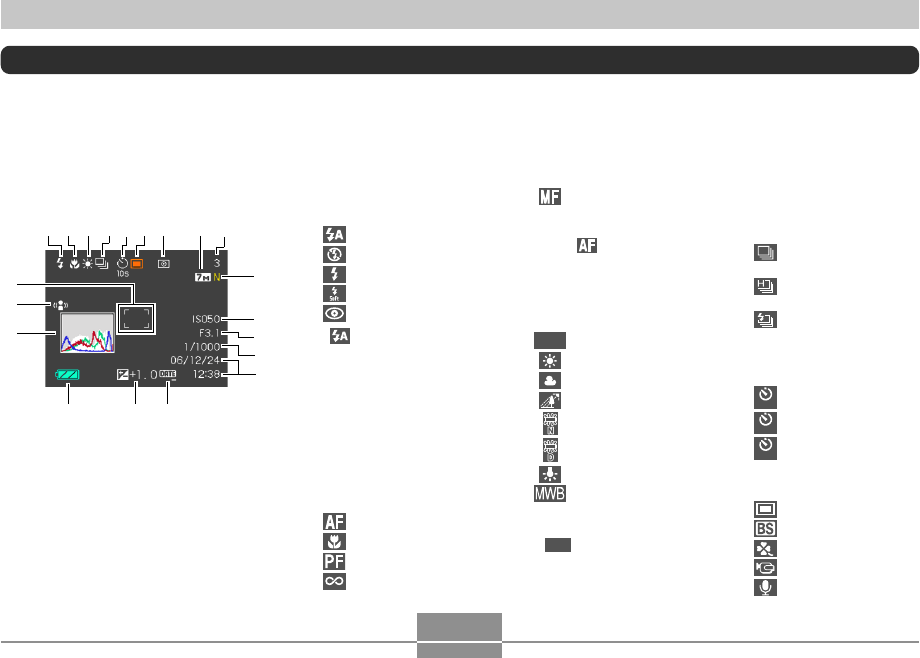
Monitor Screen Contents
The monitor screen uses various indicators and icons to keep you informed of the camera’s status.
• Note that the example screens in this chapter are for illustrative purposes only. They do not exactly match the screen
contents actually produced on the camera.
REC Mode
■ Screen Indicators
Manual Focus
• When you select Auto Focus
with Key Customize (page
112), appears only
briefly, and then disappears
from the display.
3 White balance indicator
(page 84)
AWB
Auto
Daylight
Overcast
Shade
Day White Fluorescent
Daylight Fluorescent
Tungsten
Manual
• When you select Auto with
Key Customize (page 112),
AWB
appears only briefly,
and then disappears from the
display.
1 Flash mode indicator
(page 63)
Auto Flash
Flash Off
Flash On
Soft Flash
Red-eye reduction
• appears momentarily
when you select Auto Flash
as the flash mode, and then
disappears.
• If the camera detects that
flash is required while auto
flash is selected, the flash on
indicator will appear when the
shutter button is pressed half
way.
2 Focus mode indicator
(page 74)
Auto Focus
Macro
Pan Focus
Infinity
4 Continuous Shutter
mode (page 87)
None Single shot
Normal-speed
Continuous Shutter
High-speed
Continuous Shutter
Flash Continuous
Shutter
5 Self-timer (page 68)
None 1-Image
10
s
Self-timer 10 sec
2
s
Self-timer 2 sec
x3
Triple self-timer
6 Recording types
Auto recording
BEST SHOT
easy
Movie
Voice Recording
J
I
81
35
G
9
D
C
B
A
F
2 467
0
H
E
B