
User`s guide


Table Of Contents
- INTRODUCTION
- QUICK START GUIDE
- GETTING READY
- BASIC IMAGE RECORDING
- OTHER RECORDING FUNCTIONS
- Selecting the Focus Mode
- Exposure Compensation (EV Shift)
- Adjusting White Balance
- Using Continuous Shutter
- Using the BEST SHOT Mode
- Reducing the Effects of Hand or Subject Movement
- Shooting with High Sensitivity
- Recording Images of Business Cards and Documents (Business Shot)
- Restoring an Old Photograph
- Recording a Movie
- Recording Audio
- Using the Histogram
- REC Mode Camera Settings
- Assigning Functions to the [<] and [>] Keys
- Turning the On-screen Grid On and Off
- Turning Image Review On and Off
- Using Icon Help
- Specifying Power On Default Settings
- Specifying ISO Sensitivity
- Selecting the Metering Mode
- Using the Filter Function
- Specifying Outline Sharpness
- Specifying Color Saturation
- Specifying Contrast
- Date Stamping Snapshots
- Resetting the Camera
- PLAYBACK
- Basic Playback Operation
- Zooming the Display Image
- Resizing an Image
- Cropping an Image
- Keystone Correction
- Using Color Restoration to Correct the Color of an Old Photograph
- Playing and Editing a Movie
- Displaying the 9-image View
- Displaying the Calendar Screen
- Playing a Slideshow
- Rotating the Display Image
- Adding Audio to a Snapshot
- Playing Back a Voice Recording File
- Displaying Camera Images on a TV Screen
- DELETING FILES
- FILE MANAGEMENT
- OTHER SETTINGS
- Configuring Sound Settings
- Specifying an Image for the Startup Screen
- Specifying the File Name Serial Number Generation Method
- Setting the Clock
- Using World Time
- Editing the Date and Time of an Image
- Changing the Display Language
- Changing the USB Port Protocol
- Configuring [_] (REC) and [>] (PLAY) Power On/Off Functions
- Formatting Built-in Memory
- USING A MEMORY CARD
- PRINTING IMAGES
- VIEWING IMAGES ON A COMPUTER
- USING THE CAMERA WITH A COMPUTER
- APPENDIX
APPENDIX
223
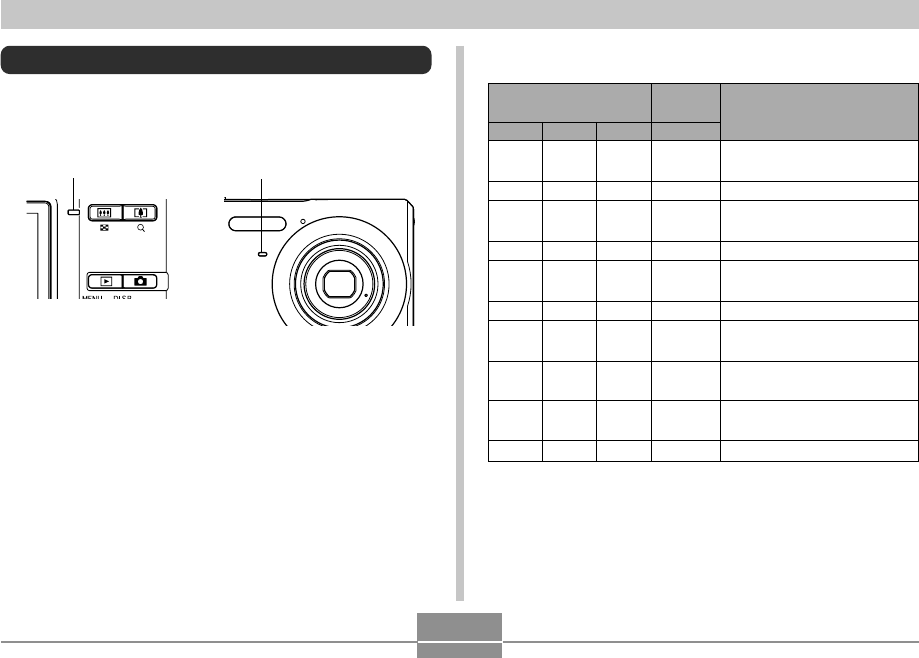
■ REC Mode
Indicator Lamp Reference
The camera has two indicator lamps: an operation lamp
and an self-timer lamp. These lamps light and flash to
indicate the current operational status of the camera.
* There are three lamp flash patterns. Pattern 1 flashes once per
second, Pattern 2 flashes twice per second, and Pattern 3 flashes
four times per second. The table below explains what each flash
pattern indicates.
Operation lamp Self-timer lamp
Operation Lamp
Self-timer
lamp
Red
Pattern 1
Pattern 2
Operational (Power on,
recording enabled)
Flash is charging.
Auto Focus operation was
successful.
Cannot Auto Focus.
Monitor screen is off. / Sleep
state
Storing image
Storing movie data /
processing image data
Self-timer countdown
(10 to 3 seconds)
Self-timer countdown
(3 to 0 seconds)
Cannot charge flash.
Meaning
Green
Lit
Lit
Pattern 3
Lit
Pattern 2
Pattern 1
Red
Pattern 1
Amber
Pattern 3