
User`s guide


Table Of Contents
- INTRODUCTION
- QUICK START GUIDE
- GETTING READY
- BASIC IMAGE RECORDING
- OTHER RECORDING FUNCTIONS
- Selecting the Focus Mode
- Exposure Compensation (EV Shift)
- Adjusting White Balance
- Using Continuous Shutter
- Using the BEST SHOT Mode
- Reducing the Effects of Hand or Subject Movement
- Shooting with High Sensitivity
- Recording Images of Business Cards and Documents (Business Shot)
- Restoring an Old Photograph
- Recording a Movie
- Recording Audio
- Using the Histogram
- REC Mode Camera Settings
- Assigning Functions to the [<] and [>] Keys
- Turning the On-screen Grid On and Off
- Turning Image Review On and Off
- Using Icon Help
- Specifying Power On Default Settings
- Specifying ISO Sensitivity
- Selecting the Metering Mode
- Using the Filter Function
- Specifying Outline Sharpness
- Specifying Color Saturation
- Specifying Contrast
- Date Stamping Snapshots
- Resetting the Camera
- PLAYBACK
- Basic Playback Operation
- Zooming the Display Image
- Resizing an Image
- Cropping an Image
- Keystone Correction
- Using Color Restoration to Correct the Color of an Old Photograph
- Playing and Editing a Movie
- Displaying the 9-image View
- Displaying the Calendar Screen
- Playing a Slideshow
- Rotating the Display Image
- Adding Audio to a Snapshot
- Playing Back a Voice Recording File
- Displaying Camera Images on a TV Screen
- DELETING FILES
- FILE MANAGEMENT
- OTHER SETTINGS
- Configuring Sound Settings
- Specifying an Image for the Startup Screen
- Specifying the File Name Serial Number Generation Method
- Setting the Clock
- Using World Time
- Editing the Date and Time of an Image
- Changing the Display Language
- Changing the USB Port Protocol
- Configuring [_] (REC) and [>] (PLAY) Power On/Off Functions
- Formatting Built-in Memory
- USING A MEMORY CARD
- PRINTING IMAGES
- VIEWING IMAGES ON A COMPUTER
- USING THE CAMERA WITH A COMPUTER
- APPENDIX
PLAYBACK
135
To do this:
Fast forward or fast reverse
playback
Pause or unpause movie
playback
Scroll paused playback one
frame
Cancel the cut operation
Do this:
Press [왗] or [왘].
Press [SET].
Press [왗] or [왘].
Press [MENU].
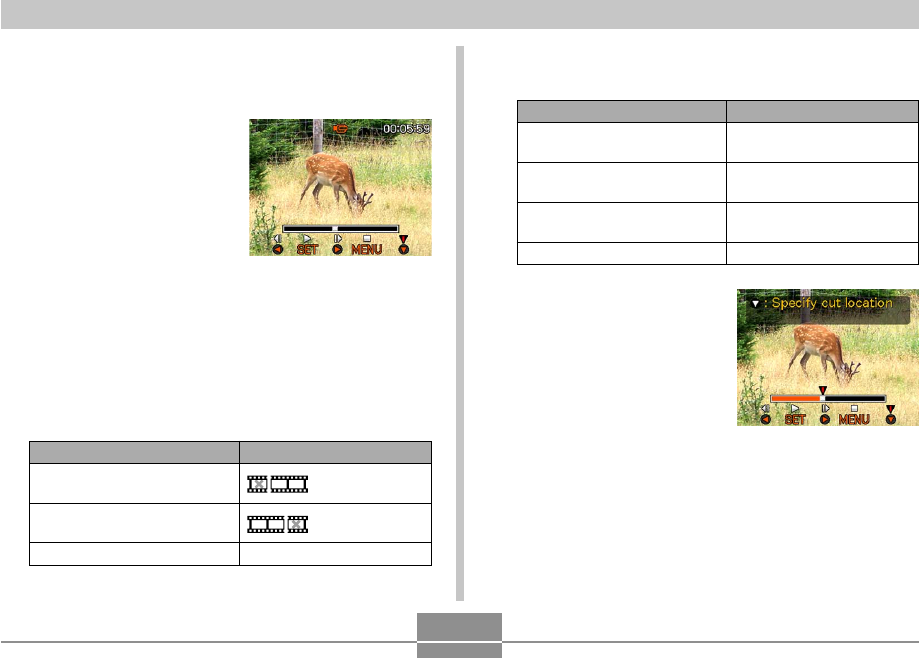
4.
Display the frame where you want the cut to
be located.
• The red portion of the
indicator bar shows
what part will be cut.
To do this:
Cut everything before a
specific frame
Cut everything after a specific
frame
Exit the cut mode
Select this setting:
Cut
Cut
Cancel
■ To cut everything before or after a specific
frame
1.
While the movie you
are editing is playing,
press [SET].
• This will pause movie
playback.
2.
Press [왔].
• You can also display the same screen while in the
PLAY mode, by pressing [MENU], selecting the
“PLAY” tab, selecting “Movie Editing”, and then
pressing [왘].
3.
Use [왖] and [왔] to select the operation you
want to perform.