
User`s guide


Table Of Contents
- INTRODUCTION
- QUICK START GUIDE
- GETTING READY
- BASIC IMAGE RECORDING
- OTHER RECORDING FUNCTIONS
- Selecting the Focus Mode
- Exposure Compensation (EV Shift)
- Adjusting White Balance
- Using Continuous Shutter
- Using the BEST SHOT Mode
- Reducing the Effects of Hand or Subject Movement
- Shooting with High Sensitivity
- Recording Images of Business Cards and Documents (Business Shot)
- Restoring an Old Photograph
- Recording a Movie
- Recording Audio
- Using the Histogram
- REC Mode Camera Settings
- Assigning Functions to the [<] and [>] Keys
- Turning the On-screen Grid On and Off
- Turning Image Review On and Off
- Using Icon Help
- Specifying Power On Default Settings
- Specifying ISO Sensitivity
- Selecting the Metering Mode
- Using the Filter Function
- Specifying Outline Sharpness
- Specifying Color Saturation
- Specifying Contrast
- Date Stamping Snapshots
- Resetting the Camera
- PLAYBACK
- Basic Playback Operation
- Zooming the Display Image
- Resizing an Image
- Cropping an Image
- Keystone Correction
- Using Color Restoration to Correct the Color of an Old Photograph
- Playing and Editing a Movie
- Displaying the 9-image View
- Displaying the Calendar Screen
- Playing a Slideshow
- Rotating the Display Image
- Adding Audio to a Snapshot
- Playing Back a Voice Recording File
- Displaying Camera Images on a TV Screen
- DELETING FILES
- FILE MANAGEMENT
- OTHER SETTINGS
- Configuring Sound Settings
- Specifying an Image for the Startup Screen
- Specifying the File Name Serial Number Generation Method
- Setting the Clock
- Using World Time
- Editing the Date and Time of an Image
- Changing the Display Language
- Changing the USB Port Protocol
- Configuring [_] (REC) and [>] (PLAY) Power On/Off Functions
- Formatting Built-in Memory
- USING A MEMORY CARD
- PRINTING IMAGES
- VIEWING IMAGES ON A COMPUTER
- USING THE CAMERA WITH A COMPUTER
- APPENDIX
OTHER RECORDING FUNCTIONS
109
■ Audio Recording Precautions
• Take care that you do not
block the microphone with
your fingers.
• Good recording results are not possible when the camera
is too far from the subject.
• Pressing the power button or pressing [ ] (PLAY) stops
recording and stores any audio recorded up to that point.
• You can also perform “after-recording” to add audio to a
snapshot after recording it, and also change the audio
recorded for an image. See page 145 for more
information.
Microphone
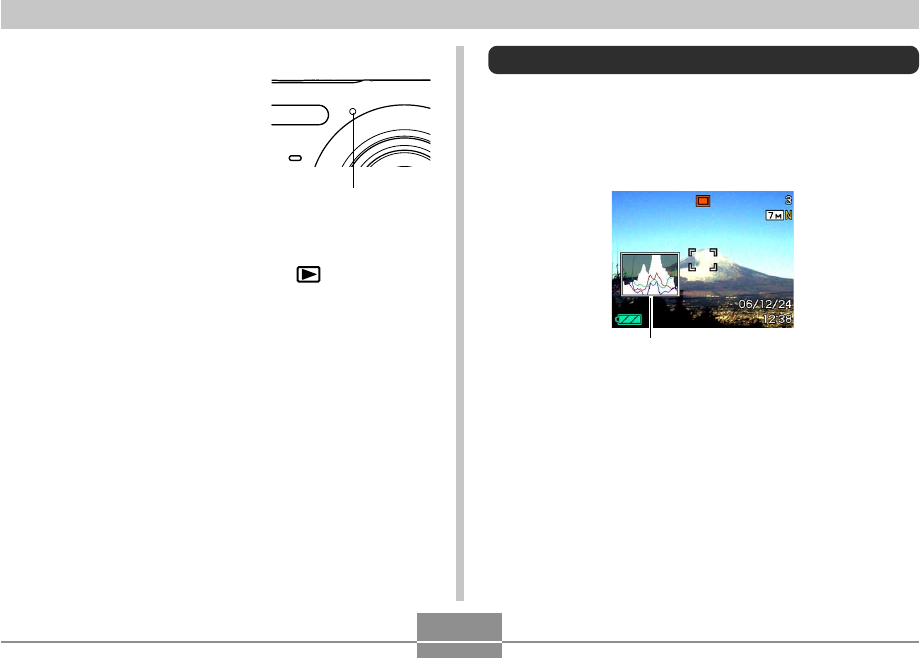
Using the Histogram
You can use [왖] (DISP) to display a histogram on the
monitor screen (page 29). The histogram lets you check
exposure conditions as you record images. You can also
display the histogram of a recorded image in the PLAY
mode.
Histogram
• A histogram is a graph that represents the lightness of an
image in terms of the number of pixels. The vertical axis
indicates the number of pixels, while the horizontal axis
indicates lightness. You can use the histogram to
determine whether an image includes the shadowing (left
side), mid tones (center), and highlighting (right) required
to bring out sufficient image detail. If the histogram
appears too lopsided for some reason, you can use EV
shift (exposure compensation) to move it left or right in
order to achieve better balance. Optimum exposure can
be achieved by correcting exposure so the graph is as
close to the center as possible.