
User manual - EXFS10_M10_FB
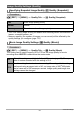
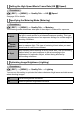
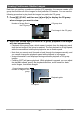
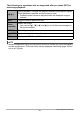

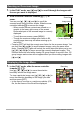
Table Of Contents
- Unpacking
- Read this first!
- Contents
- General Guide
- Monitor Screen Contents
- Quick Start Basics
- What is a digital camera?
- What you can do with your CASIO camera
- First, charge the battery prior to use.
- Configuring Basic Settings the First Time You Turn On the Camera
- Preparing a Memory Card
- Turning the Camera On and Off
- To shoot a snapshot
- Holding the Camera Correctly
- Viewing Snapshots
- Deleting Images
- Snapshot Shooting Precautions
- Snapshot Tutorial
- Using the Control Panel
- Changing the Image Size (Size)
- Specifying ISO Sensitivity (ISO)
- Adjusting White Balance (White Balance)
- Correcting Image Brightness (EV Shift)
- Shooting with Slow Motion View
- Using Lag Correction (Lag Correction)
- Using Flash (Flash)
- Changing the Control Panel Date/Time Style
- Shooting with Zoom
- Using Continuous Shutter
- Recording Movies
- Using BEST SHOT
- What is BEST SHOT?
- To shoot with BEST SHOT
- Shooting with High Speed Night Scene (High Speed Night Scene)
- Shooting with High Speed Anti Shake (High Speed Anti Shake)
- Isolating Moving Subjects (Multi-motion image)
- Shooting with Priority on Subject Faces (High Speed Best Selection)
- Shooting an Image in Accordance with Subject Movement (Move Out CS/Move In CS)
- Advanced Settings
- Using On-screen Menus
- REC Mode Settings (REC)
- Selecting a Focus Mode (Focus)
- Using the Self-timer (Self-timer)
- Reducing the Effects of Camera and Subject Movement (Anti Shake)
- Specifying the Auto Focus Area (AF Area)
- Using the Auto Focus Assist Light (AF Assist Light)
- Shooting with Face Detection (Face Detection)
- Shooting with Continuous Auto Focus (Continuous AF)
- Changing the Continuous Shutter Mode (CS)
- Configuring the Continuous Shutter Image Save Method (Save CS Images)
- Turning Digital Zoom On or Off (Digital Zoom)
- Assigning Functions to the [<] and [>] Keys (L/R Key)
- Shooting with Quick Shutter (Quick Shutter)
- Displaying the On-screen Grid (Grid)
- Turning on Image Review (Review)
- Using Icon Help (Icon Help)
- Configuring Power On Default Settings (Memory)
- Image Quality Settings (Quality)
- Specifying Snapshot Image Quality (_ Quality (Snapshot))
- Movie Image Quality Settings (_ Quality (Movie))
- Setting the High Speed Movie Frame Rate (HS _ Speed)
- Specifying the Metering Mode (Metering)
- Optimizing Image Brightness (Lighting)
- Specifying Flash Intensity (Flash Intensity)
- Using Built-in Color Filters (Color Filter)
- Controlling Image Sharpness (Sharpness)
- Controlling Color Saturation (Saturation)
- Adjusting Image Contrast (Contrast)
- Viewing Snapshots and Movies
- Other Playback Functions (PLAY)
- Playing a Slideshow on the Camera (Slideshow)
- Creating a Snapshot of Movie Frames (MOTION PRINT)
- Editing a Movie on the Camera (Movie Editing)
- Adjusting White Balance (White Balance)
- Adjusting the Brightness of an Existing Snapshot (Brightness)
- Selecting Images for Printing (DPOF Printing)
- Protecting a File Against Deletion (Protect)
- Rotating an Image (Rotation)
- Resizing a Snapshot (Resize)
- Cropping a Snapshot (Trimming)
- Copying Files (Copy)
- Dividing Up a Continuous Shutter Group (Divide Group)
- Editing a CS Image (CS Frame Edit)
- Printing
- Using the Camera with a Computer
- Other Settings (Set Up)
- Adjusting Monitor Screen Brightness (Screen)
- Turning off Eye-Fi Card Communication (Eye-Fi)
- Configuring Camera Sound Settings (Sounds)
- Specifying the File Name Serial Number Generation Rule (File No.)
- Configuring World Time Settings (World Time)
- Time Stamping Snapshots (Timestamp)
- Setting the Camera’s Clock (Adjust)
- Specifying the Date Style (Date Style)
- Specifying the Display Language (Language)
- Configuring Sleep State Settings (Sleep)
- Configuring Auto Power Off Settings (Auto Power Off)
- Configuring [_] and [>] Settings (REC/PLAY)
- Configuring USB Protocol Settings (USB)
- Selecting the Screen Aspect Ratio and Video Output System (Video Out)
- Configuring a Startup Image (Startup)
- Formatting Built-in Memory or a Memory Card (Format)
- Resetting the Camera to Factory Defaults (Reset)
- Configuring Monitor Screen Settings
- Appendix

91
Advanced Settings
Procedure
[r] (REC) * [MENU] * Quality Tab * T Quality (Snapshot)
• The “Fine” setting helps to bring out details when shooting dense tree branches or
leaves, a complex pattern, etc.
• Memory capacity (the number of images you can record) will be affected by the
quality settings you configure (page 176).
Procedure
[r] (REC) * [MENU] * Quality Tab * » Quality (Movie)
This setting can be used to specify HD or STD as the image quality for movie
recording when HD/STD is selected as the movie mode.
Image Quality Settings (Quality)
Specifying Snapshot Image Quality (T Quality (Snapshot))
Fine Gives image quality priority
Normal Normal
Economy Gives the number of images priority
Movie Image Quality Settings (» Quality (Movie))
HD
Select this setting record high-definition (HD) movies (page 57). The aspect
ratio of movies recorded with this setting is 16:9.
STD
Use this setting for standard movie recording. Recording with this setting is
performed using an aspect ratio of 4:3, an image size of 640
x
480 pixels,
and a frame rate of 30 frames per second. Image quality and image size
settings cannot be changed.