User manual - EXFS10_M10_FB
Table Of Contents
- Unpacking
- Read this first!
- Contents
- General Guide
- Monitor Screen Contents
- Quick Start Basics
- What is a digital camera?
- What you can do with your CASIO camera
- First, charge the battery prior to use.
- Configuring Basic Settings the First Time You Turn On the Camera
- Preparing a Memory Card
- Turning the Camera On and Off
- To shoot a snapshot
- Holding the Camera Correctly
- Viewing Snapshots
- Deleting Images
- Snapshot Shooting Precautions
- Snapshot Tutorial
- Using the Control Panel
- Changing the Image Size (Size)
- Specifying ISO Sensitivity (ISO)
- Adjusting White Balance (White Balance)
- Correcting Image Brightness (EV Shift)
- Shooting with Slow Motion View
- Using Lag Correction (Lag Correction)
- Using Flash (Flash)
- Changing the Control Panel Date/Time Style
- Shooting with Zoom
- Using Continuous Shutter
- Recording Movies
- Using BEST SHOT
- What is BEST SHOT?
- To shoot with BEST SHOT
- Shooting with High Speed Night Scene (High Speed Night Scene)
- Shooting with High Speed Anti Shake (High Speed Anti Shake)
- Isolating Moving Subjects (Multi-motion image)
- Shooting with Priority on Subject Faces (High Speed Best Selection)
- Shooting an Image in Accordance with Subject Movement (Move Out CS/Move In CS)
- Advanced Settings
- Using On-screen Menus
- REC Mode Settings (REC)
- Selecting a Focus Mode (Focus)
- Using the Self-timer (Self-timer)
- Reducing the Effects of Camera and Subject Movement (Anti Shake)
- Specifying the Auto Focus Area (AF Area)
- Using the Auto Focus Assist Light (AF Assist Light)
- Shooting with Face Detection (Face Detection)
- Shooting with Continuous Auto Focus (Continuous AF)
- Changing the Continuous Shutter Mode (CS)
- Configuring the Continuous Shutter Image Save Method (Save CS Images)
- Turning Digital Zoom On or Off (Digital Zoom)
- Assigning Functions to the [<] and [>] Keys (L/R Key)
- Shooting with Quick Shutter (Quick Shutter)
- Displaying the On-screen Grid (Grid)
- Turning on Image Review (Review)
- Using Icon Help (Icon Help)
- Configuring Power On Default Settings (Memory)
- Image Quality Settings (Quality)
- Specifying Snapshot Image Quality (_ Quality (Snapshot))
- Movie Image Quality Settings (_ Quality (Movie))
- Setting the High Speed Movie Frame Rate (HS _ Speed)
- Specifying the Metering Mode (Metering)
- Optimizing Image Brightness (Lighting)
- Specifying Flash Intensity (Flash Intensity)
- Using Built-in Color Filters (Color Filter)
- Controlling Image Sharpness (Sharpness)
- Controlling Color Saturation (Saturation)
- Adjusting Image Contrast (Contrast)
- Viewing Snapshots and Movies
- Other Playback Functions (PLAY)
- Playing a Slideshow on the Camera (Slideshow)
- Creating a Snapshot of Movie Frames (MOTION PRINT)
- Editing a Movie on the Camera (Movie Editing)
- Adjusting White Balance (White Balance)
- Adjusting the Brightness of an Existing Snapshot (Brightness)
- Selecting Images for Printing (DPOF Printing)
- Protecting a File Against Deletion (Protect)
- Rotating an Image (Rotation)
- Resizing a Snapshot (Resize)
- Cropping a Snapshot (Trimming)
- Copying Files (Copy)
- Dividing Up a Continuous Shutter Group (Divide Group)
- Editing a CS Image (CS Frame Edit)
- Printing
- Using the Camera with a Computer
- Other Settings (Set Up)
- Adjusting Monitor Screen Brightness (Screen)
- Turning off Eye-Fi Card Communication (Eye-Fi)
- Configuring Camera Sound Settings (Sounds)
- Specifying the File Name Serial Number Generation Rule (File No.)
- Configuring World Time Settings (World Time)
- Time Stamping Snapshots (Timestamp)
- Setting the Camera’s Clock (Adjust)
- Specifying the Date Style (Date Style)
- Specifying the Display Language (Language)
- Configuring Sleep State Settings (Sleep)
- Configuring Auto Power Off Settings (Auto Power Off)
- Configuring [_] and [>] Settings (REC/PLAY)
- Configuring USB Protocol Settings (USB)
- Selecting the Screen Aspect Ratio and Video Output System (Video Out)
- Configuring a Startup Image (Startup)
- Formatting Built-in Memory or a Memory Card (Format)
- Resetting the Camera to Factory Defaults (Reset)
- Configuring Monitor Screen Settings
- Appendix

59
Recording Movies
NOTE
• The higher the frame rate (speed), the more lighting is required when shooting.
When shooting a high speed movie, shoot in a well-lit environment.
• When recording certain types of movies, the image that appears on the monitor
screen may be smaller than normal. When recording a high speed movie, there are
black bands along the top, bottom, left, and right of the screen.
• When recording a high speed movie, light source flicker can cause horizontal
bands to appear in the image. This does not indicate malfunction of the camera.
• During high speed movie recording, Auto Focus and exposure remain fixed at the
levels they were when you initially started recording. Zoom and monitor screen
content switching are all disabled.
• To focus the image, half-press the shutter button for Auto Focus or focus manually
before starting the high speed movie recording operation.
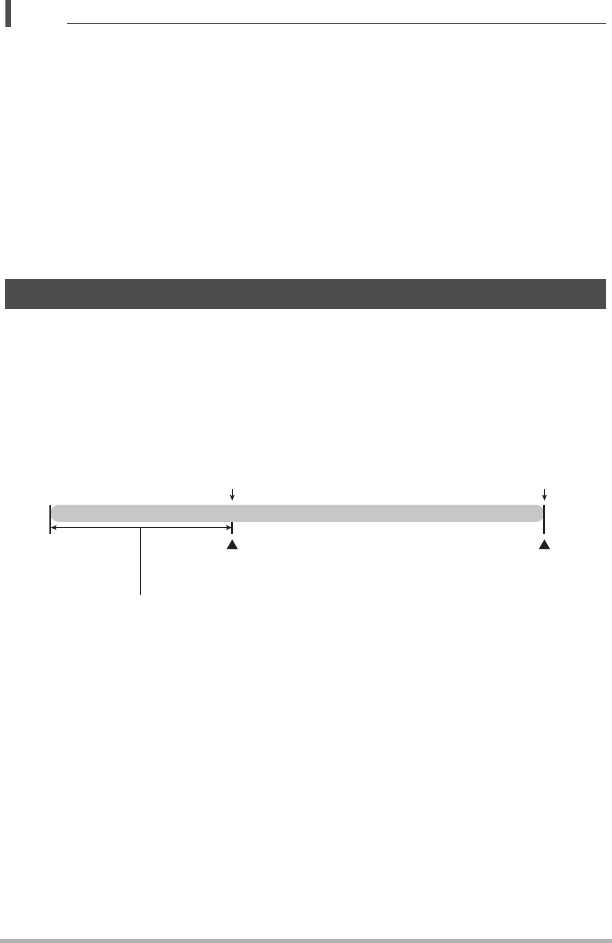
With this feature, the camera pre-records up to five seconds of whatever is happening
in front of the lens in a buffer that is continually updated. Pressing [0] saves the
pre-recorded action (buffer contents) followed by real-time recording. Real-time
recording continues until you stop it. Prerecord Movie can be used when shooting a
standard (STD) movie, a high-definition (HD) movie, or a high speed (HS) movie.
• When using Prerecord Movie in combination with high speed movie, the buffer will
store two seconds of pre-recording instead of the usual five.
Using Prerecord Movie (Prerecord (Movie))
[0]
Movie
Real-time recording start
5-second prerecorded part (from the buffer)
* Approximately two seconds for high speed movie
[0]
Real-time recording end


