
User manual - EXF1_MF_FD
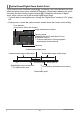
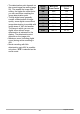
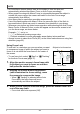

Table Of Contents
- Unpacking
- Read this first!
- Contents
- Quick Start Basics
- What is a digital camera?
- What you can do with your CASIO camera
- Attaching the Lens Cap and Strap
- First, charge the battery prior to use.
- Configuring the Display Language the First Time You Turn On the Camera
- Preparing a Memory Card
- To shoot a snapshot
- Holding the Camera Correctly
- Viewing Snapshots
- Deleting Images
- Snapshot Shooting Precautions
- Turning the Camera On and Off
- Snapshot Tutorial
- Selecting a Recording Mode
- Using the Control Panel
- Changing the Image Size (Size)
- Using Flash (Flash)
- Specifying ISO Sensitivity (ISO)
- Adjusting White Balance (White Balance)
- Correcting Image Brightness (EV Shift)
- Specifying the Metering Mode (Metering)
- Specifying the Auto Focus Area (AF Area)
- Shooting with the REC Light (REC Light)
- Changing the Control Panel Date/Time Style
- Shooting with Zoom
- Selecting a Focus Mode (Focus)
- Correcting for Back Lighting
- Locking the Auto Exposure and Auto Focus Setting
- Using Continuous Shutter
- Recording Movies
- Using BEST SHOT
- Advanced Settings
- Using On-screen Menus
- REC Mode Settings (REC)
- Using the Self-timer (Self-timer)
- Using the Auto Focus Assist Light (AF Assist Light)
- Reducing the Effects of Camera and Subject Movement (Anti Shake)
- Shooting with Face Detection (Face Detection)
- Shooting with Continuous Auto Focus (Continuous AF)
- Specifying the [AE-L/AF-L] button Operation (AE/AF Lock)
- Shooting with AE Bracketing (AE Bracketing)
- Shooting with White Balance Bracketing (WB Bracketing)
- Shooting with Focus Bracketing (Focus Bracketing)
- Turning Digital Zoom On or Off (Digital Zoom)
- Shooting with Quick Shutter (Quick Shutter)
- Assigning a Function to the Function Ring (Ring Setup)
- Configuring the Continuous Shutter Image Save Method (Save CS Images)
- Turning on Image Review (Review)
- Displaying the On-screen Grid (Grid)
- Configuring Power On Default Settings (Memory)
- Image Quality Settings (Quality)
- Specifying Snapshot Image Quality (_ Quality (Snapshot))
- Configuring HD Movie Settings (HD _ Quality)
- Setting the High-speed Movie Frame Rate (HS _ Speed)
- Reducing Underexposure and Overexposure (Dynamic Range)
- Specifying Flash Intensity (Flash Intensity)
- Turning On Flash Assist (Flash Assist)
- Using Built-in Color Filters (Color Filter)
- Controlling Image Sharpness (Sharpness)
- Controlling Color Saturation (Saturation)
- Adjusting Image Contrast (Contrast)
- Using the Remote Shutter Release
- Using an External Flash
- Installing the Lens Hood or a Lens Filter
- Viewing Snapshots and Movies
- Other Playback Functions (PLAY)
- Playing a Slideshow on the Camera (Slideshow)
- Creating a Snapshot of Movie Frames (MOTION PRINT)
- Editing a Movie on the Camera (Movie Editing)
- Adjusting White Balance (White Balance)
- Adjusting the Brightness of an Existing Snapshot (Brightness)
- Selecting Images for Printing (DPOF Printing)
- Protecting a File Against Deletion (Protect)
- Rotating an Image (Rotation)
- Resizing a Snapshot (Resize)
- Cropping a Snapshot (Trimming)
- Copying Files (Copy)
- Dividing Up a Continuous Shutter Group (Divide Group)
- Selecting the PLAY Mode Screen Layout (Display Layout)
- Copying a Continuous Shutter Group (Select Frame)
- Printing
- Using the Camera with a Computer
- Other Settings (Set Up)
- Adjusting Monitor Screen Brightness (Screen)
- Adjusting Viewfinder Brightness (EVF Brightness)
- Configuring Camera Sound Settings (Sounds)
- Specifying the File Name Serial Number Generation Rule (File No.)
- Configuring World Time Settings (World Time)
- Time Stamping Snapshots (Timestamp)
- Setting the Camera’s Clock (Adjust)
- Specifying the Date Style (Date Style)
- Specifying the Display Language (Language)
- Configuring Sleep State Settings (Sleep)
- Configuring Auto Power Settings (Auto Power Off)
- Configuring [_] and [>] Settings (REC/PLAY)
- Controlling Monitor Screen Priority (LCD Priority)
- Configuring USB Protocol Settings (USB)
- Selecting the Screen Aspect Ratio and Video Output System (Video Out)
- Selecting the HDMI Terminal Output Method (HDMI Output)
- Formatting Built-in Memory or a Memory Card (Format)
- Resetting the Camera to Factory Defaults (Reset)
- Configuring Monitor Screen Settings
- Appendix
45
Snapshot Tutorial
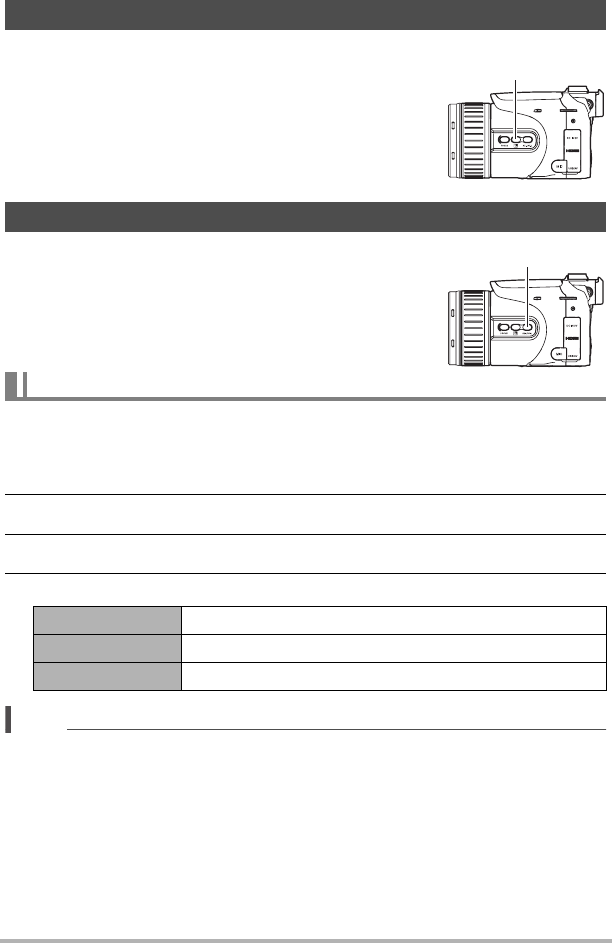
Back lighting correction compensates for the overexposure
that can occur when shooting a backlit subject. Press Æ
(Back Lighting Correction button) to toggle back lighting
correction on and off.
• When a main subject is overexposed due to backlighting,
the camera uses EV shift exposure correction and dynamic
range correction to adjust appropriately.
• This function is disabled in the M (Manual Exposure) mode.
Pressing [AE-L/AF-L] temporarily locks the current exposure
and/or focus settings. Press [AE-L/AF-L] again to unlock the
settings.
• Pressing [AE-L/AF-L] while the shutter button is half-
pressed will lock the current exposure or focus setting.
Use the following procedure to specify the operation that the [AE-L/AF-L] button
performs.
1. In the REC mode, press [MENU].
2. Use [4] and [6] to select “REC”.
3. Use [8] and [2] to select “AE/AF Lock” and then press [6].
4. Use [8] and [2] to change the setting, and then press [SET] to apply it.
NOTE
• AE Lock and AF Lock are not supported while “
O
Tracking” is selected for the “AF
Area” setting.
• Performing an EV shift operation while AE Lock is in effect will cause Auto
Exposure to be unlocked.
• Performing a zoom operation while AF Lock is in effect will cause Auto Focus to be
unlocked.
• During movie recording, you cannot lock/unlock the current exposure and focus
settings by pressing [AE-L/AF-L].
• You cannot use AE Lock or AF Lock with “Prerecord (Movie)” if you are recording a
movie.
Correcting for Back Lighting
Locking the Auto Exposure and Auto Focus Setting
Specifying the [AE-L/AF-L] button Operation
AE Lock Exposure lock
AF Lock Focus lock
AE/AF Lock Exposure and focus lock
Æ (Back Lighting
Correction button)
[AE-L/AF-L]
C