
User`s guide


E-23
Setting Up the Multi PJ Camera System
After installing PJ Camera Software and connecting all of the components, you can perform the
following steps to test the Multi PJ Camera System for proper operation.
1. Start up the computer.
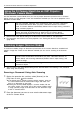
z After the computer starts up, check to make sure that the PJ Camera Software icon is in the
Windows taskbar.
z Configure your computer monitor’s resolution setting for XGA (1024 × 768) or SVGA (800 ×
600). Using any other resolution setting will cause an error message to appear when you try
to start up PJ Camera Software.
2. Turn on the projector.
z After the projector finishes its warm up process, it should start projecting the contents of the
computer screen.
3. If there is anything on the PJ Camera Stand’s document stage, remove it.
z Do not place anything on the document stage during up to step 6 of this procedure.
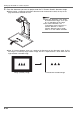
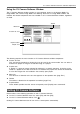
4. On the PJ Camera Stand, press the [ ] (power) button.
z This turns on the PJ Camera and causes the PJ Camera Stand [POWER] indicator to light.
z If your computer is running Windows XP and you are starting up the system for the first
time, a “Found New Hardware Wizard” dialog box will appear. Select the “Install the software
automatically (Recommended)” check box, and then click [Next].
z If the “CASIO MULTI PJ CAMERA has not passed Windows logo testing” dialog box appears,
click [Continue Anyway]. If the “Digital Signature Not Found” dialog box appears, click [Yes].
z After installation is complete, a USB connection will be established between the computer and
PJ Camera, and PJ Camera Software will start up automatically on the computer. This will
cause the “Startup Mode” dialog box (page E-26) to appear.
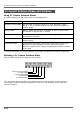
5. Select “Multi PJ”, and then click the [OK] button.
z This displays the camera position adjustment dialog box. If the PJ Camera is aimed correctly,
camera position adjustment will be performed and the dialog box will close automatically.
z If the PJ Camera is not aimed correctly, a message will appear prompting you to adjust it.
Aim the camera as instructed.
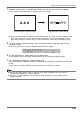
Testing the Multi PJ Camera System
PJ Camera Software icon