English MULTI PJ CAMERA/ Multifunctional Camera System YC-400 User’s Guide z Before using this product, be sure to read the Safety Precautions and ensure that you always use the product correctly. z The Multi PJ Camera System is used in combination with a projector. See the user documentation that comes with the projector for safety precautions and for details about its operation.
Safety Precautions Safety Precautions Thank you for selecting this CASIO product. Be sure to read these “Safety Precautions” before trying to use it. After reading this User’s Guide, keep it in a safe place for future reference. About safety symbols Various symbols are used in this User’s Guide and on the product itself to ensure safe operation, and to protect you and others against the risk of injury and against material damage. The meaning of each of the symbols is explained below.
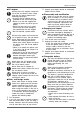
Safety Precautions ● AC adaptor Misuse of the AC adaptor creates the risk of fire and electric shock. Make sure that you always observe the following precautions. • Use only the AC adaptor that is specified for the stand and cradle. • Never try to use the supplied AC adaptor to power any other type of device. • Make sure that you use a power source with the same voltage as that specified for the AC adaptor. • Do not overload a power outlet.
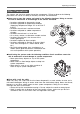
Safety Precautions • Never carry or store the battery together with conductive objects (necklaces, pencil lead, etc.) • Never try to take the battery apart or modify it, never pierce it or subject it to strong impact (by hitting it with a hammer or stepping on it), and never apply solder to the battery. Never put the battery inside of a microwave oven, dryer, highpressure container, etc.
Safety Precautions ● Location Do not leave the stand and camera in any of the following locations. Such locations create the risk of fire and electric shock.
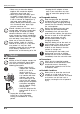
Operating Precautions Operating Precautions PJ Document Stage z z Never write on the document stage and take care to guard against scratching or otherwise damaging it. Writing or other marks on the document stage can interfere with projection in the Document Camera Mode and scanning in the Scanner Mode.
Operating Precautions Other Precautions The camera and stand are made of precision components. Failure to observe the following precautions can result in inability to correctly save data and malfunction. ● Never use or store the camera and stand in the following locations. Doing so creates the risk of malfunction of and damage to the camera and stand.
Contents Contents Safety Precautions.............................................................................................. E-2 Operating Precautions ........................................................................................ E-6 Multi PJ Camera System Features ..................................................................... E-9 Multi PJ Camera System User Documentation ................................................ E-10 Unpacking .................................................
Multi PJ Camera System Features Multi PJ Camera System Features The Multi PJ Camera System is a presentation tool that lets you record images of document, whiteboard contents, and even objects for projection and storage on your computer. Real-time projection of documents and objects Simply place a document onto the PJ Camera Stand and the PJ Camera automatically records it and projects a clear, high-resolution image.
Multi PJ Camera System User Documentation Multi PJ Camera System User Documentation The Multi PJ Camera System comes with the following user documentation. User Documentation Title Description Startup Mode* MULTI PJ CAMERA/ Multifunctional Camera System YC-400 User’s Guide (This Manual) This manual explains basic operation of the Multi PJ Camera System.
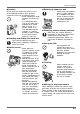
Unpacking Unpacking As you unpack this product, check to make sure that all of the items listed below are present. PJ Digital Camera Rechargeable Lithium Battery (NP-20) USB Cradle PHOTO CHAR GE PJ Camera Stand Camera Bracket USB AC Adaptor (AD-A50150S) and AC Power Cord The shape of the plug depends on your geographical area.
Using the CASIO CD-ROM Using the CASIO CD-ROM This section explains how to install the PJ Camera Software from the CASIO CD-ROM that comes bundled with this product. It also tells you how to view the contents of the PDF file user documentation that is also included on the CD-ROM. PJ Camera Software You should install PJ Camera Software on your computer before trying to connect the PJ Camera Stand and the projector to it.
Using the CASIO CD-ROM User Documentation (PDF) To read the contents of the PDF format user documentation files, you need to have Adobe® Reader® installed on your computer. If your computer does not already have Adobe Reader installed, please install it. You can download a copy of Adobe Reader for free from the following website: URL http://www.adobe.com/ Viewing PDF Format User Documentation Perform the procedure under “To install PJ Camera Software” on page E-12.
Multi PJ Camera System Multi PJ Camera System The following shows the basic configuration of the Multi PJ Camera System. PJ Camera Computer Projector RGB USB PJ Camera Stand PJ Camera Software PJ Camera The PJ Camera is a versatile digital camera that you can use to record the image of paper documents or of objects, which can then be projected with the projector. PJ Camera operations are controlled mainly using PJ Camera Software.
General Guide (PJ Camera Stand) General Guide (PJ Camera Stand) The PJ Camera Stand can be folded into a compact configuration for transport or storage. The following shows the PJ Camera Stand in its unfolded configuration, with the PJ Camera mounted. 2 1 5 3 6 7 8 9 bk bl 4 z For information about unfolding and refolding the PJ Camera Stand, and about mounting the PJ Camera onto the stand, see “Setting Up the PJ Camera Stand” (page E-17).
General Guide (PJ Camera Stand) 1 PJ Camera 2 Camera holder Attach the PJ Camera to the PJ Camera Stand here. DISP PLAY REC MENU Strap holder Insert the PJ Camera strap into the holder. [CAMERA RELEASE] Slide the release when removing the PJ Camera from the stand. View from above * You must install the camera bracket on the PJ Camera before you can attach it to the camera holder. See page E-19 for more information. 3 Arm Unfold the arm to configure the PJ Camera Stand for operation.
Setting Up the Multi PJ Camera System Setting Up the Multi PJ Camera System This section explains how to set up the Multi PJ Camera System for operation. Setting Up the PJ Camera Stand Unfolding the PJ Camera Stand The PJ Camera Stand can be folded into a compact configuration for transport or storage. Use the following procedure to unfold the stand for use. 1. With the folded PJ Camera Stand placed on a flat, stable surface, raise the arm unit until it is at a right angle to the stage unit.
Setting Up the Multi PJ Camera System 2. Open the side panels of the document stage. 3. Unfold the camera holder from the arm unit. z Open the upper section of the arm unit until it snaps securely into place. z The camera holder should be parallel with the document stage.
Setting Up the Multi PJ Camera System Mounting the PJ Camera onto the PJ Camera Stand z Before using the PJ Camera for the first time, be sure to read “PJ Camera Overview” (page E36). Also you will need to charge the PJ Camera’s battery and configure certain settings before using the PJ Camera. 1. Make sure the PJ Camera is turned off. 2. Attach the camera bracket to the bottom of the PJ Camera. 3. Attach the PJ Camera to the PJ Camera Stand camera holder.
Setting Up the Multi PJ Camera System Connecting the AC Adaptor to the PJ Camera Stand Use only the AC adaptor that comes bundled with the Multi PJ Camera System to power it. z When the AC adaptor is connected to the PJ Camera Stand, the battery of the PJ Camera mounted on the stand charges while the camera is turned off. Charging is indicated when the [CHARGE] indicator is lit.
Setting Up the Multi PJ Camera System Folding Up the PJ Camera Stand Perform the steps below to fold up the PJ Camera Stand for transport or storage. Note that you can fold up the PJ Camera Stand without removing the PJ Camera. 1. Make sure the PJ Camera is turned off, and that the stand light is off. Disconnect the USB cable and AC adaptor from the PJ Camera Stand. z Folding up the PJ Camera Stand while the lens of the PJ camera is extended can damage the camera. 2. 3.
Setting Up the Multi PJ Camera System Connecting Multi PJ Camera System Components z Make sure that PJ Camera Software is installed on your computer before trying to perform the following procedure. After you install PJ Camera Software on the computer, connect the PJ Camera Stand, computer, and projector as shown below. Projector Computer RGB Cable USB Cable z z Normally, it is a good idea to have all of the components turned off when connecting or disconnecting them.
Setting Up the Multi PJ Camera System Testing the Multi PJ Camera System After installing PJ Camera Software and connecting all of the components, you can perform the following steps to test the Multi PJ Camera System for proper operation. 1. Start up the computer. z After the computer starts up, check to make sure that the PJ Camera Software icon is in the Windows taskbar. PJ Camera Software icon z Configure your computer monitor’s resolution setting for XGA (1024 × 768) or SVGA (800 × 600).
Setting Up the Multi PJ Camera System 6. Place the document you want to project onto the PJ Camera Stand’s document stage. z When placing a landscape orientation document onto the document stand, the top of the page should face towards the arm. z Place the document in the center of the document stage, so no part of it is extending off the stage. z For more information, see “Precautions when Using the PJ Camera Software” in the PJ Camera Software User’s Guide, which is on the CASIO CD-ROM.
Setting Up the Multi PJ Camera System 7. Replace the document on the document stage with the next one you want to project. z The currently projected image is replaced by the new image. Current document camera image New document camera image z A copy of each image you project is stored automatically in a folder on your computer’s hard disk, where it remains until you quit PJ Camera Software.
PJ Camera Software Overview and Basic Operations PJ Camera Software Overview and Basic Operations This section provides an overview of PJ Camera Software functions and operations. z Before performing the operations described here, use the procedures under “Setting Up the Multi PJ Camera System”. z The explanations here assume that the “Multi PJ” (which is the initial default setting) is selected for the PJ Camera Software startup mode.
PJ Camera Software Overview and Basic Operations Select the button next to the startup mode you want to use by clicking it. { Clicking the [OK] button starts up PJ Camera Software in the startup mode that is currently selected on the dialog box. z To change the startup mode after PJ Camera Software is already running, display the operation bar. Next, click [Tools] and then [Operating Environment].
PJ Camera Software Overview and Basic Operations PJ Camera Software Modes and Windows Using PJ Camera Software Modes PJ Camera Software has five modes, which are described below. Mode Name Description Document Camera Mode Use this mode to record the image of a paper document or object placed on the PJ Camera Stand with the PJ Camera, and project the resulting image. Scanner Mode With this mode, you can place a document on the PJ Camera Stand and record its image with the PJ Camera.
PJ Camera Software Overview and Basic Operations Using the PJ Camera Software Window The PJ Camera Software window remains on your computer screen in the Scanner Mode, PC Image Mode, and Camera Image Mode. The following shows the PC Image Mode window, and indicates the window components that are included in all PJ Camera Software windows, regardless of mode.
PJ Camera Software Overview and Basic Operations Using the PJ Camera Stand Like an OHP Projector (Document Camera Mode) Use the Document Camera Mode when you want to project documents placed on the PJ Camera Stand, just like an OHP projector. There are two different methods you can use for projection in the Document Camera Mode. Auto With auto recording, projection starts automatically when you place a document onto the document stand.
PJ Camera Software Overview and Basic Operations 3. 4. Use the scanner window to configure PJ Camera settings. z To change the zoom setting, click the [Wide] or [Tele] button. You can select a zoom factor in the range of 1X to 3X. The initial default zoom setting is 1X. z To adjust focus, display the operation bar and then select [Camera] and then [Refocus], or press the computer keyboard’s [F2] function key. If the currently selected zoom factor is larger than 1.
PJ Camera Software Overview and Basic Operations Projecting Image Files Stored on the Computer (PC Image Mode) With the PC Image Mode, you can create a projector presentation using image files recorded in the Scanner Mode and saved on your computer’s hard disk. Projecting a Specific Computer Image File 1. Display the operation bar, and then select [PC Image] on the [File] menu or click the toolbar. on z This enters the PC Image Mode and displays its preview list area and playlist area.
PJ Camera Software Overview and Basic Operations Using a Playlist to Project Images With a playlist, you can prepare your presentation by specifying which images you want to appear as well as the sequence they should appear. After creating a playlist, you can save it to a file for later recall when you need it. When you recall a playlist and play it, its images are projected in the sequence they are arranged in the playlist.
PJ Camera Software Overview and Basic Operations Performing a Projection Area Capture Operation Use the following procedure in the PC Image Mode, Camera Image Mode, or Presentation Mode after text and/or graphics have been handwritten into a projected image. 1. Display the operation bar, and then select [Projection Area Capture] on the [File] menu or click on the toolbar. z This displays the Projection Area Capture dialog box. 2. 3. 4. Point the PJ Camera at the whiteboard.
PJ Camera Software Overview and Basic Operations Projection Area Capture Image Files Image files created with Projection Area Capture are saved in the folder at the directory path shown below. Folder: C:\CASIO\PJ_System\Projection_Area_Capture File Name: File names are generated automatically in accordance with the recording date. Example: 20040218T104525.JPG (Year: 2004; Month: 2; Day: 18; Time: 10:45:25) Image Resolution: XGA (1024 × 768) 800 × 600 when an SVGA computer screen is being used.
PJ Camera Overview PJ Camera Overview The PJ Camera can also be used as a stand-alone digital camera. This section provides an overview of PJ Camera operations. See the Camera User’s Guide on the CASIO CD-ROM for details about PJ Camera operations. First, charge the battery! 1. Load the battery. 1 2 3 Stopper 2. Place the camera onto the USB cradle to charge the battery. z It takes about two hours to achieve a full charge.
PJ Camera Overview 2 3 z If the camera bracket is attached to the camera, remove it before mounting the camera onto the cradle. Store the camera bracket in the carrying bag to ensure that it does not become soiled with dirt, dust, etc. PLAY REC MEN U SET DISP PHOTO CHARG E USB To configure display language and clock settings z Be sure to configure the following settings before using the camera to record images. 1. Press the power button to turn on the camera. 2.
PJ Camera Overview To record an image 1. 2. 3. Press the power button to turn on the camera. Green operation lamp Align the mode selector with “REC”. 2 1 4 IN 1 / 1000 F2.6 03/12 03 12/24 24 12:58 12 58 PLAY REC Point the camera at the subject, use the monitor screen or viewfinder to compose the image, and then press the shutter release button half way. MENU SET 3 z When proper focus is achieved, the focus frame turns green and the green operation lamp lights. 4.
Troubleshooting Troubleshooting The following explains what you should do when you experience problems with using the Multi PJ Camera System. z For information about the messages that appear on the PJ Camera monitor screen and other troubleshooting procedures, see the “Reference” section of the Camera User’s Guide. z You can find more troubleshooting information in the FAQ of PJ Camera Software help. Problem Nothing works.
Product Specifications (PJ Camera Stand) * For PJ Camera specifications, see the PJ Camera User’s Guide on the CASIO CD-ROM. Product Specifications (PJ Camera Stand) Power Requirements: 100V to 240V AC, 50/60Hz Rated Voltage: 5.0V Power Consumption: 5.2W Connection Terminal: USB (1.1) × 1 Approximate Dimensions: 168(W) × 43(H) × 285(D) mm (excluding projections) (6.6 × 1.7 × 11.2 inches) During Use: 327(W) × 391(H) × 264(D) mm (12.9 × 15.4 × 10.4 inches) Approximate Weight: 1.6kg (3.