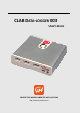
CLAB DATA‐LOGGER 003 USER’S GUIDE CENTRE FOR MICROCOMPUTER APPLICATIONS http://www.cma-science.
CLAB User’s Guide ver. 2.0, April 2014 Author: Ewa Kedzierska © CMA, Amsterdam, 2015 CMA, A.J. Ernststraat 169, 1083 GT Amsterdam, Netherlands info@cma-science.nl www.cma-science.nl CASIO and ClassPad are trademarks or registered trademarks of Casio Computer Co., Ltd.
TABLE OF CONTENTS I. INTRODUCTION 5 1. About CLAB 5 2. Items included with CLAB 5 3. How to use this guidebook 6 II. GETTING STARTED 7 1. CLAB overview 7 2. Power Button 8 3. Status LEDs and Speaker 3.1. Power LED 3.2. Measurement LED 3.3. Speaker 9 9 10 10 4. Powering CLAB 10 5. Memory 13 6. Sensor inputs 6.1. BT analog sensor plug 6.2. Automatic sensor detection 6.3. Sampling rate 14 14 14 15 7. Built‐in Accelerometer 15 8. The ways of using CLAB 8.2.
V. USING CLAB STANDALONE 3. Typical measurement procedure with CLAB standalone VI. INCLUDED SENSORS 20 20 21 1. BT01 Temperature sensor 1. Practical information 2. Suggested experiments 3. Technical data 22 22 23 23 2. BT02 Voltage sensor 1. Practical information 2. Suggested experiments 3. Technical data 23 24 24 24 VII. TECHNICAL SPECIFICATIONS 25 1. Key features 25 2. Working conditions and maintenance 25 3. Software for CLAB 26 4. Warranty 26 5. Battery precautions 26 6.
I. INTRODUCTION 1. About CLAB CLAB is an easy‐to‐use portable data‐logger for Mathematics, Science and Technology Education that can be used with a CASIO Graphic Calculator equipped with the E‐CON program, with a PC computer and standalone, in the field and in the classroom. CLAB is equipped with its own processor and memory, enabling measurements at high sampling rates up to 100 000 Hz with accurate independent timing.
3. How to use this guidebook This guidebook is intended to provide instructions for the basic operations of the CLAB data‐logger. The chapters in this guidebook include: II. Getting started – provides start‐up information for the learning of data‐logger, and offers and overview of basic operations of CLAB. III. Using CLAB with a CASIO Graphic Calculator and E‐CON software – explains how to use CLAB with a CASIO Graphic Calculator. IV.
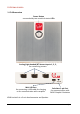
II. GETTING STARTED 1. CLAB overview Power Button surrounded by two semicircle status LEDs Analog (right‐handed) BT Sensors Inputs 1, 2, 3, for connecting sensors Mini USB Port for connecting a USB cable for charging or for communication with computer Calculator 3‐pin Port for communication with CASIO Graphic Calculators CLAB has built‐in a 3‐axis Accelerometer and Speaker.
2. Power Button The Power Button of CLAB is used to: Turning the device on and off. Rebooting the device. Use this feature when CLAB “locks up” and does not respond to commands. Data and measurement settings may be lost. Handling data collection process.
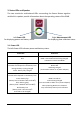
3. Status LEDs and Speaker The two semicircles multicolored LEDs surrounding the Power Button together with built‐in speaker provide information about the operating status of the CLAB. Left Power LED for displaying power and battery status Right Measurement LED for displaying data collection status 3.1. Power LED The left Power LED indicates power and battery status.
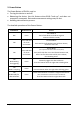
3.2. Measurement LED The right Measurement LED indicates the data‐collection status. MEASUREMENT LED CLAB STATE OFF No data collection ON Blue Ready for data collection ON Blinking Blue Waiting for trigger conditions Data collection starts automatically after the trigger conditions are met. To start the data collection manually, press the Power Button. ON Blinking Green Sampling data ON Green Measurement data present in CLAB’s memory ON Red Error 3.3.
Before the battery becomes too low for operating the device the Power LED turns red to warn that the battery level is critical (lower than 20 %). If you continue working without charging, the device will shut down. A fully discharged battery requires up to 4 hours of charge time to become fully charged. But within 3 hours the battery will be charged at least up to 90 %.
To charge battery Use only the USB cable and USB power adapter delivered with your CLAB. Connect the USB cable to the mini USB port of CLAB. Connect the other end of the USB cable to a USB power adapter. Plug the USB power adapter into a standard power outlet. ‐ or ‐ Connect the USB cable to the mini USB port of CLAB. Connect the other end of the USB cable into a free USB port of your computer.
Insert the Power button into the new backside. Take care that the parts of the Power button are placed in the correct position. Carefully insert the PCB board to the backside. The PCB should fit firmly. Keep the backside together with the board, insert the board into small rails inside the CLAB housing and move the board to close the housing. Screw the screws. Return your old battery for responsible recycling and do not throw it in the trash. 5.
6. Sensor inputs For connecting sensors CLAB has three BT (right‐handed) sensor inputs 1, 2, and 3 with input voltage ranges 0 .. 5 V and ‐10 .. 10 V. These inputs support all analog CMA sensors and automatically identify these sensors. Especially for CLAB a new CMA Ultrasonic Motion Detector BT55i, which can be connected to analog BT inputs of CLAB, is available. CMA offers a wide range of sensors, for a complete list of available CMA sensors consult the CMA website. CLAB also supports Vernier sensors. 6.
sensor adapter (e.g. CMA 4‐mm to BT adapter 0519) will be not identified and need to be manually selected from the Sensor Library (on a CASIO Graphic Calculator in the E‐CON software, on a PC computer in the Coach software) or a custom probe should be defined (on a CASIO Graphic Calculator in the E‐CON software). 6.3. Sampling rate CLAB can sample up to 3 sensors simultaneously. The sampling rate depends on the number of channels used during the data collection.
8. The ways of using CLAB CLAB can be used: ‐ as an interface connected to a CASIO Graphic Calculator with display of measured data on the calculator screen, ‐ as an interface connected to a PC computer with display of measured data on the computer screen, ‐ as a stand‐alone data‐logger. 8.2. CLAB with a CASIO Graphic Calculator CLAB can be used with CASIO Graphic Calculators on which the E‐CON software is installed, such as CASIO fx‐CG Series, fx‐9860GII Series or ClassPad II (fx‐CP400).
III. USING CLAB WITH A CASIO GRAPHIC CALCULATOR AND E‐CON When using CLAB with a CASIO Graphic Calculator CLAB is controlled by the E‐ CON program running on the calculator. The collected data are transferred to the calculator and depending on the selected measurement mode measurement data appear during the data collection (real‐time mode) or after the measurement is finished. 1.
IV. USING CLAB WITH A COMPUTER AND COACH When using CLAB as a lab interface connected to a PC computer CLAB stays connected to the PC via a USB port (on‐line mode) and is controlled by the Coach program running on the PC. The collected data are transferred in real‐time to the computer and the course of the measurement can be followed directly in the program. The recorded data are not stored in CLAB’s memory and should be saved on the PC in the Coach 6 program. 1.
2. Installing the CLAB driver CLAB is equipped with HID3 USB for which a standard driver is available in Windows. The driver installation is automatically executed the first time CLAB is connected to the computer4. 3. Typical on‐line measurement procedure in Coach To collect data with CLAB connected to the computer 5: Connect CLAB to the computer via the provided USB cable. Turn on CLAB. Start Coach 6 Lite or Coach 6 and open an Activity for CLAB. Connect sensor(s) to the sensor input(s) on CLAB.
V. USING CLAB STANDALONE When using CLAB as a standalone device, CLAB controls the data collection process ‐ it collects and stores the measurement data. This is very useful for remote data collection e.g. outside the school. The experimental setup is prepared using the E‐CON application on a CASIO Graphic Calculator or the Coach software on a computer and uploaded to CLAB. CLAB can be then disconnected from the calculator or computer.
The data collection stops after the specified measurement time (time‐based mode) or specified number of samples (manual mode) has been reached. The Measurement LED remains green to show that measured data are stored in the CLAB’s permanent memory. These data will stay in this memory also when you turn CLAB off. Only new measurement settings will cause the data to disappear. Re‐connect CLAB to your Graphical Calculator or computer and retrieve the collected data into the ECON or Coach software.
VI. INCLUDED SENSORS Two additional sensors, Temperature and Voltage sensors are included with CLAB. Below you find technical specifications of both sensors. 1. BT01 Temperature sensor The CMA BT01 Temperature sensor is a general‐purpose temperature sensor that can be used to measure temperature in liquids (water, mild acidic solutions) and air. The sensor can record temperature in the range of ‐40°C to 140°C.
sensors be left to soak in acids of between 1 ‐ 3 M concentration for longer than 48 hours. The exceptions to this are Hydrochloric acid HCL and Sulphuric acid H2SO4. The maximum exposure time for these acids are: Acid 1 M HCL 2 M HCL 3 M HCL 1 M H2SO4 2 M H2SO4 3 M H2SO4 Maximum Exposure Time 20 minutes 10 minutes 5 minutes 48 hours 20 minutes 10 minutes 2. Suggested experiments The Temperature sensor can be used in many experiments like: Monitoring indoor and outdoor temperatures.
2. BT02 Voltage sensor The CMA BT02 Voltage sensor is a generic probe that can be used to measure voltage between ‐10 .. 10 Volts. It has two banana (4‐mm) plugs for easy connection. Note that this sensor has a direct connection to the inputs of CLAB. The sensor does not have differential inputs, and will not behave like a traditional voltmeter. To measure a potential difference between two points in a circuit, connect the red and black plugs to the two points.
VII. TECHNICAL SPECIFICATIONS 1. Key features PROCESSORS PIC32MZ (512 kB SRAM) MEMORY 2 MB Flash POWER Rechargeable battery Li‐ion 3.
When replacing the battery, only use a CLAB replacement battery pack supplied by CMA. Make sure to handle it gently. Rough handling may cause the battery damage. Do not pull on wires. Pull only from the connectors at the ends of the wires. Dispose your old battery appropriately. 3. Software for CLAB CASIO E‐CON – Data collection software installed on CASIO Graphic Calculators. CMA Coach Lite* for PC – PC program to control CLAB with computer (free).
CLAB User’s Guide | 27
This product is to be used for educational purposes only. It is not appropriate for industrial, medical, research, or commercial applications.