DIVAR AN 3000 / DIVAR AN 5000 Digital Video Recorder en Quick Installation Guide
DIVAR AN 3000 / DIVAR AN 5000 Table of Contents | en 3 Table of contents 1 Basic Safety 4 1.1 Safety precautions 4 1.2 Important safety instructions 4 1.3 Important Notices 6 1.4 FCC and UL 8 2 System overview 3 Quick install 10 3.1 Connections 10 3.1.1 Primary connections 12 3.1.2 Optional connections 12 3.2 Powering up 13 3.3 Login 14 3.4 Startup Wizard 15 3.4.1 Reset startup wizard 16 3.4.2 General 16 3.4.3 Encode 17 3.4.4 Schedule 18 3.4.
en | Basic Safety 1 DIVAR AN 3000 / DIVAR AN 5000 Basic Safety This safety section describes safety requirements and the format used for warnings and cautions. 1.1 Safety precautions Danger! Indicates a hazardous situation which, if not avoided, will result in death or serious injury. ! Warning! Indicates a hazardous situation which, if not avoided, could result in death or serious injury.
Basic Safety | en DIVAR AN 3000 / DIVAR AN 5000 7. 5 Controls adjustment - Adjust only those controls specified in the operating instructions. Improper adjustment of other controls may cause damage to the unit. Use of controls or adjustments, or performance of procedures other than those specified, may result in hazardous radiation exposure. 8. Overloading - Do not overload outlets and extension cords. This can cause fire or electrical shock. 9.
en | Basic Safety 1.3 DIVAR AN 3000 / DIVAR AN 5000 Important Notices Accessories - Do not place this unit on an unstable stand, tripod, bracket, or mount. The unit may fall, causing serious injury and/or serious damage to the unit. Use only with the cart, stand, tripod, bracket, or table specified by the manufacturer. When a cart is used, use caution and care when moving the cart/apparatus combination to avoid injury from tip-over.
DIVAR AN 3000 / DIVAR AN 5000 Basic Safety | en 7 Caution! ! Electronic Surveillance - This device is intended for use in public areas only. U.S. federal law strictly prohibits surreptitious recording of oral communications. Electrostatic-sensitive device - Use proper CMOS/MOS-FET handling precautions to avoid electrostatic discharge. NOTE: Wear required grounded wrist straps and observe proper ESD safety precautions when handling the electrostatic-sensitive printed circuit boards.
en | Basic Safety DIVAR AN 3000 / DIVAR AN 5000 Video loss - Video loss is inherent to digital video recording; therefore, Bosch Security Systems cannot be held liable for any damage that results from missing video information. To minimize the risk of lost digital information, Bosch Security Systems recommends multiple, redundant recording systems, and a procedure to back up all analog and digital information. 1.4 FCC and UL FCC & ICES Information (U.S.A.
DIVAR AN 3000 / DIVAR AN 5000 2 System overview | en 9 System overview The Bosch Video Recorder DIVAR 3000/5000 is a multi-channel digital recorder that uses the latest 960H high resolution technology, plus modern compression techniques. Simultaneous monitoring, recording, archiving and playback are guided remote or local by simple menu selections and operator commands. If required, a variety of optional storage capacities can be added (including built-in HDDs and/or a DVD writer).
3 en | Quick install DIVAR AN 3000 / DIVAR AN 5000 Quick install To get the unit operational, perform the following quick install steps: 1. Make all the hardware connections – see Connections, page 10. 2. Power up the system – see Powering up, page 13. 3. Log in – see Login, page 14. 4. Correctly configure your system software with the Startup wizard (this appears the first time the unit is started) – see Startup Wizard, page 15.
Quick install | en DIVAR AN 3000 / DIVAR AN 5000 11 Connections on back of DIVAR AN 5000 (16-channel) 2 ON 6 4 8 10 12 14 16 CVBS MON. A 2 4 5 6 7 8 AUDIO OUT 9 10 11 12 13 14 15 16 1 1 3 5 7 9 11 13 15 CVBS MON. B 3 G +12V CTRL C5 NO5 ALARM OUT +12V NO2 C2 C3 NO4 C4 NO3 NO1 C1 0 VIDEO IN OFF ALARM IN G + _ G + _ G RS-485 KEYBOARD MIC IN AUDIO IN RS-232 VIDEO OUT VGA MON.A HDMI MON.
en | Quick install DIVAR AN 3000 / DIVAR AN 5000 Connections on back of DIVAR AN 5000 (4/8-channel) 1 3 2 4 5 6 7 CVBS MON. A 8 2 4 5 6 7 8 AUDIO OUT VIDEO OUT 1 1 2 3 4 5 6 7 8 CVBS MON. B 3 G +12V CTRL C5 NO5 ALARM OUT +12V NO2 C2 0 C3 NO4 C4 VIDEO IN NO3 OFF NO1 C1 ON ALARM IN + _ G G + _ G RS-485 KEYBOARD MIC IN AUDIO IN RS-232 VGA MON.A HDMI MON.
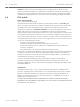
DIVAR AN 3000 / DIVAR AN 5000 Quick install | en 6. Connect up to 6 ALARM OUT outputs (via the supplied terminal blocks). 7. Connect a pan/tilt/zoom control unit to the RS-485 or RS-232 port. 8. Connect to your network via the ETHERNET connector. 9. Connect extra video out cables to the VIDEO OUT ports if loop through is required to 13 other devices (only for DIVAR 5000). 10.
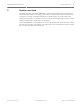
3.3 en | Quick install DIVAR AN 3000 / DIVAR AN 5000 Login The system login interface is shown in the following figure: When you startup the system for the first time, the Startup Wizard appears where you can setup the system software. Here the default User ID is administrator and the default password is 000000 (six zeros). Use the supplied USB mouse, front panel, remote control or keyboard to input data and commands. See Mouse controls, page 25 for how to use the mouse.
DIVAR AN 3000 / DIVAR AN 5000 3.4 Quick install | en 15 Startup Wizard The Startup Wizard opens automatically after you log in for the first time. See following screen: Select a language and video standard from the drop-down menus and click . The wizard will guide you through the following steps: 1. Choose to reset the startup wizard to run after the next system restart – see Reset startup wizard, page 16. 2. Assign General settings – see General, page 16. 3.
en | Quick install 3.4.1 DIVAR AN 3000 / DIVAR AN 5000 Reset startup wizard If required, select the check box here to activate the Startup wizard after the next system restart (this is only useful if you need to reconfigure the system during the next startup). Later, during operation, you can also reset this mode in the General screen. Click for the next Startup wizard screen (General settings). 3.4.
DIVAR AN 3000 / DIVAR AN 5000 – 3.4.3 Quick install | en 17 When ready, click to move to the Encoder Startup wizard screen. Encode Assign here the encoder settings and click for the next Startup wizard screen (Schedule settings). To save time when setting up channels, use to copy settings from one channel to other(s). Bosch Security Systems Quick Installation Guide 2014.10 | 2.
en | Quick install 3.4.4 DIVAR AN 3000 / DIVAR AN 5000 Schedule Assign here all the schedule settings and click for the next Startup wizard screen (Record settings). Use to copy settings from one channel to other(s). 3.4.
DIVAR AN 3000 / DIVAR AN 5000 3.4.6 Quick install | en 19 Network Assign here all the network settings and click to complete the Startup wizard (you will need to confirm the setup by clicking ). The system will automatically display the active view mode (with a maximum 16 camera views). From here you can operate your system using the mouse, remote control or front panel. See the following sections.
3.5 en | Quick install DIVAR AN 3000 / DIVAR AN 5000 Shutdown/Logout 1. Right-click the mouse to access the Quick menu; from here choose the option Main menu. 2. Select the Shutdown option on the Main menu for the following dialog box. 3. Use the drop-down menu to choose from the following options: Logout user Shutdown Restart system Switch user 4. Click to confirm the selection.
DIVAR AN 3000 / DIVAR AN 5000 4 First time operation | en 21 First time operation Once the Startup Wizard steps have been completed, your monitor will show the live viewing mode with real time camera displays - see Live viewing, page 21. From here, you can control your system via menus (Quick menu and Main menu) using the mouse, front panel buttons, or the remote control. Notice! The mouse is normally the preferred input device when setting up the system and entering field values.
en | First time operation DIVAR AN 3000 / DIVAR AN 5000 Each channel view has one or more of the following icons displayed: Recording – this icon is Camera masking – the camera has been displayed when a channel is blocked recording Motion detection – a No camera is attached to this channel or movement has been detected communication has been lost from this in the camera view camera PTZ active If your camera is equipped with a PTZ function, you can pan, tilt and zoom the live viewing image as
First time operation | en DIVAR AN 3000 / DIVAR AN 5000 Icon name Function Instant playback Press to playback the previous 5-60 minutes recorded on the 23 current channel (default is 5 minutes). The playback screen supports drag and play function - use your mouse to drag the play bar to any playback start time (use the pause and exit functions as required).
4.2 en | First time operation DIVAR AN 3000 / DIVAR AN 5000 Quick menu When in live viewing mode, right-click the mouse for the following quick menu: Figure 4.3: Quick menu Here you can select: – View 1, 4, 9, 16 – choose here the number of view windows shown on Monitor A (onewindow, four-windows, nine-windows or sixteen-windows). Press play to activate the new view.
DIVAR AN 3000 / DIVAR AN 5000 4.
en | First time operation Right button DIVAR AN 3000 / DIVAR AN 5000 In Live mode, the following Quick menu appears: If you are currently in a menu, right-click to exit the current menu without saving any modifications. 2014.10 | 2.
DIVAR AN 3000 / DIVAR AN 5000 4.4 First time operation | en 27 Main menu Access the Main menu as follows: – Use the Enter key and the direction buttons on the front panel or the remote control – Right-click the mouse for the Quick menu and select ‘Main menu’ Figure 4.
4.5 en | First time operation DIVAR AN 3000 / DIVAR AN 5000 Search/Playback Click Search/Play in the Main Menu (or from the Quick menu) for the following screen. Note: A disclaimer screen may initially appear (click to continue). Figure 4.5: Search/Play screen See the following table for an overview of the features on this screen. ID Name Function 1 Display Display of the currently chosen picture or file (supports 1/4/9/16-window window playback.
DIVAR AN 3000 / DIVAR AN 5000 4 First time operation | en 29 Calendar Select a date to overview the recordings available for that day (dates and time highlighted in blue have recordings available for that day). The time bar on the bottom of the screen will show a 24-hour trace of the recordings available for the chosen date.
en | First time operation 6 DIVAR AN 3000 / DIVAR AN 5000 File list Double click to view a list of recorded files for the selected day. The list displays the first channel of the recorded file (click the numbers above to select another channel). A maximum 128 files are shown at one time.
First time operation | en DIVAR AN 3000 / DIVAR AN 5000 7 Smart This function is only active when the system is playing a recording in 1- search window mode. 31 to activate smart search. See following figure. Click Use your mouse to drag and select zone(s) in the window to detect motion. again to begin smart search. Click The system searches for motion in the chosen area(s). When ready, click again to stop smart search playback.
en | First time operation 8 DIVAR AN 3000 / DIVAR AN 5000 Time bar Displays a maximum 16 channel time bars for the current search date (use the scroll bars on the right to scroll up and down through the available channels).
First time operation | en DIVAR AN 3000 / DIVAR AN 5000 11 Restrict/ Use this function to restrict playback of a recording and/or to protect that Protect recording from being deleted. The restrict/protect permission can be 33 individually set for each user account.
en | First time operation 4.5.1 DIVAR AN 3000 / DIVAR AN 5000 Export The Export menu is accessed from the main menu or Search/Play screen (or by pressing the Export key on the Front Panel or on the remote control). Use this menu to write segments of recorded video to a USB storage device or recordable DVD. Figure 4.6: Export screen 1. Choose from the Selected Device pull-down list to export recording(s) to either a USB memory stick or CD/DVD.
DIVAR AN 3000 / DIVAR AN 5000 5 Maintenance | en 35 Maintenance Maintenance of this unit is limited to: – External cleaning and inspection – Replace internal battery, page 39 – Install HDD in DIVAR AN 3000, page 40 – Install HDD in DIVAR AN 5000, page 43 – Install DVD in DIVAR AN 3000, page 47 – Install DVD in DIVAR AN 5000, page 49 The following figures show the DIVAR AN 3000 and the DIVAR AN 5000 (with top covers removed) and the installed positions of the battery (1), DVD (2) and HDD (3):
en | Maintenance DIVAR AN 3000 / DIVAR AN 5000 Figure 5.2: DIVAR AN 5000 Refer to the Appendix in the Operator Manual for recommended DVD and HDD types. 2014.10 | 2.
DIVAR AN 3000 / DIVAR AN 5000 Maintenance | en 5.1 Maintenance precautions 5.1.1 Attach ESD strap 37 Precaution – ESD Caution! ! Possible processor damage. When the DIVAR cover is removed for installing, replacing or repairing internal components (battery, HDD or DVD), always make sure you wear an approved ESD wrist strap – see below. Figure 5.3: ESD strap The ESD strap is vital to prevent damage to ESD-sensitive parts when maintaining components in an opened DVR cabinet.
en | Maintenance DIVAR AN 3000 / DIVAR AN 5000 Connector/processor damage 5.1.3 Caution! ! Possible connector damage. Notice also that some cables for both the DIVAR AN 3000 and DIVAR AN 5000 have a lock which must be pressed and held when inserting/removing the cable. See following figures. Press pin Hold pin and connect cable Press pin Hold pin and connect cable Caution! Loose connectors and cables.
DIVAR AN 3000 / DIVAR AN 5000 Maintenance | en 39 See also – 5.2 Attach ESD strap, page 37 Replace internal battery This product uses a 3.0 V Lithium CR2032 battery (article number F01U099057) as the backup power supply for internal system status (e.g. real time clock). Under normal circumstances this battery will last for a minimum of 5 years. Low battery power affects the DVR operation causing it to reset at every power-up.
5.3 en | Maintenance DIVAR AN 3000 / DIVAR AN 5000 Install HDD in DIVAR AN 3000 See the following components for installing HDD (brackets, rubbers, screws, tie wrap and cables included in package; HDD not included): Figure 5.4: HDD install components for DIVAR AN 3000 Note: A maximum 2 HDDs can be installed in the DIVAR AN 3000 2014.10 | 2.
DIVAR AN 3000 / DIVAR AN 5000 Maintenance | en 41 Install HDD 1 5.3.1 4x 4x (1) (3) (2) 4x (4) (5) (6) (8) (9) 4x (7) 4x (10) Bosch Security Systems (11) Quick Installation Guide (12) 2014.10 | 2.
en | Maintenance 5.3.2 DIVAR AN 3000 / DIVAR AN 5000 Install HDD 2 Install HDD 2 in the position of the optional DVD – see following figure: Figure 5.5: Install HDD 2 Use the same install steps described for installing HDD 1. 2014.10 | 2.
DIVAR AN 3000 / DIVAR AN 5000 5.4 Maintenance | en 43 Install HDD in DIVAR AN 5000 See the following components for installing HDD (brackets, rubbers, screws, tie wrap and cables included in package; HDD not included): Figure 5.6: HDD install components for DIVAR AN 5000 Note: A maximum 4 HDDs can be installed in the DIVAR AN 5000 Bosch Security Systems Quick Installation Guide 2014.10 | 2.
en | Maintenance 5.4.1 DIVAR AN 3000 / DIVAR AN 5000 Install HDD 1 2x 4x (1) (2) (3) 2x 2x (4) (5) (6) (8) (9) 4x (7) 2x (10) 2014.10 | 2.
DIVAR AN 3000 / DIVAR AN 5000 5.4.2 Maintenance | en 45 Install HDD 2 Use the same procedure as for installing HDD 1, but include the following extra steps: 4x (5a) (8a) (5b) (8b) (10a) Bosch Security Systems Quick Installation Guide 2014.10 | 2.
en | Maintenance 5.4.3 DIVAR AN 3000 / DIVAR AN 5000 Install HDD 3 and 4 Use the same install steps as for HDD 1 and 2, but install HDD 3 and 4 at the optional DVD location. See following figure. 2014.10 | 2.
DIVAR AN 3000 / DIVAR AN 5000 5.5 Maintenance | en 47 Install DVD in DIVAR AN 3000 See the following components and steps required for this installation (screws included in package): Figure 5.7: DVD install components for DIVAR AN 3000 Bosch Security Systems Quick Installation Guide 2014.10 | 2.
en | Maintenance DIVAR AN 3000 / DIVAR AN 5000 4x (1) (3) (2) 4x (4) (5) (6) 4x (7) (8) (9) Figure 5.8: Install DVD in DIVAR AN 3000 2014.10 | 2.
DIVAR AN 3000 / DIVAR AN 5000 5.6 Maintenance | en 49 Install DVD in DIVAR AN 5000 See the following components and steps required for this installation (spacers and screws included in package): Figure 5.9: DVD install components for DIVAR AN 5000 Bosch Security Systems Quick Installation Guide 2014.10 | 2.
en | Maintenance DIVAR AN 3000 / DIVAR AN 5000 2x (1) (3) (2) 4x (4) (6) (5) 4x 4x (7) (8) (9) 2x (10) (11) (12) Figure 5.10: Install DVD in DIVAR AN 5000 2014.10 | 2.
Bosch Security Systems B.V. Torenallee 49 5617 BA Eindhoven The Netherlands www.boschsecurity.com © Bosch Security Systems B.V.