
User Manual
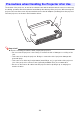

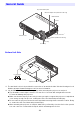
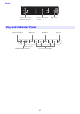
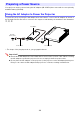
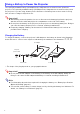
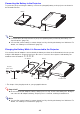
Table Of Contents
- Contents
- Safety Precautions
- Operating Precautions
- About the Light Source Unit
- Do not block light output or look directly into the lens!
- Laser Precautions (See the label on the projector)
- AC Adapter Precautions
- Battery (Optional YA-B10) Precautions
- Soft Inner Case (Optional YB-3) Precautions
- Other Precautions
- Precautions when Handling the Projector after Use
- Getting Ready
- Operating the Projector
- Cleaning the Projector
- Troubleshooting
- Appendix
- Specifications

30
Connecting the Battery to the Projector
To power the projector using the battery, connect the (charged) battery to the projector as shown in
the illustration below.
Note
For information about the amount of projector operating time provided by the battery, see
“Specifications” (page 79).
You can find out the battery’s current charge level by checking the battery level indicator. For
details, see “Battery Level Indicator” (page 31).
Charging the Battery While it is Connected to the Projector
You can have the AC adapter connected with the battery as shown in the illustration below as you are
using the AC adapter to power the projector. Be sure to connect in the sequence indicated by the
numbers in the illustration:
,
,
,
.
* The shape of the plug depends on your geographical area.
Important!
Do not stack the AC adapter, battery, and projector on top of each other during use. Doing so
can cause the AC adapter, battery, and projector to overheat, resulting in malfunction.
Note
You can find out the battery’s current charge level by checking the battery level indicator. For
details, see “Battery Level Indicator” (page 31).
DC IN terminal
Battery
DC IN terminal
Battery
AC adapter
Power cord*
Plug into
power outlet.
DC IN terminal