
User Manual
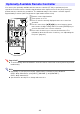

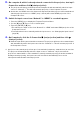
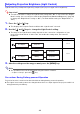
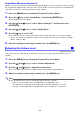
Table Of Contents
- Contents
- Safety Precautions
- Operating Precautions
- About the Light Source Unit
- Do not block light output or look directly into the lens!
- Laser Precautions (See the label on the projector)
- AC Adapter Precautions
- Battery (Optional YA-B10) Precautions
- Soft Inner Case (Optional YB-3) Precautions
- Other Precautions
- Precautions when Handling the Projector after Use
- Getting Ready
- Operating the Projector
- Cleaning the Projector
- Troubleshooting
- Appendix
- Specifications

47
You can use the procedure below to correct for vertical and horizontal keystoning caused by the
positioning of the projector in relation to the projection surface.
You can adjust keystoning vertically and horizontally within a range of ±30° each.
Your projector performs automatic vertical keystone correction.*
1
However, there are times when
the relationship between the projector and projection surface makes it impossible to achieve a
normal-looking image using automatic keystone correction alone. In step 2 of the procedure below,
you can adjust the Vertical Keystone Correction operation while checking the projection image.
1.
Press the [MENU] key to display the Frequent Functions Menu.
This displays the Frequent Functions Menu with “Vertical Keystone Correction” selected.
2.
Use the [] and [] keys to change the Vertical Keystone Correction setting.
3.
Press the [] key to select “Horizontal Keystone Correction”.
4.
Use the [] and [] keys to change the Horizontal Keystone Correction setting.
5.
After the settings are the way you want, press the [MENU] key.
Note
The operations below can be performed using the remote controller.
– In place of step 1, press the [KEYSTONE +] or [KEYSTONE –] key.
– In steps 2 and 4, use the [KEYSTONE +] and [KEYSTONE –] keys to change the settings.
Correcting Vertical and Horizontal Keystoning Manually
*1 When “On” is selected for “Option Settings 1 3 Auto Keystone Correction” (page 58).