
User Manual


Chapter 8: Geometry Application 33
0803
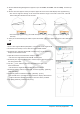
1. Tap [Draw], [Special Polygon], and then [Regular n-gon].
• This displays the n-gon dialog box.
2.
Enter a value indicating the number of sides of the polygon, and then tap [OK].
3. Place the stylus on the screen and drag diagonally in any direction.
• This causes a selection boundary to appear, indicating the size of the
polygon that will be drawn. The polygon is drawn when you release the
stylus.
0804
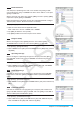
1. Specify “Degree” for the Geometry Format “Measure Angle” (see “1-7 Configuring Application Format
Settings” in the User’s Guide).
2. Draw triangle ABC and select sides AB and BC.
3. Tap the u button to the right of the toolbar.
• This will display the measurement box, which shows the current value of angle B.
4. Input 90 into the measurement box
and then press E.
• This locks the angle B at 90°.
5. Tap in a blank area on the screen to deselect everything and then select the AC side.
• This displays the measurement box, which shows the length of side AC.
6. Tap
.
• This causes the icon to change to
, indicating that the length of AC is locked.
7. Tap the following: [Draw] - [Construct] - [Midpoint].
• This creates midpoint D on side AC.
8. Tap the following: [Draw] - [Basic Object] - [Circle].
• This deselects side AC and enters the circle drawing mode.
9. Tap point D and then point B.
• With point D as the center point, draw a circle that circumscribes triangle
ABC.
10. Tap [View] and then [Select].
• This exits the circle drawing mode and enables selection.
11. Select side AB and side AC, and then tap the following: [Draw] - [Slider] -
[Angle].
• This displays a slider.
12. On the menu that appears when you tap the upper left corner of the slider
display box, tap [Settings].