
User Manual
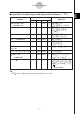

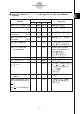


Table Of Contents
- Getting Ready
- Contents
- About This User’s Guide
- Chapter 1 Getting Acquainted
- Chapter 2 Using the Main Application
- 2-1 Main Application Overview
- 2-2 Basic Calculations
- 2-3 Using the Calculation History
- 2-4 Function Calculations
- 2-5 List Calculations
- 2-6 Matrix and Vector Calculations
- 2-7 Using the Action Menu
- 2-8 Using the Interactive Menu
- 2-9 Using the Main Application in Combination with Other Applications
- 2-10 Using Verify
- Chapter 3 Using the Graph & Table Application
- Chapter 4 Using the Conics Application
- Chapter 5 Using the 3D Graph Application
- Chapter 6 Using the Sequence Application
- Chapter 7 Using the Statistics Application
- 7-1 Statistics Application Overview
- 7-2 Using List Editor
- 7-3 Before Trying to Draw a Statistical Graph
- 7-4 Graphing Single-Variable Statistical Data
- 7-5 Graphing Paired-Variable Statistical Data
- 7-6 Using the Statistical Graph Window Toolbar
- 7-7 Performing Statistical Calculations
- 7-8 Test, Confidence Interval, and Distribution Calculations
- 7-9 Tests
- 7-10 Confidence Intervals
- 7-11 Distribution
- 7-12 Statistical System Variables
- Chapter 8 Using the Geometry Application
- Chapter 9 Using the Numeric Solver Application
- Chapter 10 Using the eActivity Application
- Chapter 11 Using the Presentation Application
- Chapter 12 Using the Program Application
- Chapter 13 Using the Spreadsheet Application
- Chapter 14 Using the Setup Menu
- Chapter 15 Configuring System Settings
- 15-1 System Setting Overview
- 15-2 Managing Memory Usage
- 15-3 Using the Reset Dialog Box
- 15-4 Initializing Your ClassPad
- 15-5 Adjusting Display Contrast
- 15-6 Configuring Power Properties
- 15-7 Specifying the Display Language
- 15-8 Specifying the Font Set
- 15-9 Specifying the Alphabetic Keyboard Arrangement
- 15-10 Optimizing “Flash ROM”
- 15-11 Specifying the Ending Screen Image
- 15-12 Adjusting Touch Panel Alignment
- 15-13 Viewing Version Information
- Chapter 16 Performing Data Communication
- Appendix
20050501
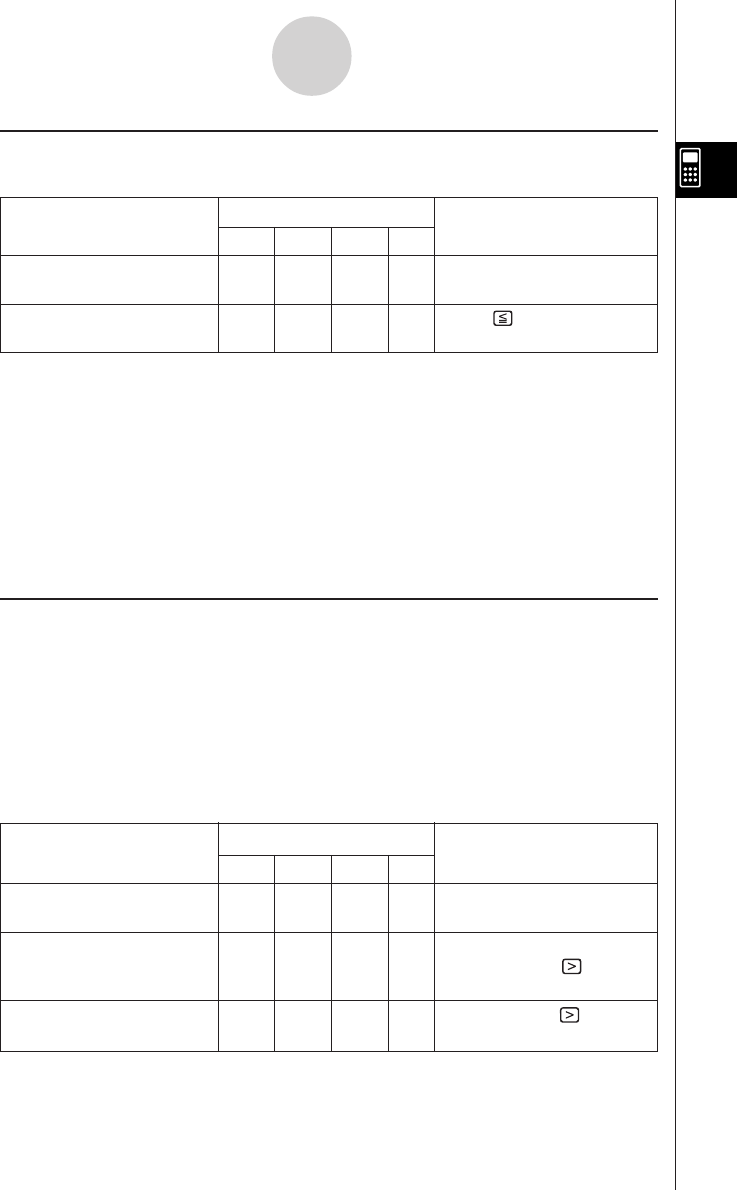
k Equal Symbols and Unequal Symbols (=, ≠, <, >, <, >)
You can use these symbols to perform a number of different basic calculations.
Problem
Use this keyboard:
Operation
mth abc cat 2D
To add 3 to both sides of MATH Cmd (X= 3 )+ 3 w
x = 3. x + 3 = 6
Subtract 2 from both sides OPTN MATH Cmd (Y
5 )- 2 w
of y < 5. y – 2 < 3
Tip
• In the “Syntax” explanations of each command under “2-7 Using the Action Menu”, the following
operators are indicated as “Eq/Ineq”: =, ≠, <, >, <, >. Whether or not the “Eq/Ineq” operators
include the “≠” operator is specified for each command by a separate note.
• An expression that contains multiple equation or inequality operators cannot be input as a single
expression. For output expressions, an expression can be output with multiple operators only in
the case of inequality operators that are facing in the same direction (example: –1< x <1).
Example: solve(x
2
– 1
< 0, x) w {–1 < x < 1}
k “with” Operator ( | )
The “with” (I) operator temporarily assigns a value to a variable. You can use the “with”
operator in the following cases.
•To assign the value specified on the right side of | to the variable on the left side of |
•To limit or restrict the range of a variable on the left side of | in accordance with conditions
provided on the right side of |
The following is the syntax for the “with” (I) operator.
Exp/Eq/Ineq/List/Mat|Eq/Ineq/List/(and operator)
You can put plural conditions in a list or connected with the “and” operator on the right side.
“≠” can be used on the left side or the right side of |.
Problem
Use this keyboard:
Operation
mth abc cat 2D
Evaluate x
2
+ x + 1 when OPTN SMBL Cmd X{ 2 +X+ 1 UX
x = 3. 13 = 3 w
For x
2
– 1 = 0, determine OPTN SMBL Cmd [solve] X{ 2 - 1 = 0
the value of x when x > 0. ,X)UX
0 w
{x = 1}
Determine the value of OPTN SMBL Cmd $X)UX
0 w
abs (x) when x >0. x
2-4-11
Function Calculations