
ClassPad 300 PLUS ClassPad OS Version 2.20 Brugervejledning

20050501
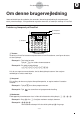
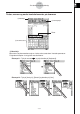
5 Værktøjslinje
Handlinger med knapper på værktøjslinjen angives med illustrationer, som ligner de knapper,
du skal trykke på.
Eksempel 1: Tr yk på $ for at afbilde funktionerne grafisk.
Eksempel 2: Tr yk på ( for at åbne vinduet List Editor.
6 Skærmtastatur
Tastehandlinger på det skærmtastatur, der åbnes, når du trykker på k-tasten, angives
med illustrationer, som ligner tastaturtasterne.
Du kan skifte fra den ene tastaturtype til den anden ved at trykke på en af fanerne øverst
på skærmtastaturet.
Eksempel 1: baa/gw
Eksempel 2: )
NN
NN
Ngce*fw
Vigtigt!
• Hvis en fremgangsmåde i denne brugervejledning kræver brug af et skærmtastatur, skal
du trykke på k-tasten for at åbne skærmtastaturet. k-tastehandlingen er ikke
medtaget som et af proceduretrinnene. Du kan få yderligere oplysninger om indtastning
af data på ClassPad under "1-6 Indtastning".
Sideindhold
De tredelte sidetal er centreret øverst på hver side. F.eks.
angiver sidetallet "1-4-2" kapitel 1, afsnit 4, side 2.
0-1-3
Om denne brugervejledning
20021201
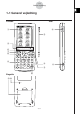
Starting a Built-in Application
Perform the steps below to start a built-in application.
u ClassPad Operation
(1) On the icon panel, tap
m
to display the application menu.
(2) If you cannot see the icon of the application you want on the menu, tap the scroll
buttons or drag the scroll bar to bring other icons into view.
(3) Tap an icon to start its application.
Tip
•You can also start the Main application by tapping M on the icon panel. See “1-3 Using the Icon
Panel” for details.
Application Menu Operations
The following describes the various types of operations you can perform while the
application menu is on the display.
•Starting an application
See “Starting a Built-in Application” above.
•Displaying applications according to group (Additional Applications, All Applications)
See “Using Application Groups” on page 1-4-3.
•Mov ing or swapping icons
See “Moving an Icon” on page 1-4-3, and “Swapping Two Icons” on page 1-4-4.
• Deleting an application
See “Deleting an Application” on page
α
-2-1.
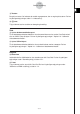
Application Menu
Scroll down button
Scrollbar
Scroll up button
20040801
1-4-2
Built-in Applications
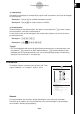
Bemærk
De viste eksempler, der anvendes i brugervejledningen, er kun ment som illustration.
Den tekst og de værdier, der vises på skærmen, kan være forskellige fra de eksempler,
der anvendes i denne brugervejledning.
2003020120040801