USER’S GUIDE GUÍA DEL USUARIO Please keep all information for future reference. Guarde toda información para tener como referencia futura. Safety Precautions Before trying to use the piano, be sure to read the separate “Safety Precautions”. Precauciones de seguridad Antes de intentar usar el piano, asegúrese de leer las “Precauciones de seguridad” separadas.
TO REDUCE THE RISK OF FIRE OR ELECTRIC SHOCK, REFER SERVICING TO QUALIFIED SERVICE PERSONNEL. IMPORTANT SAFETY INSTRUCTIONS 1. 2. 3. 4. 5. 6. 7. 8. 9. Read these instructions. Keep these instructions. Heed all warnings. Follow all instructions. Do not use this apparatus near water. Clean only with dry cloth. Do not block any ventilation openings. Install in accordance with the manufacturer’s instructions.
Getting Ready ........................................................................................................E-32 Assembling the Stand ............................................ E-32 To connect the cables ............................................ E-34 To install the music stand and headphones hook.... E-35 Power Outlet........................................................... E-36 General Guide ................................... E-2 FUNCTION Button...........................................
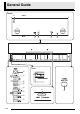
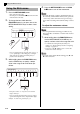
General Guide Bottom 1 Front Rear 2 3 4 5 Front 6 7 bo 8 9 bk bl bm bn E-2 bp bq
General Guide English *CAUTION • Make sure that the cover is fully open whenever you are playing on the keyboard. A partially open cover can suddenly close unexpectedly and pinch your fingers. NOTE • The names shown here are always indicated in bold when they appear within the text of this manual.
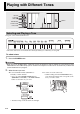
Playing with Different Tones VOLUME FUNCTION SONG a POWER METRONOME GRAND PIANO ELEC PIANO Selecting and Playing a Tone The piano comes with 16 built-in tones. • The names of the tones are marked above the keyboard keys to which they are assigned. To select a tone 1. Press the POWER button. IMPORTANT! • When you turn on the digital piano, it performs a power up operation in order to initialize its system.
Playing with Different Tones Use the VOLUME controller to adjust the volume. NOTE • GRAND PIANO tones (MODERN, CLASSIC) Your digital piano has a total of 16 built-in tones. The MODERN and CLASSIC tones are stereo sampled tones that can be selected using the GRAND PIANO buttons. Try using the GRAND PIANO tones to familiarize yourself with their distinctive sounds and characteristics. Tone Name Characteristics MODERN This tone provides a bright grand piano sound.
Playing with Different Tones Layering Two Tones Use the following procedure to layer two tones, so they sound at the same time. When specifying two tones for layering, first tone you select will be the main tone, while the second tone will be the layered tone. 1. To adjust the volume balance between two layered tones 1. While holding down the FUNCTION button, use the keyboard keys shown below to adjust the volume of the layered tones.
Playing with Different Tones ■ About DSP Reverb : Makes your notes resonate. Chorus : Adds more breadth to your notes. To turn reverb on and off 1. While holding down the FUNCTION button, press the MODERN button to toggle reverb on (lamp lit) and off (lamp unlit). DSP makes it possible to digitally produce complex acoustic effects. The DSP is assigned to each tone whenever you turn on digital piano power.
Playing with Different Tones Using the Metronome 1. Press the METRONOME button. • This starts the metronome. • The lamp above the SONG a button flash in time with the metronome beat. 2. To change the beat, hold down the FUNCTION button as you press one of the METRONOME BEAT keys to select a beat setting. 4. Press the METRONOME button or SONG a button to turn off the metronome.
Playing with Different Tones You can use the Duet Mode to split the piano’s keyboard in the center so two people can play a duet. Keyboard Split point Left keyboard C3 C4 C5 (middle C) Right keyboard C6 C3 C4 C5 C6 You can change the ranges of the left and right keyboards in octave units from their initial default settings. This comes in handy, for example, if the initial default range is not enough when one person is playing the left hand part and another person is playing the right hand part.
Playing Back Built-in Songs FUNCTION SONG a RECORDER METRONOME Your digital piano comes with a Music Library of 60 built-in tunes. You can play all 60 tunes in sequence, from beginning to end. Playing Back All of the Built-in Songs 1. While holding down the FUNCTION button, press the SONG a button. • This will start repeat demo playback of the built-in songs in sequence, from 01 through 60. • You can play along with a song on the keyboard as it is playing.
Playing Back Built-in Songs 4. To stop playback, press the SONG a button again. English • Playback will stop automatically when the end of the song is reached. NOTE • Pressing the + and – keys at the same time will select song number 01. • You also can adjust the playback tempo and volume of the song. See “Configuring Settings with the Keyboard” on page E-16 for more information.
Recording and Play Back FUNCTION SONG a RECORDER METRONOME You can store the notes you play in digital piano memory for later playback. Tracks A track is a container of recorded data, and a song consists of two tracks: Track 1 and Track 2. You can record each track separately and then combine them so they play back together as a single song. Track 1 Record While playing back. . . Song Recording Data Storage • Starting a new recording deletes any data that was previously recorded in memory.
Recording and Play Back 4. • Recording will start automatically. 5. After recording to either of the tracks of a song, you can record to the other track while listening to playback what you recorded in the first track. 1. Start playing something on the keyboard. To stop recording, press the SONG a button. • This will cause the RECORDER button lamp and the lamp of the track you recorded to change from flashing to lit. • To play back the track you just recorded, press the SONG a button.
Recording and Play Back To record to one track of a song while listening to the playback of the other track 1. Playing Back from Digital Piano Memory 1. Press the RECORDER button so its lamp is lit. Press the RECORDER button so its lamp is lit. NOTE 2. 3. While holding down the FUNCTION button, press the RECORDER (L) button or METRONOME (R) button to select the track you want to play back while recording. Press the RECORDER button so its lamp is flashing. • This will cause the L lamp to flash. 4.
Recording and Play Back Deleting Recorded Data English The following procedure deletes a specific track of a song. IMPORTANT! • The procedure below deletes all of the data of the selected track. Note that the delete operation cannot be undone. Check to make sure you really do not need the data in digital piano memory before you perform the following steps. 1. Press the RECORDER button twice so its lamp is flashing. 2.
Configuring Settings with the Keyboard FUNCTION In addition to selecting tones and Music Library tunes, you also can use the FUNCTION button in combination with the keyboard keys to configure effect, keyboard touch, and other settings. To configure settings with the keyboard 1. 2. 3. Use the “Parameter List” on pages E-18 E-20 to find the setting you want to configure, and note its details.
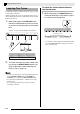
Configuring Settings with the Keyboard Keyboard Keys Used for Configuring Settings English • The numbers 1 through cm correspond to the same numbers in the “Parameter List” on pages E-18 - E-20.
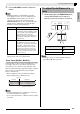
Configuring Settings with the Keyboard Parameter List ■ Tones Parameter Settings Operation Type (page E-16) Description 1 Reverb 1 to 4 Default: 2 A Specifies the reverb of notes. (page E-7) 2 Chorus 1 to 4 Default: 2 A Controls the breadth of notes. (page E-7) 9 Tone selection See page E-4. Default: GRAND PIANO (MODERN) A Assigns a tone to the keyboard. (page E-4) bl Brilliance –3 to 0 to 3 Default: 0 B Specifies the brilliance of notes.
Configuring Settings with the Keyboard ■ Keyboard 3 Keyboard key Operation Type (page E-16) Settings Description Remarks –12 to 0 to 12 Default: 0 B Raises or lowers the tuning of the digital piano in semitone steps. • The transpose setting cannot be configured while Music Library playback is in progress or while in the Duet Mode. • Raising the key of the digital piano can cause notes the highest part of the range to become distorted.
Configuring Settings with the Keyboard ■ MIDI and Other Settings Parameter Settings bq USB device MIDI, Storage Default: MIDI mode (USB DEVICE MODE) Operation Type (page E-16) Description Remarks – • While storage is selected for this setting, the The digital piano enters MIDI GRAND PIANO (MODERN, CLASSIC) mode automatically when it is and ELEC PIANO button lamps flash, and connected to a computer by a USB all other lamps are unlit. cable.
English Using a Memory Card FUNCTION SONG a METRONOME MODERN CLASSIC ELEC PIANO You can use the procedures in this section to save songs you recorded on the Digital Piano (recorder songs) to a memory card, and to use a memory card to load songs to user song memory (Music Library 61). z Use a memory card with a capacity of 2GB or less. Use of a card with a capacity that is greater than 2GB or other types of memory cards is not supported.
Using a Memory Card Loading and Removing a Memory Card 2. While holding down the FUNCTION button, press the CARD MENU keyboard key. The CARD lamp will flash. IMPORTANT! • A memory card must be positioned correctly when being loaded into the Digital Piano. Trying to force an improperly oriented memory card into the slot can damage the memory card and the slot. 1.
Using a Memory Card Use the procedure below to save data you recorded on the Digital Piano to a memory card as a MIDI file (SMF Format 0). 1. Insert a memory card into the Digital Piano’s memory card slot. 2. While holding down the FUNCTION button, press the CARD MENU keyboard key. The CARD lamp will flash. ■ Memory Card Data Storage The above procedure stores Digital Piano data in a folder named MUSICDAT on the memory card.
Using a Memory Card 5. While holding down the FUNCTION button, press the CARD MENU keyboard key. Deleting Memory Card Data You can use the procedure below to delete song data stored in the memory card’s “MUSICDAT” folder. The CARD lamp will flash. 1. Insert the memory card into the piano’s memory card slot. 2. Press the FUNCTION button. The CARD lamp will light. • Note that the CARD lamp will not remain lit if you hold down the FUNCTION button too long. 3.
Simple Play Back of a Song on a Memory Card You can use the procedure below to play back a user song (page E-29) stored on a memory card without loading the song into Digital Piano memory (Music Library song number 61). 1. On your computer, copy the song data into the “MUSICDAT” folder. • The Digital Piano recognizes only the first 99 files in the “MUSICDAT” folder (sorted by file name) for playback.
Using a Memory Card Error Indicators The following shows how the lamps indicate the error type when an error occurs due to data transfer failure or some other reason. Lamps Error Type No Card No File No Data Protect You are attempting The memory card is 1. The memory card 1. There is no write-protected. to save data to a MUSICDAT is not loaded folder (page E-23) memory card when correctly in the there is no data to on the memory Digital Piano’s save. card. memory card slot. Cause 2.
English Using a Memory Card Lamps Error Type Not SMF01 SizeOver You are attempting The data on the memory card it too to play back SMF Format 2 song data. big to play. Cause WrongDat Convert Format Media R/W 1. Memory card data 1. The memory card There is not enough 1. The current is corrupted. memory card data is corrupted. Digital Piano format is not memory available to 2. Digital Piano compatible with 2. The memory card convert a recorder memory is this Digital Piano.
Connecting to a Computer You can connect the Digital Piano to a computer and exchange MIDI data between them. You can send play data from the Digital Piano to music software running on your computer, or you can send MIDI data from your computer to the Digital Piano for playback. 2. After starting up your computer, use a commercially available USB cable to connect it to the Digital Piano.
Connecting to a Computer Using MIDI 3. Change the digital piano’s USB device mode to storage. English What is MIDI? The letters MIDI stand for Musical Instrument Digital Interface, which is the name of a worldwide standard for digital signals and connectors that makes it possible to exchange musical data between musical instruments and computers (machines) produced by different manufacturers. NOTE • For detailed information about MIDI Implementation, visit the CASIO website at: http://world.casio.
Connecting to a Computer 5. Double-click “PIANO”. • “PIANO” contains folders named MUSICLIB and RECORDER. Use MUSICLIB to load a song into the piano’s user song memory (Music Library 61), and RECORDER to transfer Recorder memory data to and from your computer. ■ To load a song into user song memory (Music Library 61) 1. Copy the file (.MID or .CM2) you want to load into user song memory to the MUSICLIB folder. 2. Change the name of the file to BIDSNG01, with a file name extension of .MID or .CM2.
Connecting to a Computer You can use the procedure below at any time to copy user song data to the PIANO drive (without putting it in the MUSICLIB folder) for simplified playback on the Digital Piano. • When you copy a user song data file to the MUSICLIB folder, you need to rename it according to specified format (step 5, above). You do not need to rename the file if you use the procedure below.
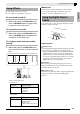
Getting Ready 1. Assembling the Stand Before assembling the stand, first take a few moments to check that all of the items shown below are present. • This stand does not include any of the tools required for assembly. It is up to you to prepare a large Philips head (+) screwdriver for assembly. Unfasten the band 1 that bundles the pedal cable to the back of crosspiece D and pull the pedal cord out from the crosspiece. 1 A Pedal cable C B 2.
Getting Ready Use the two screws I to secure the top left and right edges of the back panel C to the brackets 5 of side panels A and B. • At location 6, slip the clip G onto to the screw I before installing the screw. 6 B 5 7. Place the piano onto the stand. IMPORTANT! • In order to ensure you do not get your fingers pinched between the piano and the stand, grasp the piano on its sides (not its ends) at the locations marked with stars () in the illustration.
Getting Ready 8. First, use the two butterfly bolts H to secure the back of the piano to the stand. Next, use the two screws K to secure the front of the piano. To connect the cables 1. Insert the plug of the AC adaptor that comes with the Digital Piano into its power terminal (DC24V). AC adaptor plug N clip H Supplied AC adaptor K * Using the Clip N IMPORTANT! • The butterfly bolts H and screws K keep the piano from slipping off the stand.
Getting Ready 4. Bundle the AC adaptor and pedal cables together and use clips G to secure them at the two points shown in the illustration below. Plug the power cord of the AC adaptor that comes with the Digital Piano into a household power outlet as shown in the illustration below. Household power outlet AC adaptor To install the music stand and headphones hook 1. Install the music stand by inserting its pegs into the holes in the top of the piano. 2. Install the headphones hook. 2-1.
Getting Ready Power Outlet Your digital piano runs on standard household power. Be sure to turn off power whenever you are not using the digital piano. Connecting Headphones Bottom PHONES jacks Using an AC Adaptor Use only the AC adaptor (JEITA Standard, with unified polarity plug) that comes with this digital piano. Use of a different type of AC adaptor can cause malfunction of the digital piano.
Getting Ready You can connect audio equipment or a music amplifier to the Digital Piano and then play through external speakers for more powerful volume and better sound quality. IMPORTANT! • The Digital Piano automatically adjusts sound output to optimize for headphone output (when headphones are connected) or built-in speaker output (when headphones are not connected). This also will cause a change in the output quality from the Digital Piano’s LINE OUT R and L/MONO jacks.
Reference Troubleshooting Problem No sound is produced when I press a keyboard key. The pitch of the digital piano is off. Cause 1. The VOLUME controller is set to “MIN”. 2. Headphones or an adaptor plug is plugged into one of the PHONES jacks. 3. MIDI Local control is turned off. 1. The digital piano’s key setting is something other than “0”. 2. Digital piano tuning is incorrect. 3. Octave shift is enabled. 4. A non-standard temperament setting is being used. Nothing happens when I press a pedal.
Reference Product Specifications AP-420BK/AP-420BN Keyboard 88-key piano keyboard, with Touch Response Maximum Polyphony 128 notes Tones 16 • Layer (excluding bass tones) • Split (Low-range bass tones only) Effects Brilliance (–3 to 0 to 3), Reverb (4 types), Chorus (4 types), DSP, Acoustic Resonance Metronome • Beats: 0, 2, 3, 4, 5, 6 • Tempo Range: 20 to 255 Duet Adjustable tone range (–1 to 2 octaves) Music Library • Number of Songs: 60, User Songs: 1 (memory capacity; up to 65KB)* * Based
Reference Operating Precautions Be sure to read and observe the following operating precautions. ■ Location Avoid the following locations for this product. • Areas exposed to direct sunlight and high humidity • Areas subjected to temperature extremes • Near a radio, TV, video deck, or tuner The above devices will not cause malfunction of the product, but the product can cause interference in the audio or video of a nearby device.
Reference Model: AD-E24250LW 1. Read these instructions. 2. Keep these instructions on hand. 3. Heed all warnings. 4. Follow all instructions. 5. Do not use this product near water. 6. Clean only with a dry cloth. 7. Do not install near radiators, heat registers, stoves, or any other source of heat (including amplifiers). 8. Use only attachments and accessories specified by the manufacturer. 9. Refer all servicing to qualified service personnel.
Appendix/Apéndice Tone List/Lista de tonos Tone Name/ Nombre de tonos Song List/Lista de canciones Bank Select MSB/ Program Change/ MSB de selección de Cambio de programa banco GRAND PIANO MODERN 0 2 GRAND PIANO CLASSIC 0 1 GRAND PIANO VARIATION 0 0 ELEC PIANO 4 0 FM E.PIANO 5 0 60’S E.
MIDI Implementation Chart Model AP-420 Function Transmitted Recognized Basic Channel Default Changed 1 - 16 1 - 16 1 - 16 1 - 16 Mode Default Messages Altered Mode 3 X Mode 3 X 0 - 127 0 - 127 0 - 127*1 O 9nH v = 1 - 127 X 8nH v = 64 O 9nH v = 1 - 127 X 9nH v = 0, 8nH v =** X X X O X O O X X X O X X X X X X O X O O X X X X X X X X X O X X O O O O O O O O O O O O O O O O O O O O O O O O O O O O O Note Number True voice Velocity Note ON Note OFF After Touch Key’s Ch’s Pitch Bender
This recycle mark indicates that the packaging conforms to the environmental protection legislation in Germany. Esta marca de reciclaje indica que el empaquetado se ajusta a la legislación de protección ambiental en Alemania.